Table of Contents
- Getting started with Visual Studio Code
- 1. Install git
- 2. Create a repository
- 3. Clone your repository
- 4. Install the .NET SDK
- 5. Install MAUI workloads
- 6. Set environment variables
- 7. Install VSCode
- 8. Install Android dependencies
- 9. Update Android SDK
- 10. Build project
- 11. Install Android emulator
- 12. Install AVD image
- 13. Configure AVD manager
- 14. Create AVD
- 15. Run the default app
Getting started with Visual Studio Code
The purpose of this exercise is to install and configure the software tools required for the rest of the module.
Follow the instructions below carefully.
Where you are asked to execute a command, you should do this in a command window. On a Mac, that means in a terminal, and on Windows it means using a command prompt. Please avoid using the Windows PowerShell unless you are confident with it.
Where the format of a command is operating system specific, it will be labelled with either or
You can click the relevant icon for more information. For links relevant to either operating system, you can click for more information.
When you see USERNAME in a variable value, replace it with your username on your computer.
1. Install git
git is already installed on Macs
2. Create a repository
There is a template repository that you can use to create your own copies. The repo is essentially empty apart from some administrative files and a basic .NET MAUI project. The default project is called Haulage because of the topic of the coursework, but you can use the repo for other practical exercises as well.
To make your own copy, click the green button labelled Use this template rather than the usual Code button.
3. Clone your repository
Find and copy the github link for your repo (not the template!) as shown.
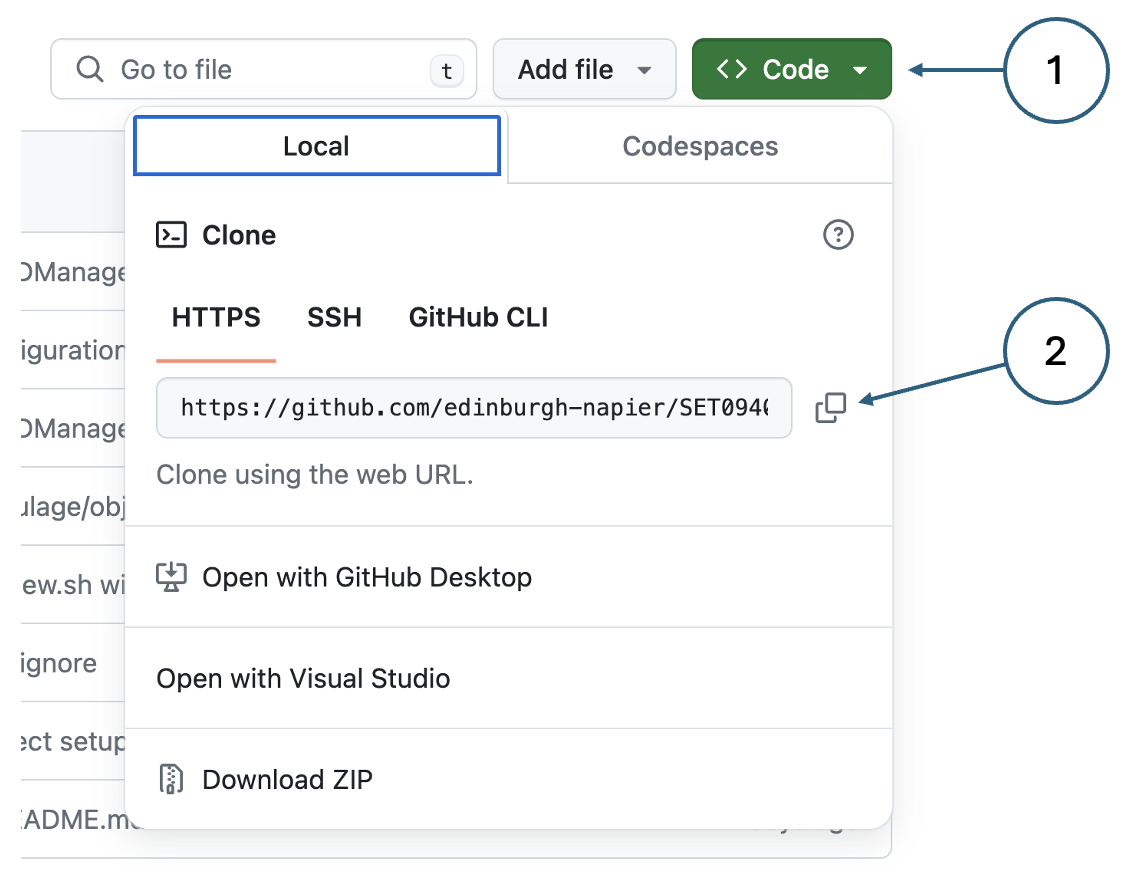
Create a folder on your laptop where project workspaces will be created.
Change into that folder and use the command below to clone your repository, replacing URL with the one you copied in the previous step.
git clone URL4. Install the .NET SDK
Follow the instructions for your operating system on the Microsoft website
Check that .NET is installed correctly by executing the command:
dotnet --version You should see that your .NET version is 8.0.300
5. Install MAUI workloads
A workload is a set of software files that provide support functionality for a .NET feature. For example, the MAUI workloads add options to the VSCode command palette for creating a new MAUI project, configuring the development environment and choosing a target device for mobile development.
Install the MAUI workloads by executing the command:
dotnet workload install mauiThe command is the same for both Mac and Windows
6. Set environment variables
Environment variables are values that are set centrally at the operating system level and are used by software applications and command windows. They hold values such as the path to executable or configuration files.
You can see the environment variables you currently have set with the command:
set env The following variables are required for building and testing Android versions of your app.
| Variable | Description | Windows value | Mac value |
|---|---|---|---|
| JAVA_HOME | Stores the root directory of a Java SDK | C:\Users\**USERNAME**\MAUI\java | /Users/**USERNAME**/MAUI/java |
| ANDROID_HOME | Stores the root of an Android SDK | C:\Users\**USERNAME**\MAUI\android | /Users/**USERNAME**/MAUI/android |
| ANDROID_SDK_HOME | Stores the directory that contains user-specific settings such as ADVs | C:\Users\**USERNAME**\.android | /Users/**USERNAME**/.android |
The best approach is to create a folder in your home directory and let .NET install the appropriate versions there specifically for use with .NET. Instructions for this are given later. For now, it is enough to create the relevant directories and set the environment variables.
Warning
Please check whether you already have these environment variables defined. If so, changing them may affect other applications that you use.
Create the new directory
mkdir C:\Users\USERNAME\MAUI mkdir ~/MAUI Create the variables on Windows
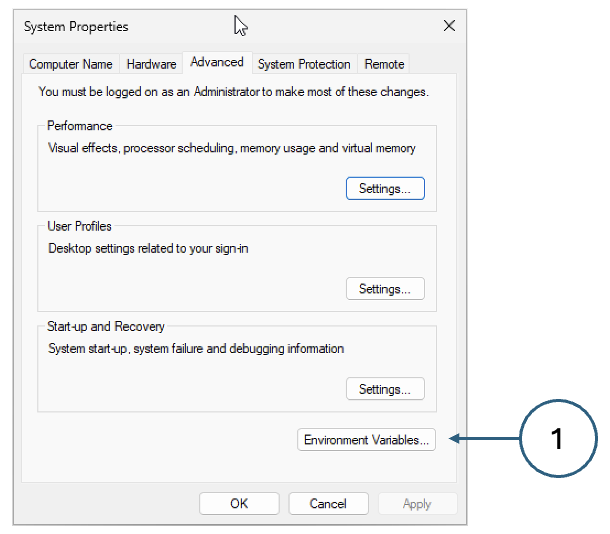
In the Start menu panel, start typing Environment variables and choose the option to edit them when it appears. You will be taken to the system control panel as shown below where you should click the Environment Variables button.
In the next dialog, there are two panels. Click New… in the top panel for a new user variable and fill in the details.
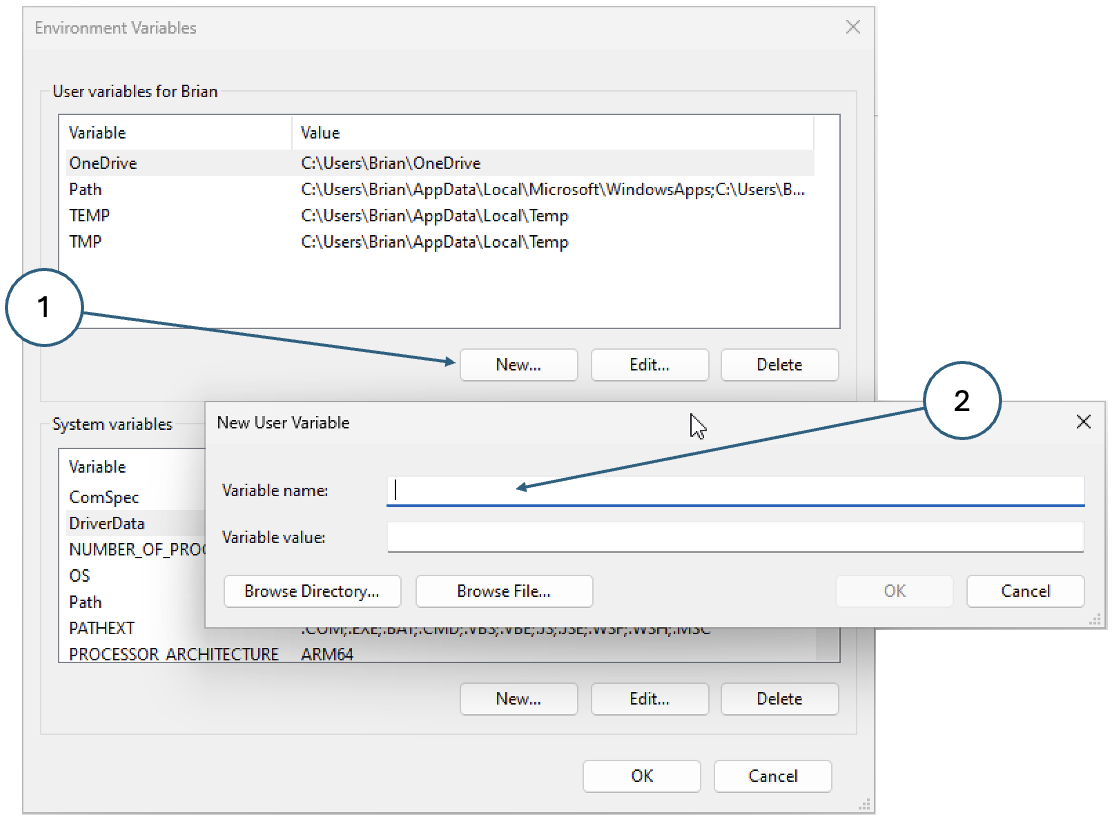
To make the Android SDK command-line tools available from any directory, you also need to update the PATH environment variable. Specifically, you need to add the directory %ANDROID_HOME%\cmdline-tools\11.0\bin to the PATH - follow the steps indicated in the image below.
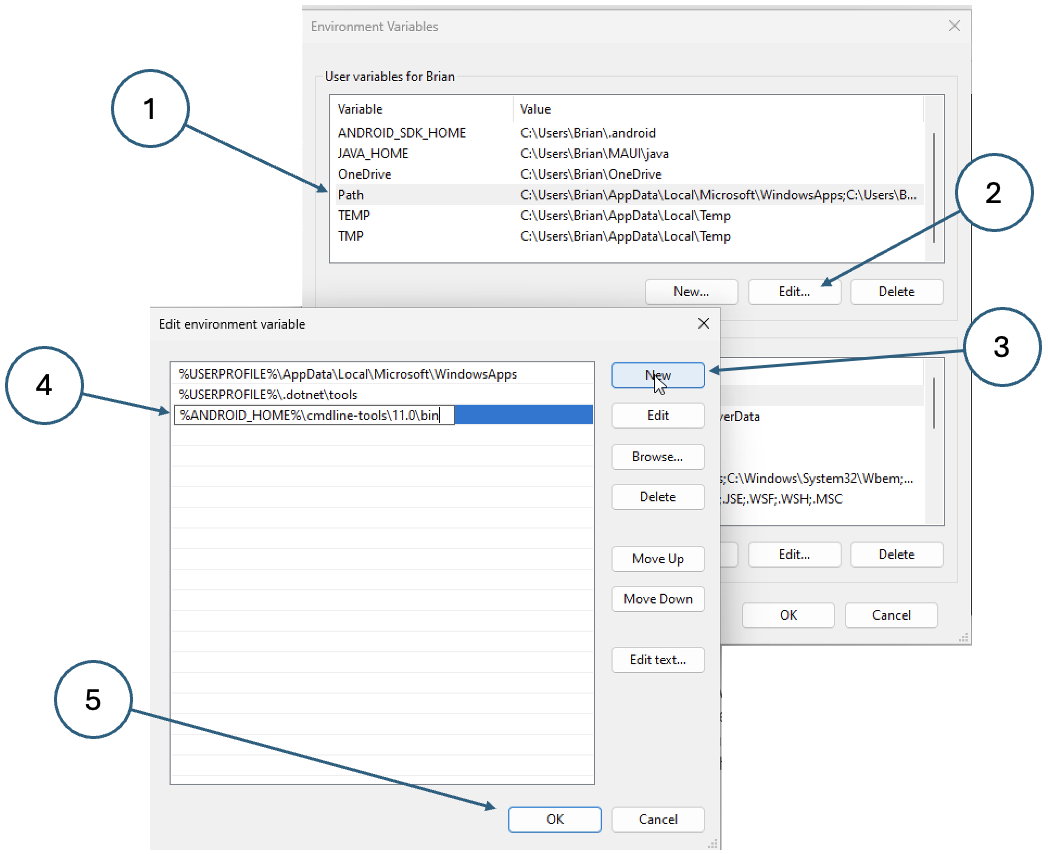
The changes will not be visible in any CMD or PowerShell windows that are currently open. You will need to close and re-open them to pick up the new variables.
Create the variables on Mac
The simplest way to define environment variables is in the .zshrc file in your home directory. This file is run automatically whenever a new terminal is opened and when an application starts. Edit the file and add the following lines at the end.
1
2
3
4
5
    # Environment variables for .NET MAUI development <br>
    export JAVA_HOME=${HOME}/MAUI/java <br>
    export ANDROID_HOME=${HOME}/MAUI/android <br>
    export ANDROID_SDK_HOME=${HOME}/MAUI <br>
    export PATH=${PATH}:${ANDROID_HOME}/cmdline-tools/11.0/bin <br>
The new settings will not affect any currently running terminal windows. You will need to restart them or alternatively type the same commands at the prompt.
7. Install VSCode
Follow the installation instructions for your operating system on the VSCode website
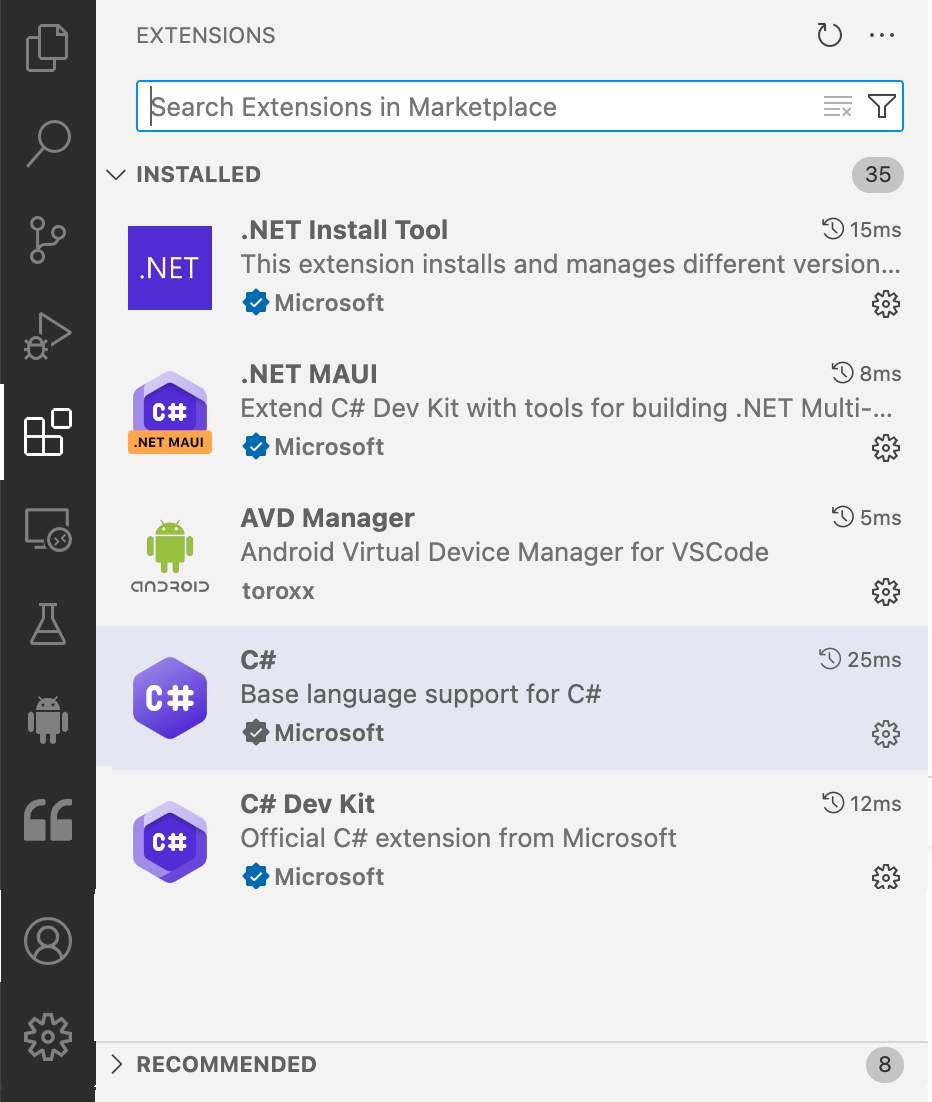
Once the installation is finished, open the application and install the following extensions:
- .NET MAUI (dotnettools.dotnet-maui)
- AVD Manager (toroxx.vscode-avdmanager)
The first one requires some other extensions as dependencies and these will be added automatically.
Note that you will need to sign in with your University username and password to use the .NET extension. Some error messages may appear but they can be ignored once you have signed in.
When you are done, you should have at least the extensions shown below.
8. Install Android dependencies
.NET 8 has a build target that installs the Android dependencies using the environment variables that you defined earlier. However, the command must be run from the root directory of a .NET project. Change into the root directory of your cloned repo (created in step 3 above) - that is the one containing the .sln file.
Run the following command to configure your machine:
dotnet build -t:InstallAndroidDependencies -f:net8.0-android -p:AndroidSdkDirectory="%ANDROID_HOME%" -p:JavaSdkDirectory="%JAVA_HOME%" -p:AcceptAndroidSDKLicenses=True dotnet build -t:InstallAndroidDependencies -f:net8.0-android -p:AndroidSdkDirectory="${ANDROID_HOME}" -p:JavaSdkDirectory="${JAVA_HOME}" -p:AcceptAndroidSDKLicenses=True 9. Update Android SDK
The Android SDK installed in the previous step may not be completely up to date. Update the contents with
sdkmanager --update 10. Build project
The purpose of this step is to check that everything is working so far. If all of the steps up to this point have been successful, it should be possible to build the app.
First, restart VSCode to pick up any environment changes since it was last opened.
Next, open the project root folder using the *File -> Open Folder… *option on the menu.
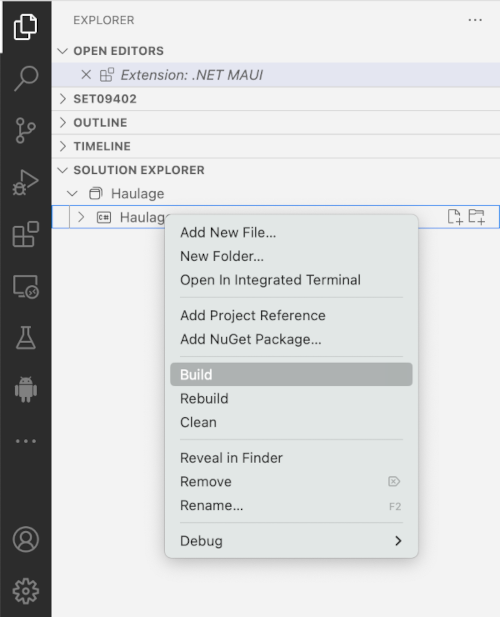
To build the project, right-click the project name in the *Solution Explorer *section of the files panel as shown.
Warning
If you see the error message error XA5300: The Android SDK directory could not be found with a recommendation to set the AndroidSdkDirectory MSBuild property, add the following line to the Haulage.cproj file replacing ANDROID_HOME with the value of the environment variable you set earlier.
If there are any other error messages in the output, they will need to be investigated and resolved before moving on.
11. Install Android emulator
To build and test your apps for the Android platform, you need either an Android phone or a software emulator. For consistency, we are planning to use an emulator by default, but if you want to use your Adroid device that is fine. You will just need to follow the appropriate instructions.
The emulator can be installed using one of the following commands:
sdkmanager --install emulator Warning
If the command above fails with the message Failed to find package ‘emulator’, you can install an emulator manually. Download the latest version, unzip it and copy the emulator directory into the ANDROID_HOME directory.
Copy the file package.xml from the setup directory in your cloned repo into the emulator directory. Edit the last line of the file so that the revision number corresponds to the version of the emulator that you downloaded
12. Install AVD image
The emulator is an application for playing virtual machines that represent different types of phone with different software configurations. On its own, it does nothing, so we need to create a virtual device for it to host. The first step is to choose which image to use. You can get a list of all available system images by using the command
sdkmanager --list By default, we will be using Android 34; however, Apple Silicon Macs require a different image because of their architecture.
For Windows machines and Intel Macs, use the command
sdkmanager --install "system-images;android-34;google_apis;x86_64" For Apple Silicon Macs, use
sdkmanager --install "system-images;android-34;google_apis;arm64-v8a" 13. Configure AVD manager
The AVD Manager extension in VSCode allows you to create Android Virtual Devices (AVDs) based on the images that you have installed.
Activate the AVD Manager panel by clicking the Android icon in the left-hand menu.
You may see some prompts appear in the bottom right-hand corner of the window asking you to configure the required paths. If so, click the button to update the value and navigate to the appropriate executable if needed.
Warning
If the prompts do not appear, you may need to update the values manually. Call up the VSCode command palette by pressing Shift+Ctrl+P on Windows or Shift+Cmd+P on Mac. Then type AVD into the search box. There are four settings that need to be updated as shown below. When prompted, make each setting global.
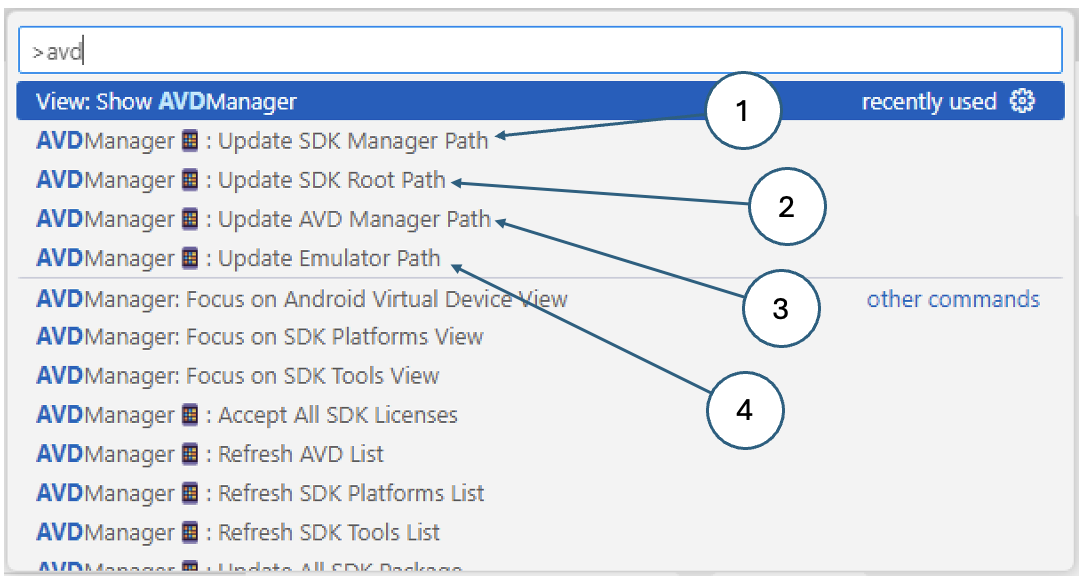
The values you need are shown below
| Variable | Description | Windows value | Mac value |
|---|---|---|---|
| SDK Manager path | Path to the sdkmanager executable | C:\Users\USERNAME\MAUI\android\cmdline-tools\11.0\bin\sdkmanager | /Users/USERNAME/MAUI/android/cmdline-tools/11.0/bin/sdkmanager |
| SDK root path | Same as the ANDROID_HOME environment variable | C:\Users\USERNAME\MAUI\android | /Users/USERNAME/MAUI/android |
| AVD Manager path | Path to the avdmanager executable | C:\Users\USERNAME\MAUI\android\cmdline-tools\11.0\bin\avdmanager | /Users/USERNAME/MAUI\android\cmdline-tools\11.0\bin\avdmanager |
| Emulator path | Path to the emulator executable | C:\Users\USERNAME\MAUI\android\emulator\emulator.exe | /Users/USERNAME/MAUI/android/emulator/emulator |
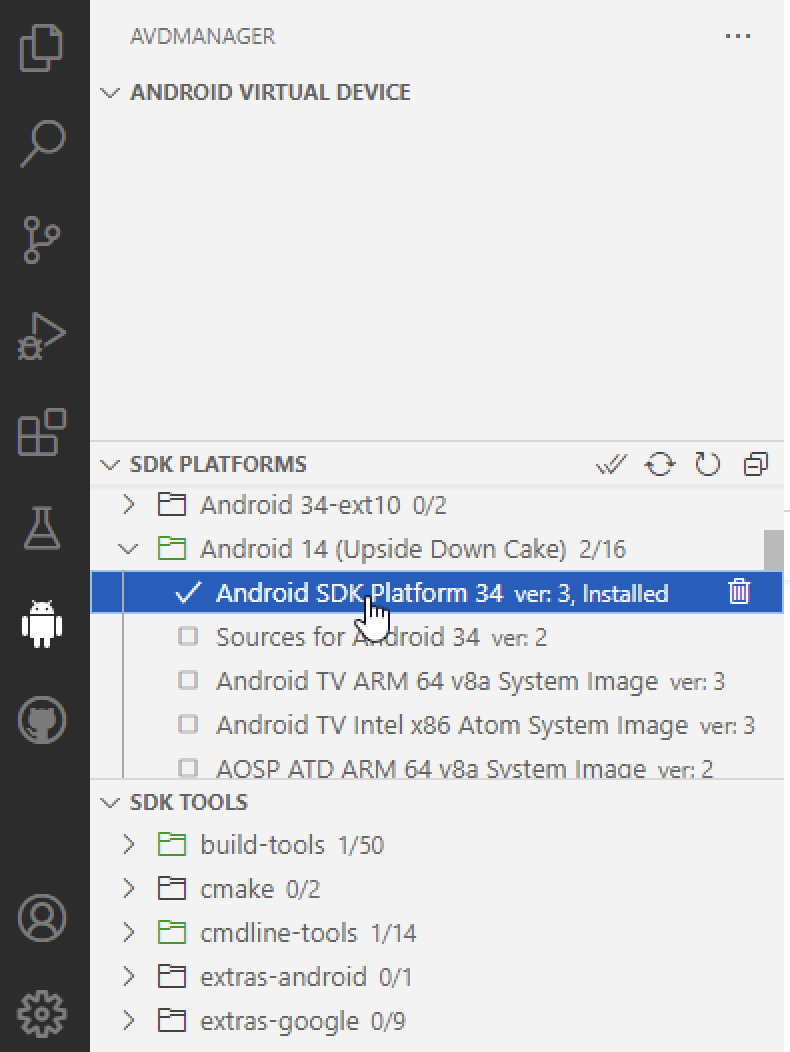
Once the AVD Manager is correctly configured, information about the installed and available SDK components will be displayed as shown below. The image shows the Android SDK Platform 34 installed, but no AVDs yet.
14. Create AVD
Creating an API is simply a question of pairing an Android platform with a device file. We will be using the Google Pixel Pro 7 which can be installed using one of the commands below.
For Windows and Intel Macs use
avdmanager create avd -d 30 --name Pixel_7_Pro -k "system-images;android-34;google_apis;x86_64" For Apple silicon Macs use
avdmanager create avd -d 30 --name Pixel_7_Pro -k "system-images;android-34;google_apis;arm64-v8a" Clicking the refresh icon in the Android Virtual Device panel will reveal the newly-created AVD. Start it by clicking the Run icon next to its name. If everything is set up correctly, you should see a virtual Android device appear on your screen.
15. Run the default app
While the Android emulator is running, it can be used as a debug target so that the application is loaded and run on the emulator.
To select the debug target for a project, click the curly brackets in the lower tray of the VSCode window as shown below. Click Debug Target and some options will appear at the top of the window. Choose the emulator from the ist.
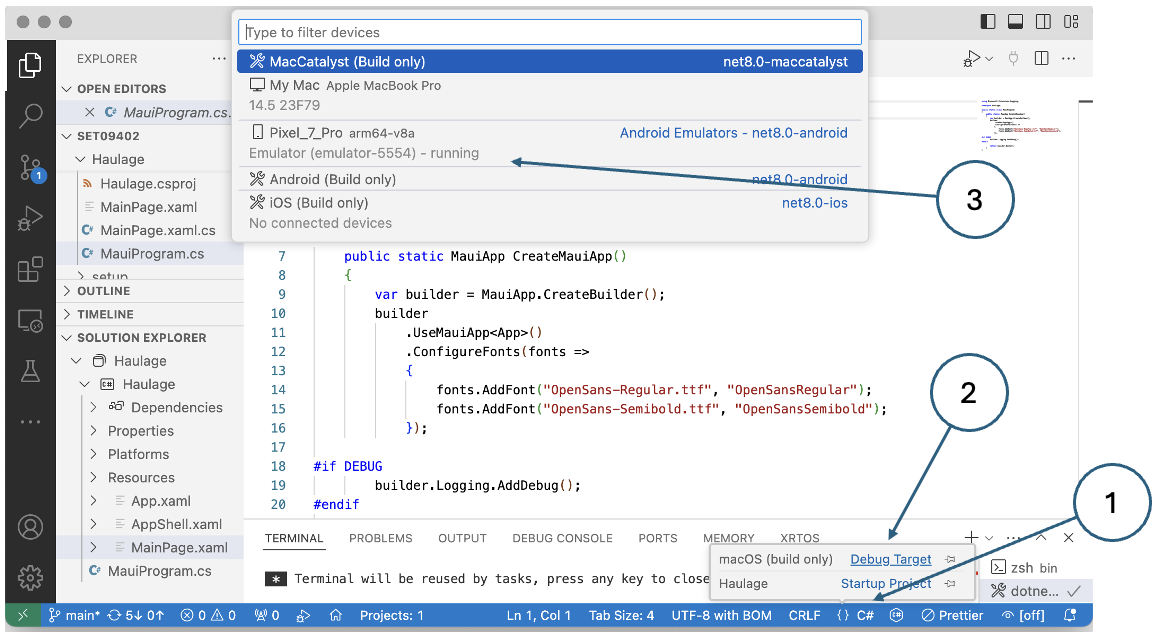
With the target selected, click the Run icon in the control panel on the left. Then, follow through the prompts to select the debugger and the run configuration.

After a few moments, a .NET icon should appear on the screen of the virtual phone.
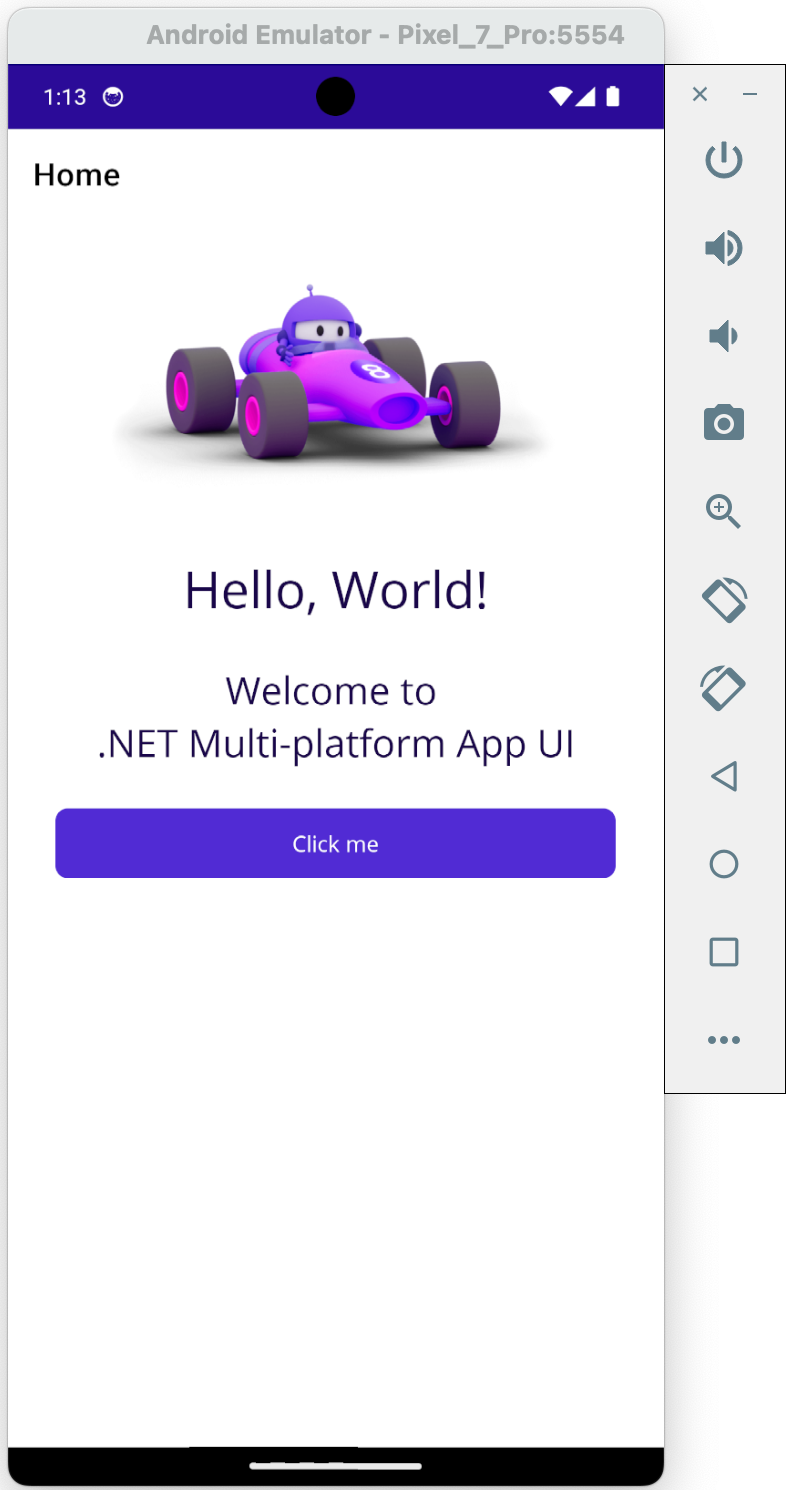
Clicking it should launch the default app:
