Environments
An environment is the working context of a software system. The term is widely used and it is important to understand its full implications. The major distinction is between the production environment (also referred to as the live environment) where a system is in actual use, and the development environment where software developers are making changes. As the software system evolves over time, code changes will be introduced into the production environment, but this has to be done very carefully to avoid any disruption to the users. The development environment replicates the production environment including code and supporting infrastructure such as databases. Because each member of the development team will be working on different changes to the codebase, each one will have their own development environment. This is an important detail: the development environment is not shared - each member of the team has their own copy which includes the last known good configuration of the codebase, plus the changes they are currently working on.

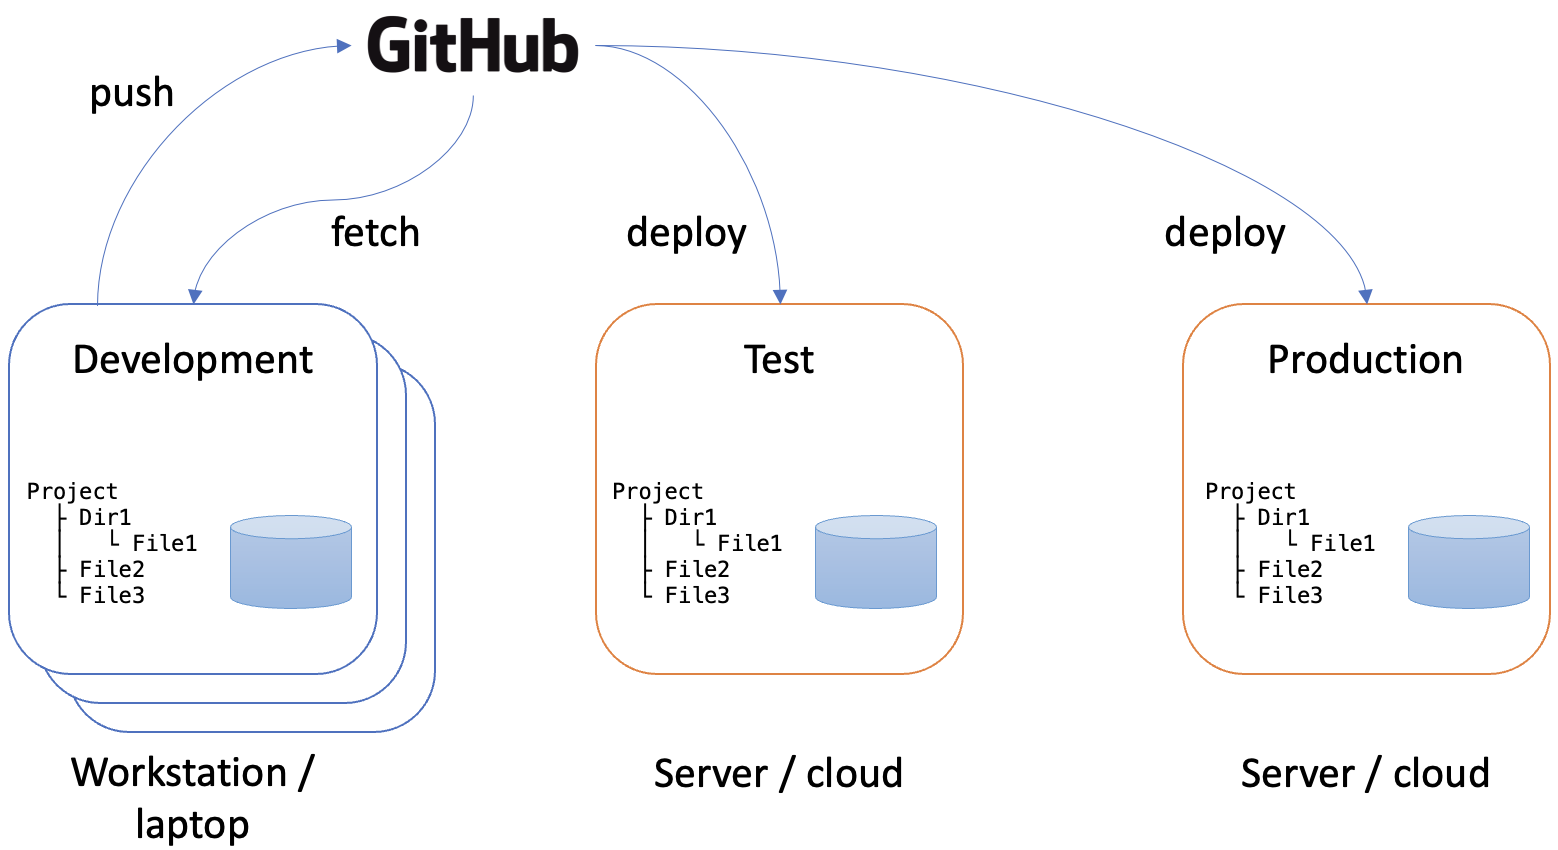
Code repositories such as GitHub are excellent tools for managing the synchronisation of the various environments in use. Once developers have completed the changes they are working on, they push the code to the repository. Once any quality assurance procedures have been completed, the code can then be deployed to the production environment. Fig. 1 illustrates this and also includes a test environment where integrated code can be tested before deployment. Like the live environment, the test environment is a shared instance of the code that is hosted on a server or on the cloud. Development environments, in contrast, are located on the workstation belonging to the individual developer. In order for their personal development environment to be kept up to date, developers need to fetch changes from the repository on a regular basis. Typically, this is done just before starting a new development task. During work on a task, it is important that developer’s working environment remains stable. Changes from other developers are only introduced between one task and the next.
Having a clear understanding of the way environments are used within a project is vital to ensure that things continue to run smoothly. Many steps in the process of code deployment and synchronisation of environments can be automated and in the majority of cases there will be no problems. However, no system is perfect and when things go wrong, it is up to the team to sort them out. Some steps such as the synchronisation of the development environment remain the responsibility of the individual developer. A good familiarity with some basic concepts is therefore required. The remained of this section recaps on some concepts that have almost certainly come across before. They bear repeating here though because they are fundamental to the way software systems are developed and managed, and having a clear picture of what is going on behind the scenes helps to understand processes more clearly and gives you greater control over them. If you are comfortable working at the command line, you will have no difficulty with the ideas summarised here. Although the majority of our interactions with computers now take place via a graphical user interface (GUI), the files that make up an application are still arranged in a hierarchical tree structure. This has been a constant feature of operating system design since the introduction of Multics in 1967. While a GUI is convenient, it is much less efficient that using the command line, provides limited control and has its own learning curve.
In a complex or sensitive context, it may be advantageous to differentiate between a test environment and a staging environment. A staging environment is a controlled, production-like environment used to test software just before it is released to production. It closely mimics the configuration, data, dependencies, and infrastructure of the live production environment, providing a space to validate that the application will function correctly for end users. In staging, teams can conduct final tests, such as end-to-end testing, performance testing, and user acceptance testing (UAT), to confirm the software’s stability, functionality, and readiness for release. The purpose of the staging environment is to simulate real-world conditions as closely as possible, allowing teams to catch and address any last-minute issues that might arise when the software is deployed to actual users.
An integration testing environment, in cointrast, is used earlier in the development process to test how different components of an application work together. It allows developers to verify that various modules, services, and external dependencies (like databases or APIs) integrate properly. Integration testing environments may not always match the full configuration of production; they may lack certain data, security settings, or infrastructure setups that are present in staging. The goal of integration testing is to ensure that each part of the application communicates and functions correctly within the system as a whole.
While both staging and integration testing environments are used to validate the application, they serve different purposes and occur at different stages in the pipeline. The integration testing environment is used to verify that components work together correctly, often as a step within a continuous integration pipeline, whereas the staging environment is typically the last testing environment before production, providing a final check under conditions that closely replicate those in production.
The path
Applications and other executable files exist in specific locations in the file system. To run an application, the operating system needs to know where to find it. The location is known as the path and can be absolute or relative. An absolute path starts at the top level and includes all directories between the file system root and the file of interest. A relative path starts at the user’s current working directory and includes a series of steps to get from that directory to the file of interest. That can involve moving upwards through the hierarchy until a common directory is reached before following a branch to the target.

Normally, you can run an executable file by providing a full path, but usually, you want to be
able to call the executable by name only. In that case, the operating system checks a set of
common locations that are listed in an environment variable usually called PATH. By adding
directories to PATH, you can make it easier to run scripts and programs without needing to
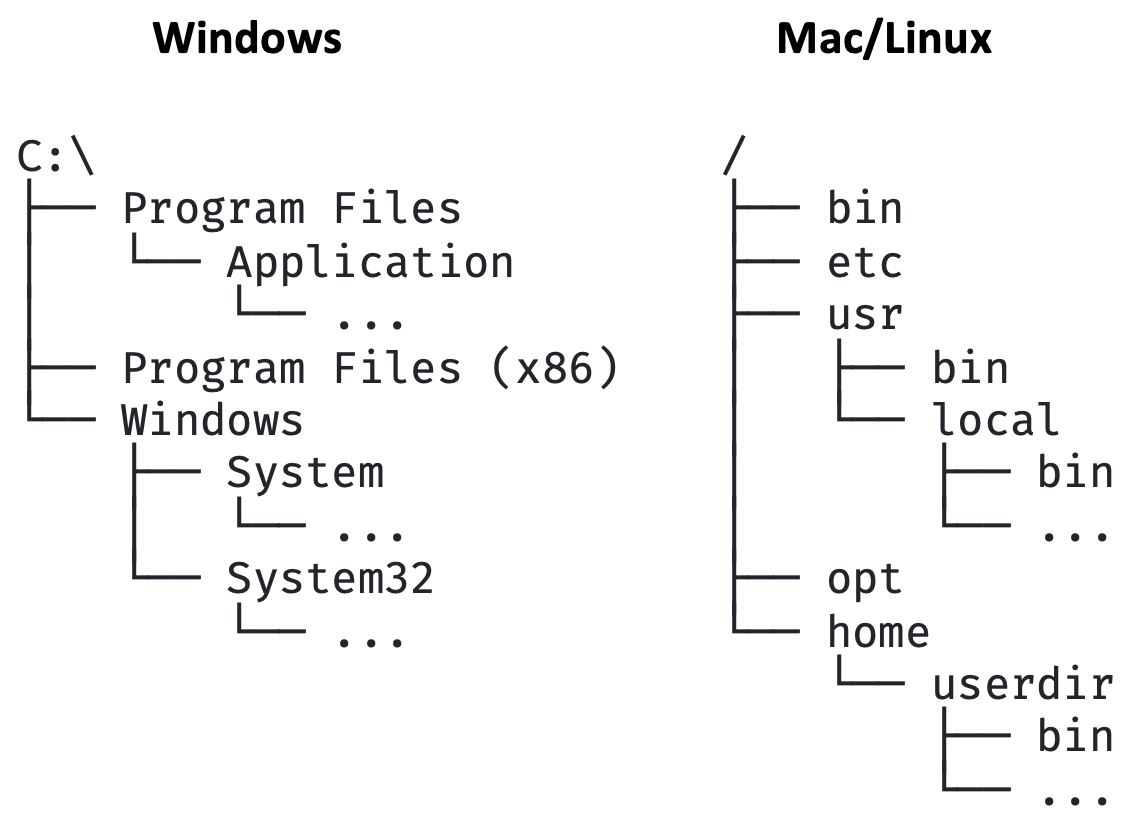
specify their full path. Fig. 2 illustrates some of the usual locations for installed
applications in Windows and Mac/Linux. The problem is that there are several possible locations
each of which may have further subdirectories. If an application encloses its executable
binaries in additional levels of structure, they will not be visible unless the relevant
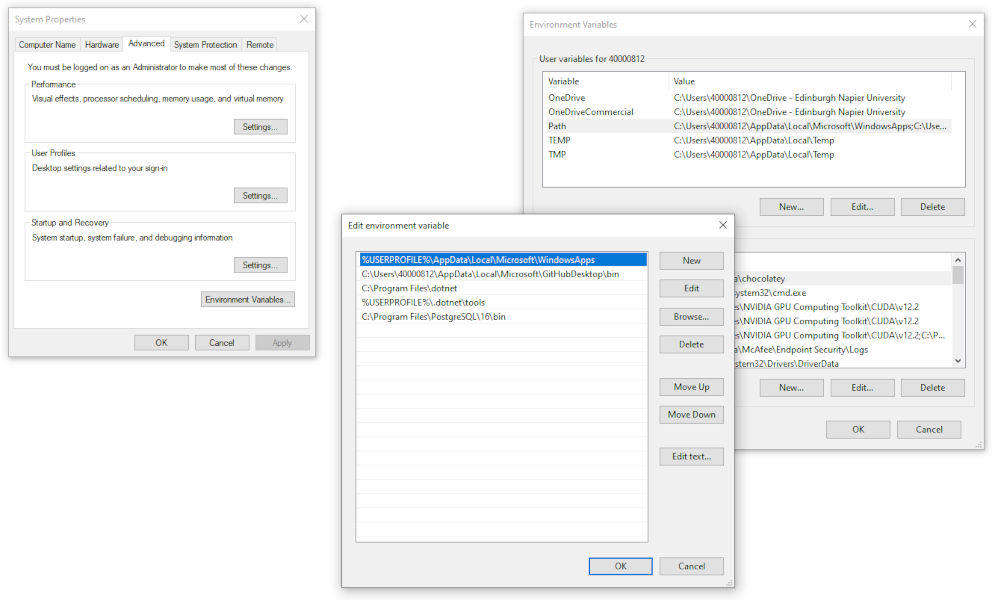
subdirectory is added to the PATH. Fig. 3 illustrates the dialogs provided by Windows for
updating the PATH.

Setting the PATH Environment Variable in Mac/Linux is a little more complicated but gives
greater control. Environment variables control the way the current command shell behaves.
To make a temporary change to PATH (only for the current session), you can modify PATH in
the terminal. This change will last only until you close the terminal.
To add a new directory to PATH, use the following command:
1
2
export PATH="$PATH:/path/to/your/directory"
Replace /path/to/your/directory with the directory you want to add.
Verify the change by echoing PATH:
1
echo $PATH
You should see your directory appended to the existing PATH. For example:
1
export PATH="$PATH:/home/user/scripts"
This temporarily adds /home/user/scripts to PATH in the current shell session.
To make a permanent change to PATH, you can add the export command to your .bashrc file on
Linux or your .zsh file on a Mac. Both files are found in your home directory. This change
will persist across terminal sessions and reboots. To make a permanent change, edit the
relevant configuration file an add the following line to the end of the file:
1
export PATH="$PATH:/path/to/your/directory"
Replace /path/to/your/directory with the directory you want to add. Save and close the file.
To apply the changes immediately, source the .bashrc file:
1
source ~/.bashrc
Your changes will be applied automatically to any new shell sessions.
The project root
We already mentioned the root of the file system. That is the top-level directory which acts as
the ancestor of all other directories. It is often useful, however, to identify a specific
directory to act as the root for an individual project. A development project in Visual Studio
uses this concept, and by default, project root directories are created in the
C:\Users\<username>\source\repos directory on Windows. There are two major benefits to
this approach. The first is that all project root directories are kept together which makes
them easy to lcate if necessary. The second benefit is that it keeps each project independent
and self-contained. While Visual Studio project share some features, they will also all be
slightly different.
Other software tools such as git use the same concept of the root folder. Git is a distributed software coordination system where each developer has their own copy of the repository of interest. Keeping the contents in a known location with a common structure allows git to identify changes when it comes to committing and merging.
It is important to understand, though, that although these two examples share the concept of the root folder, there is no intrinsic link between them. It would be perfectly possible, for example, to create a git repository that includes only part of a Visual Studio project. In that case, the git root would be located in a subdirectory below the project root. Similarly, it is possible to include more than on project in the same git repository. In that case, each project would occupy a subdirectory of the git root. This is visualised in Fig. 4.
flowchart TB
    p1["Project root"] --> p2["Front end"]
    p1 --> p3["Back end = <br/>git root"]
    g1["Git repo root"] --> pp1[Project 1 root]
    g1 --> pp2[Project 2 root]
Fig. 4: Cases where the project root and git root are different
Hidden files
Many applications require configuration and state information to be saved so that the setting persist from one use of the application to the next. Visual Studio does this, as does git and many other common tools. Typically, this information is saved in a hidden file in the relevant root directory - i.e. git information is saved in the git root directory. The most common way to designate a file as hidden is to start its filename with a dot. Windows allows you to view hidden files in the file explorer, but you need to select this option explicitly.
It is vital to understand that these hidden files are context-dependent. That is, they relate
specifically to the local environment and include such things as local PATH settings,
relative paths and preference setting for the specific user. These settings cannot necessarily
be transferred to another user or environment where the environment may be different because
they would cause errors.
The implication of the last point is that hidden files must not be committed to a shared code repository. If they are, a developer’s environment will become corrupted when they synchronise their repository because their own settings will be overwritten by someone else’s.
One of the hidden files that is maintained at the git root is the .gitignore. This file
maintains a list of the files and subdirectories below the git root will not be included in
any git operations. That is, they will not be committed locally or pushed to the remote repo.
All hidden files should be excluded from the repo by adding them to the .gitignore file -
this is easy to do via the IDE interface.
If any hidden files are committed to the repo by accident, they need to be removed. In addition, it is necessary to find out who made the mistake and to ensure that they exclude the files. Otherwise, they will reappear next time the same developer pushes their changes.
Databases in application architecture
In general, a database is something that is independent of the rest of the code for an application. The code makes a connection to the database in order to interact with the data, but the database itself is managed by its own management software, and is often running on a different host machine from the application code. Some major advantages of this model are that the database can be shared between different applications, it can be scaled separately as the amount of data grows, and it can have specific security measures applied that are perhaps not relevant to the application as a whole. This typical arrangement is visualised in Fig. 5. The cloud is included to emphasise the separation between the different instances of the application and the database, and the fact that the route between the application and the database may not be known. We often rely on standard internet infrastructure to resolve the route for us.

While Fig. 5 depicts a database in use, there are two other situation that you need to be aware of. The first is where the database is not intended to be shared, but instead provides storage exclusively for a single application user, or is used as a local data cache which is periodically synchronised with a remote shared database. In that case, SQLite is a common choice. It provides single-user access to relational data structures via standard SQL. It also has a range of APIs for different programming environments and makes use of a local file for data storage.
It is tempting in this case to assume that the database can be included in the application repo since it is a local, single user file. However, that would be a mistake because while the database might be common to all users of the application, the data it contains will almost certainly be different. This is also a case where the database should be excluded from the repo just like the hidden files. SQLlite implementations typically include the facility to create the database on the fly if it does not already exist. That is the preferred mechanism for ensuring that every instance of the application has access to a database.
The second situation is during the development project where different members of the development team may need slight variations of the database for the changes they are currently working on. This means that each developer needs their own copy of the database. However, the important point is that although it may be a feature of the developer’s local working environment, it should be treated in exactly the same way as the shared database that will eventually be used. Changes should always be made via script files rather than by interacting with the database structure manually. Those scripts can then be checked into the repo so that they are available for other member of the development team to use to implement the same changes on their local copies of the database. Typically, database changes are defined in code using an object-relational mapper (ORM) tool. Running the change scripts on an instance of the database in order to make the required changes is known as migration.