Controlling Agile Projects
When they first hear about Agile development, many people mistakenly think that it is a licence to work without rules. In fact, the work in an Agile project needs to be coordinated just as much as it does in any other kind of project. The Agile approach does, however, acknowledges that it is difficult, time-consuming and often futile to attempt to answer all of the design questions in advance. Instead, it assumes that the requirements themselves will be clarified as the project accumulates knowledge during the development. This would be naively optimistic though without some control over the process, and one of the fundamental elements of the Agile approach is iterative development as illustrated in Fig. 1.
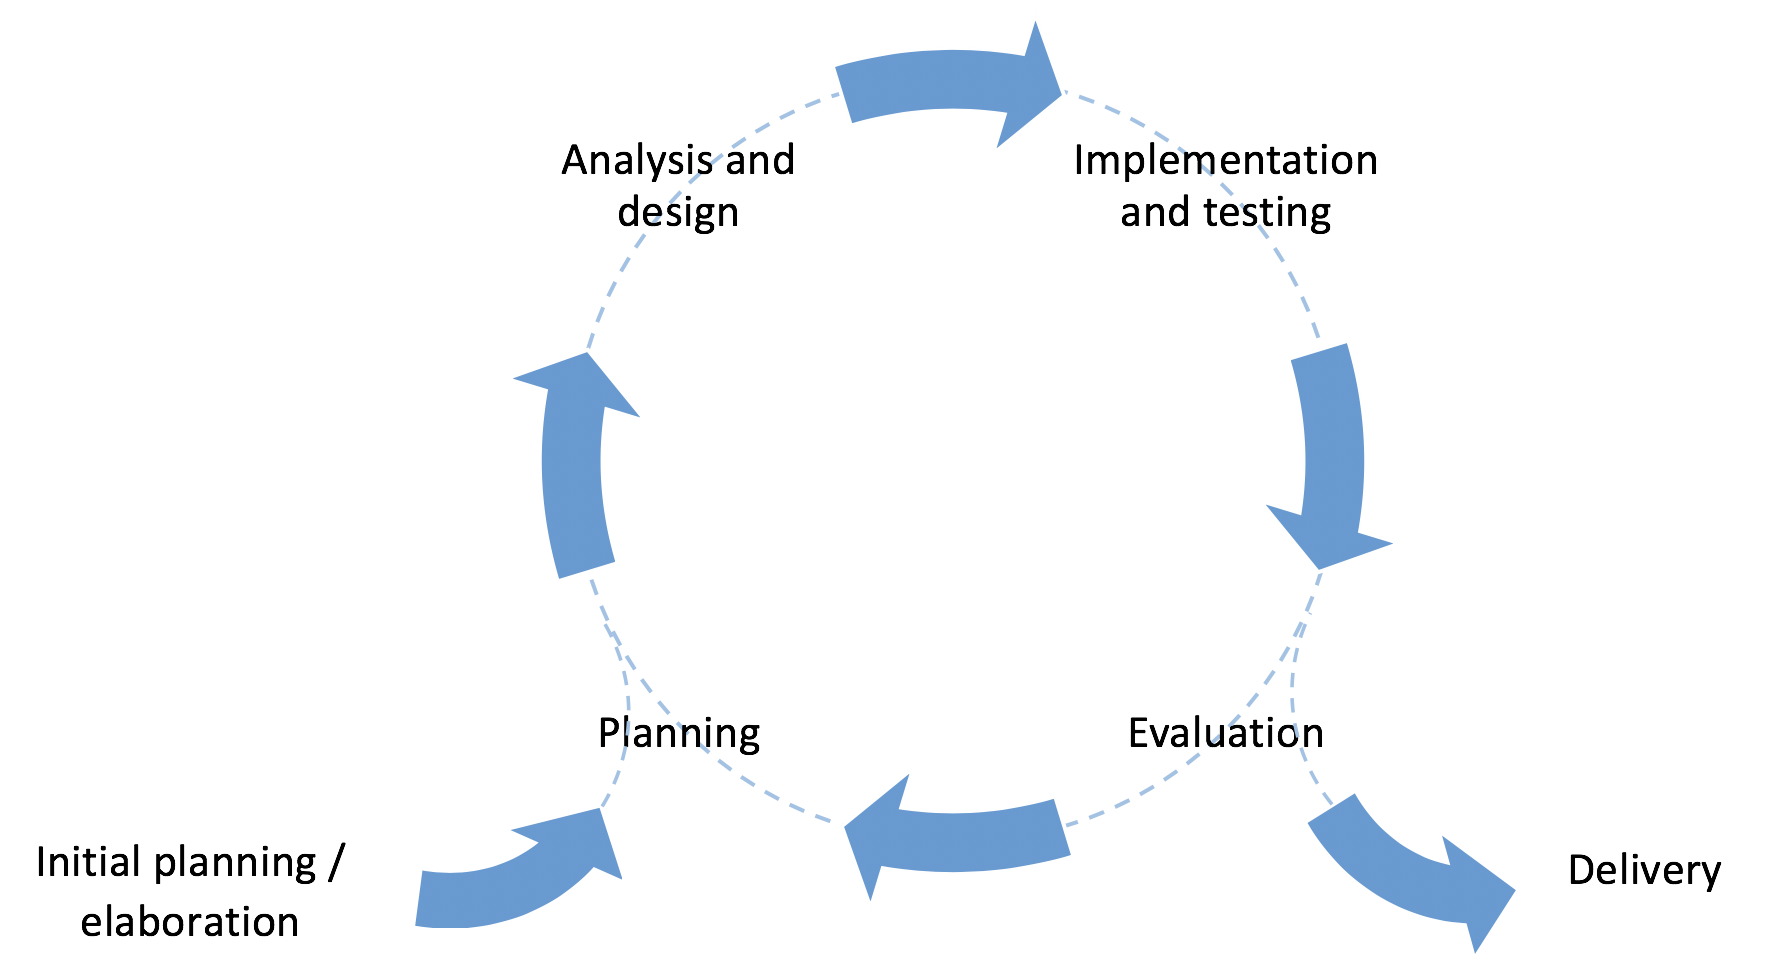
A project usually runs for several months. A prototyping cycle structures that time to create opportunities to re-evaluate the work done so far and to check that the project is going in the right direction. The simplest approach is to choose a period of time such as two weeks, and to structure each period according to the illustration above. Each cycle would start with some planning, followed by some analysis and design, some implementation and eventually the evaluation of the work within the cycle. Using this approach, a two-month project would be made up of four cycles. It is also possible to divide a project into cycles of unequal sizes if there is some advantage to doing so.
An important element of iterative development is that a working prototype is produced at the end of each cycle. This is often referred to as the frequent delivery of product which is an expression of Agile principle 3. Delivering working software on a regular basis provides an opportunity to
- identify problems
- seek feedback from others
- evaluate work done so far
- refine the design
- re-evaluate the scope of the project
- plan the next stage of development
Managing iterations
In a project team, it is important that everyone is working in a coordinated fashion in order to realise the benefits of iterative development. The regular delivery of prototypes creates a rhythm to the work which contributes to a sense of progress and achievement. This in turn supports a good working atmosphere with natural breaks in the pressure to get things done.
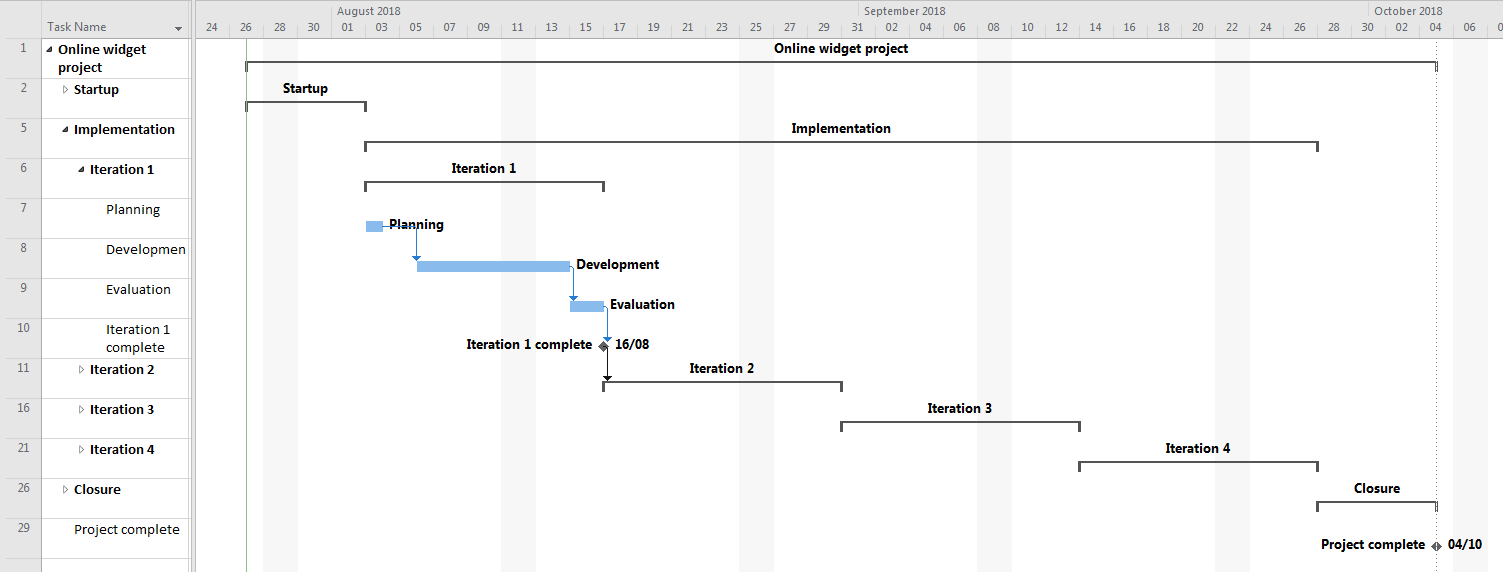
The basic requirements are to make sure that everyone knows what the goals of a cycle are at the start, to communicate progress during the cycle, and to coordinate the work of the team towards the end so that the prototype emerges in a controlled way at the expected time. The first requirement then, is for the team to know when the deadlines are. Fig. 2 shows how a Gantt chart for an Agile project might be structured at the top level.

There are several things that need to be done during project start-up and project closure. There are many sources of advice on this topic, including
The Disciplined Agile Framework
![]() Agile development release planning
Agile development release planning
In this illustration, they are simply represented as a single activity on the Gantt chart as shown in the next image. Expanding the Startup and Closure stages reveals two important features of the Gantt chart. First, the name of every task is displayed on the chart. This makes it easier to read and understand, especially as the complexity grows. Second, each summary task ends with a milestone. This is a task of zero duration which acts as a deadline. One way to measure the health of a project is to monitor the milestones in the plan to make sure that they do not slip. Notice that the milestone which marks the end of Startup is linked to the beginning of the next summary task, Implementation.

In Fig. 3 it is clear that the Implementation stage lasts eight weeks. In our example, we have decided to split that into four iterations of two weeks each. This could be represented as a series of further summary tasks as shown in Fig. 4.

In some ways, each iteration is like a small project in its own right. They all have a similar structure with some planning at the start and the evaluation of the prototype at the end. This has benefits for the team because each iteration has a predictable structure. In addition, the transition from one iteration to the next provides an opportunity to celebrate the achievements of the one that has just finished. The image below illustrates how each iteration might appear on the Gantt chart. In some cases it is not possible to add more detail than this to the implementation stage of the Gantt chart because the actual tasks are handled in an Agile manner using techniques such as a Kanban board.
Prioritising requirements
DSDM Atern is an agile methodology that defines a useful technique for prioritisation which can be used to control the overall scope of a project and to control iterative development.
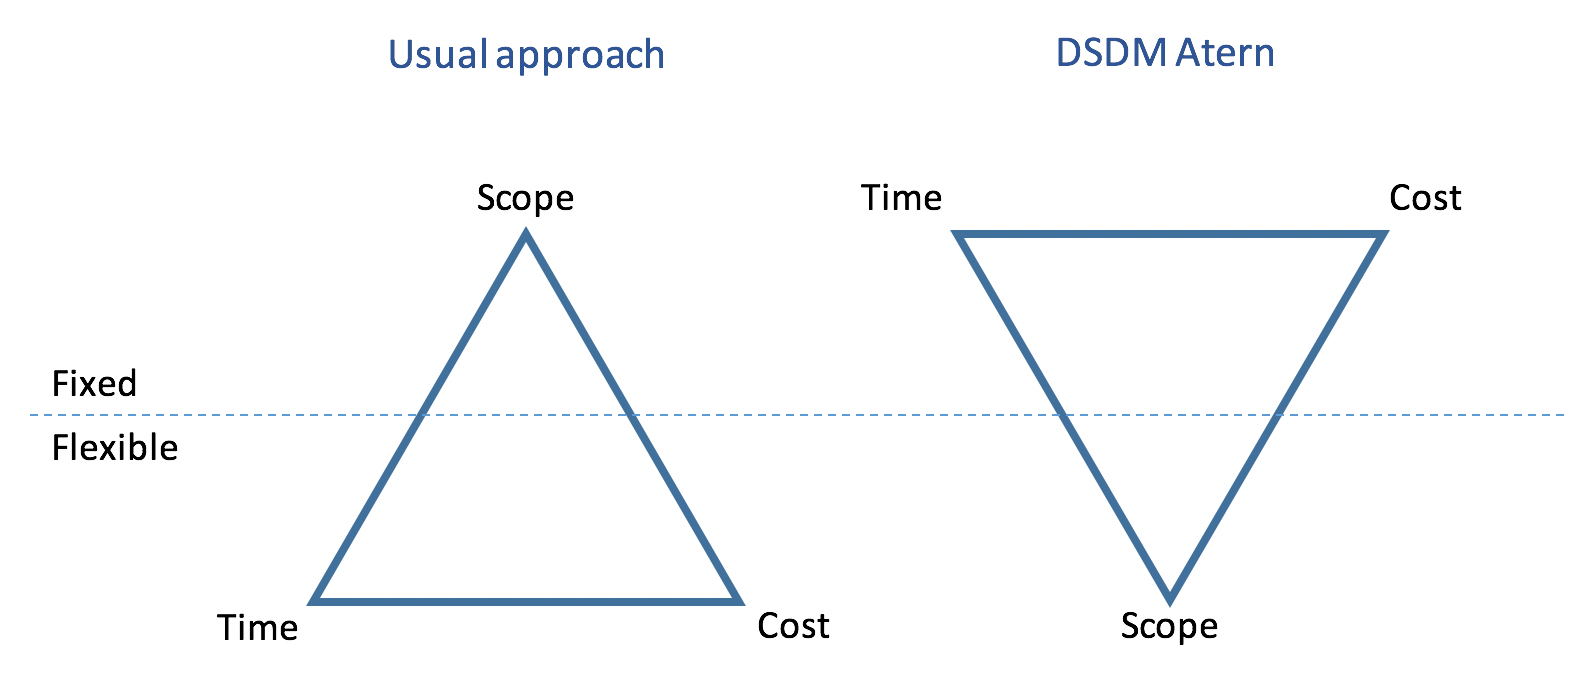
DSDM Atern refers to a prototyping cycle as a timebox which it defines as a period of time with a fixed duration. This means that time is not a flexible quantity, and missing deadlines is not permitted in a DSDM Atern project. Likewise, DSDM Atern insists that the budget for a project is also fixed, and that the cost of a project must not increase over time. The three dimensions of time, cost and scope are sometimes referred to as the iron triangle, and together they define the output of the project. In many projects, the scope of the project - the list of features - is the fixed dimension, and time and cost are flexible as illustrated in Fig. 1. However, this can lead to missed deadlines and cost over-runs. Because DSDM Atern fixes time and cost, the only other source of flexibility is in the project scope.
MoSCoW prioritisation
In order to allow flexibility in scope, DSDM Atern uses the MoSCoW prioritisation technique. This is a four-level scheme which is applied to the requirements that will be attempted during a timebox. The four priority levels are described in the table below.
| Label | Interpretation |
|---|---|
| M | Must-have items are essential for the product or for the business case of the project |
| S | Should-have items are not essential, but are nevertheless important for the quality of the finished product |
| C | Could-have items are features which would be nice to have, but which would not compromise the overall quality if they were missing |
| W | Won’t-have items are not included in the current scope - this final category is more important than it first appears |
MoSCoW at project level
Clients may not differentiate between different requirement priorities until prompted. They can have an all-or-nothing view of the project which you need to move them away from. This is a process of education in that you may have to explain MoSCoW to them so that you can come to an informed agreement over the scope of the project.
Two important things to remember during these early negotiations are:
A good scope definition will have an even spread of requirements across the M, S and C categories
Spreading the requirements across categories is what gives your project flexibility. Without this, you will not reap the full benefit of an agile approach.
You should actively try to reduce the number of items in the M category
Because the M category represents the essential requirements for the project, it is essentially your definition of success. Once you have achieved all of the Must-have items, you have by definition achieved a successful project. The shorter the list, the more quickly you can reach success.
MoSCoW at timebox level
At the start of a timebox, DSDM Atern says that there should be a list of requirements that will be attempted within the time available. MoSCoW is applied to this list so that there are items in each category, and that according to your best estimates, there is enough time to complete all the Must-have and Should-have items. This is how DSDM Atern builds in flexibility: if things go well, you finish all of the planned items and you can also include some of the Could-have items as well. On the other hand, if things do not go to plan (which is more likely), some of the Should-have items can be dropped without compromising on the essentials. Putting items in the Won’t-have category ensures that no-one on the team is tempted to spend time on things which are not immediate priorities.
The red line in the diagram below represents the point that is reached in the requirements list at the fixed end point of the timebox. Careful scoping should ensure that at this point all Must-have items have been done and ideally some of the Should-have and Could-have items as well.
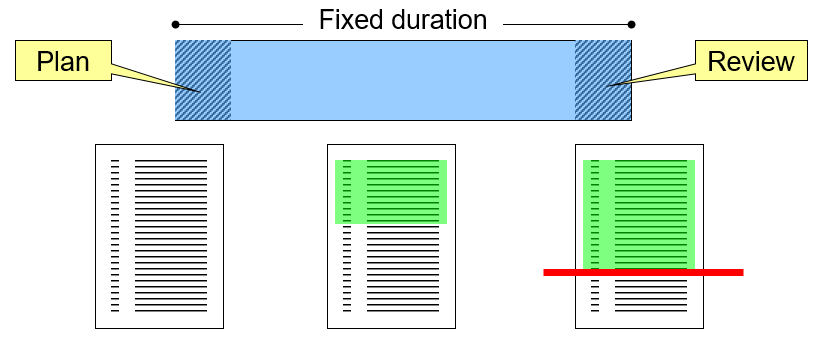
At the end of a timebox, the delivered features are compared with the original prioritised list. This provides an opportunity to take explicit decisions about the remaining requirements by adjusting their priorities. Something that was a Should-have in the previous timebox, for example, can be promoted to a Must-have item in the next. Alternatively, it could keep the same priority or be demoted to a Could-have or a Won’t-have. In this way, priorities are constantly re-evaluated throughout the project ensuring that the team focuses on what is most important. If the priorities change by a large degree, this could trigger a discussion with the client. This is especially true when something is moved into the Won’t-have category since this means that the team no longer expects it to be included in the final product. This is called de-scoping, and is a natural part of a DSDM Atern project.
Issue-related workflow
Most code management platforms provide features to help manage projects. In GitHub, a project can be represented in a tabular format, as a roadmap or in the form of a Kanban-style task board. The choice of format is up to the team, but for the purposes of these notes, we will assume the use of a task board.
By default, a task board in GitHub contains the three swimlanes, Todo, In Progress and Done as
shown in Fig. 6. Further columns can be added if needed - this depends on how the team decides to
manage the work. For example, a swimlane for stalled tasks could be added, or for tasks in review.
The task board can be as complicated as required, but in general, the simpler the structure, the
more intuitive it is to use.

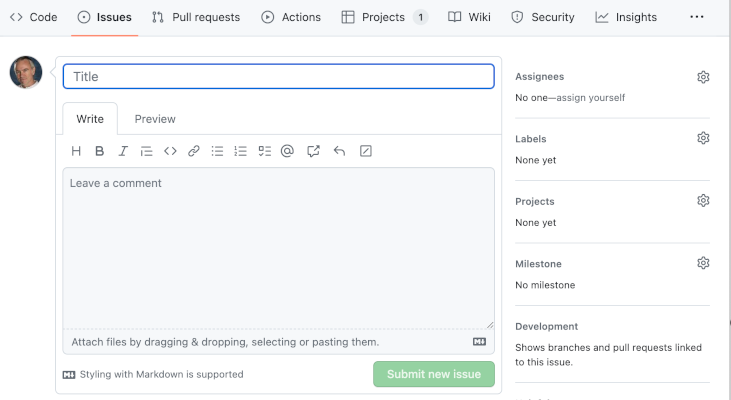
Tasks in GitHub are represented by issues. They can be added directly on the task board using the button at the bottom of each swimlane. If you take that option, you will need to explicitly attach the new issue to the relevant code repository. This is because the relationship between projects and repositories doesnot have to be one-to-one. You can also create issues using the issues tab on the repository page. If you take that option, you will need to say explicitly which project the issue should be added to. This is done using the controls on the right of the issue creation page as shown in Fig. 7.
When using a task board, an item gradually accumulates detail and moves through the swimlanes from left
to right as the work progresses. Exactly when an item is moved from one swimlane to the next needs to
be defined in the team workflow so that there is no ambiguity. Once defined, these rules can be
performed and enforced manually, but GitHub can help to automate some of the steps. Clicking on the
three-dots icon in the top right-hand corner of the task board (see Fig. 5) allows you to select a
Workflows option. Here, you can define several actions to be triggered automatically. The options
are more or less self-explanatory and require some experimentation. The main point is that a team
should make explicit decisions about how their task board should operate and which steps are to be
automated. Those decisions should be clearly documented sothat they are easy for team members to
follow.