Using GitHub
GitHub is a cloud-based platform for storing code. It has many useful features including
- Version control: It automatically tracks changes to files and allows for the recovery of earlier versions.
- Repositories: Projects are represented as repositories with their own permissions and properties to keep them separate from other code on GitHub.
- Branches: Different but related versions of a codebase can be managed easily through the concept of branching.
- Workflow: The lifecycle of files is managed through features such as pull requests and code reviews.
- Project management: GitHub supports the use of agile task boards in the Kanban style.
- Continuous integration: CI/CD is supported using GitHub actions.
In this tutorial, there will not be time to cover all of the features and services that GitHub offers. Instead, we will concentrate on a small number of fundamental features that software engineers should be familiar with. In particular, we will not be covering the use of the git command line which we assume you are already aware of. If not, please find an appropriate tutorial. CI/CD is also beyond the scope of this tutorial, but please use the link above to learn more about using GitHub as a devops tool if that is of interest.
You will need a personal GitHub account for these exercises.
1. Code repositories
A repository is the most basic element of GitHub. It's a place where you can store your code, your files, and each file's revision history. Repositories can have multiple collaborators and can be either public or private.
Create a repository
The repo you create here is only for practising with GitHub features. It is intended to be disposable so that you can delete it with confidence at any time.
The simplest way to set up a new repo is to click on your account link in the top right-hand corner of the display once you are logged into GitHub. This will reveal an options menu where you can select Your repositories. On the next page, there is a large green button on the right-hand-side labelled New.
The next page offers some options for your new repo, but the only mandatory item is the repo name. Pick a name and click the green button labelled Create Repository at the foot of the page.
That’s all there is to it.
The next page that you see will offer several ways forward. Some of them are to set up additional features and invite other people to collaborate. Because the repo is empty, some of the suggestions are for creating new files. There are also some recipes for how to connect your new repo with a folder on your laptop.
Create a better repository
In this step, we will repeat the process of creating a repo, but paying more attention to the options available. Start by deleting the repo you created in the first step - it does not contain any useful content, and deleting it will allow us to re-use the name.
-
On the main page for your repo, click the Settings button as shown in Fig. 1.

Fig. 1. Finding the settings button in GitHub The settings page provides many options for you to configure the behaviour of your repo.
-
Scroll to the bottom of the settings page where you will find the Danger Zone:
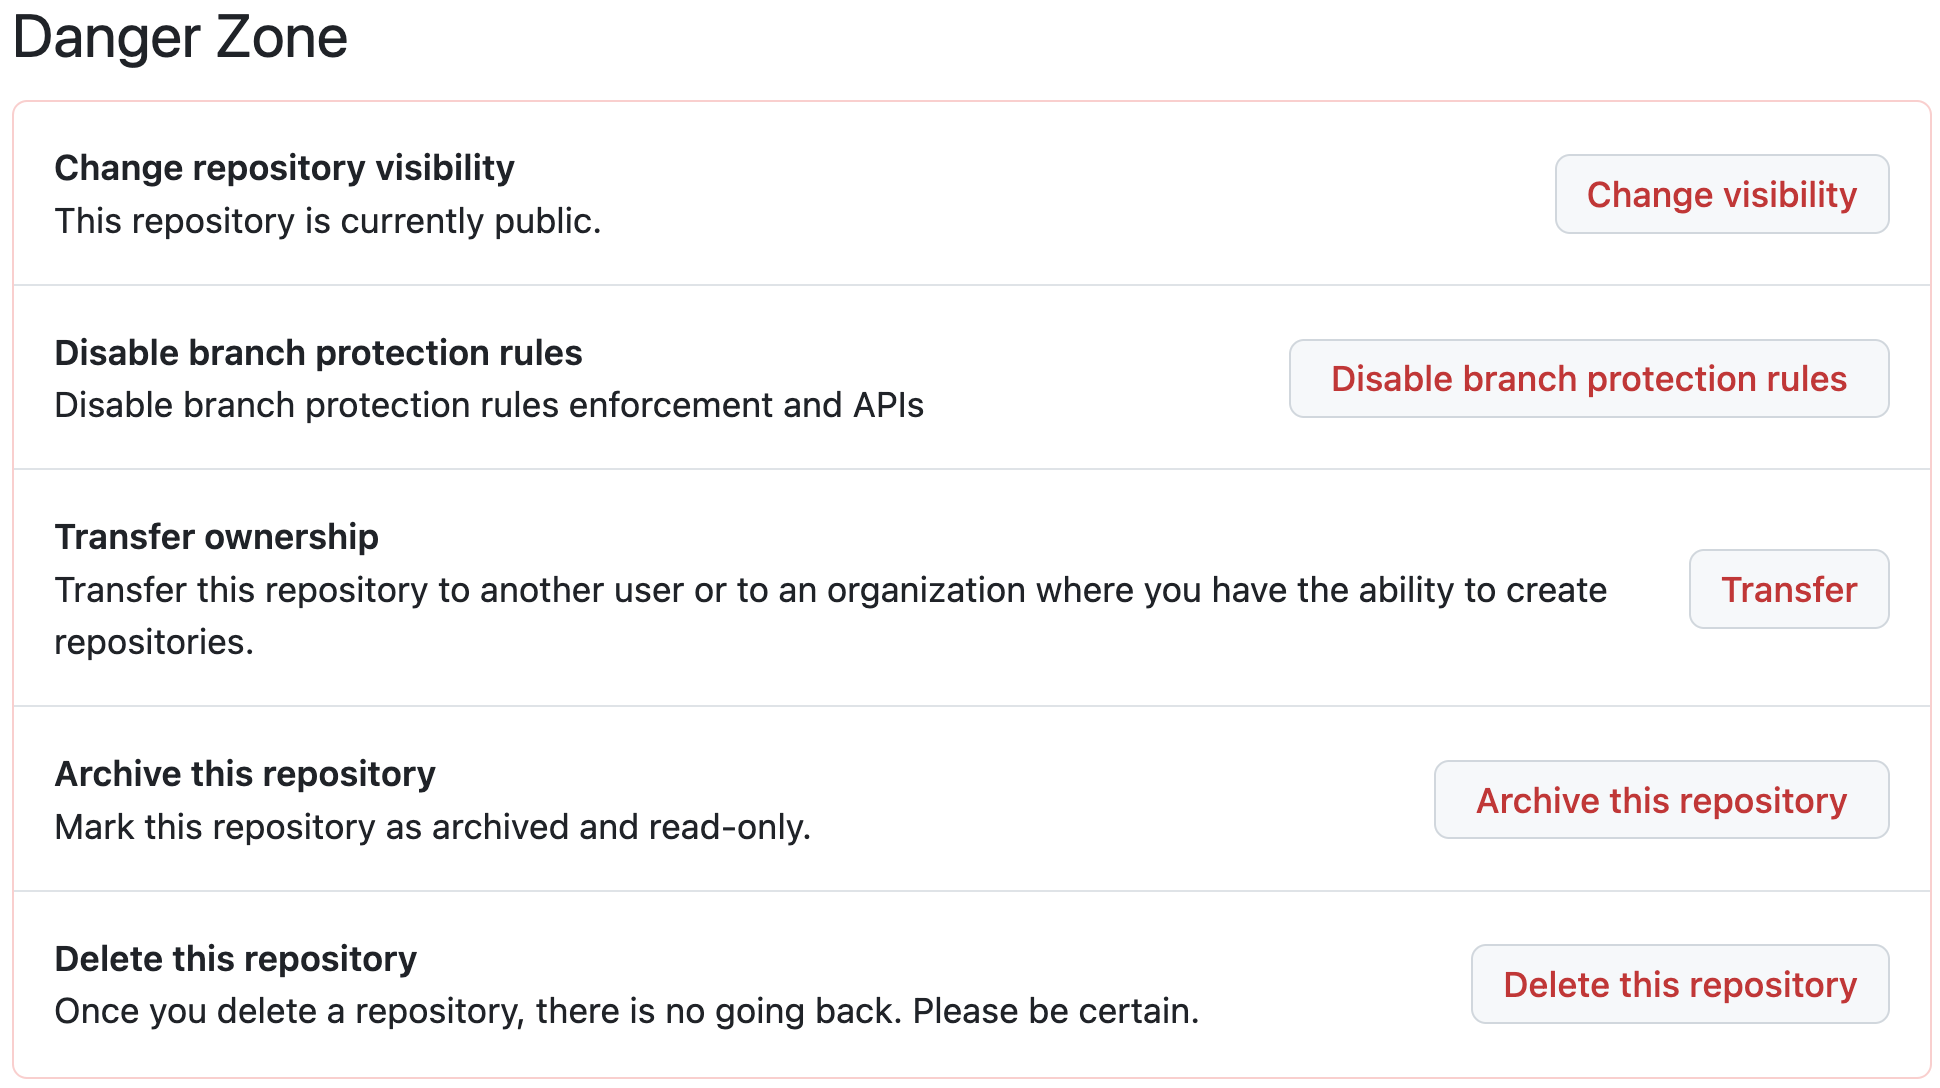
Fig. 2. The Danger Zone In the Danger Zone, choose the option to delete the repo. Because this is an irreversible action, you will be asked for three types of confirmation before it is complete.
-
Next, start the process of creating the repo over again by pressing the green New button.
-
Specify visibility
You have two options, Public or Private. By default, a repo is accessible publicly. Let’s make this version private - this still allows you to invite specific people to access it to collaborate on writing code.
-
Add a README file
The README file is an important communication tool because it is displayed automatically when someone accesses the repo via GitHub. This means that it provides an informative home page for the project. You can also have README files in subdirectories as well where they perform a similar function.
Check the box to add a README file to your new repo.
-
Don’t add a .gitignore
When you are working on the code for a project, there are many types of file that you do not want to store in the repo. These include object and binary files that are the results of building your project as well as cache files created by your development tools. GitHub provides a large number of templates that correspond to different working environments; however, there are none specifically for working with .NET.
Fortunately, there is a code .NET template available in GitHub’s own repo. We will be able to add the file later on.
-
Choose a licence
Strictly speaking, if your repo is private you don’t need to specify a licence. It is always worth planning ahead though for a time when someone else may have access and you want to control what they are allowed to do. Here we will choose the MIT licence which is simple and permissive according to choosealicense.com
-
Finally, press the Create repository button.
This takes you to the main page of your new repo which should look like Fig. 3.
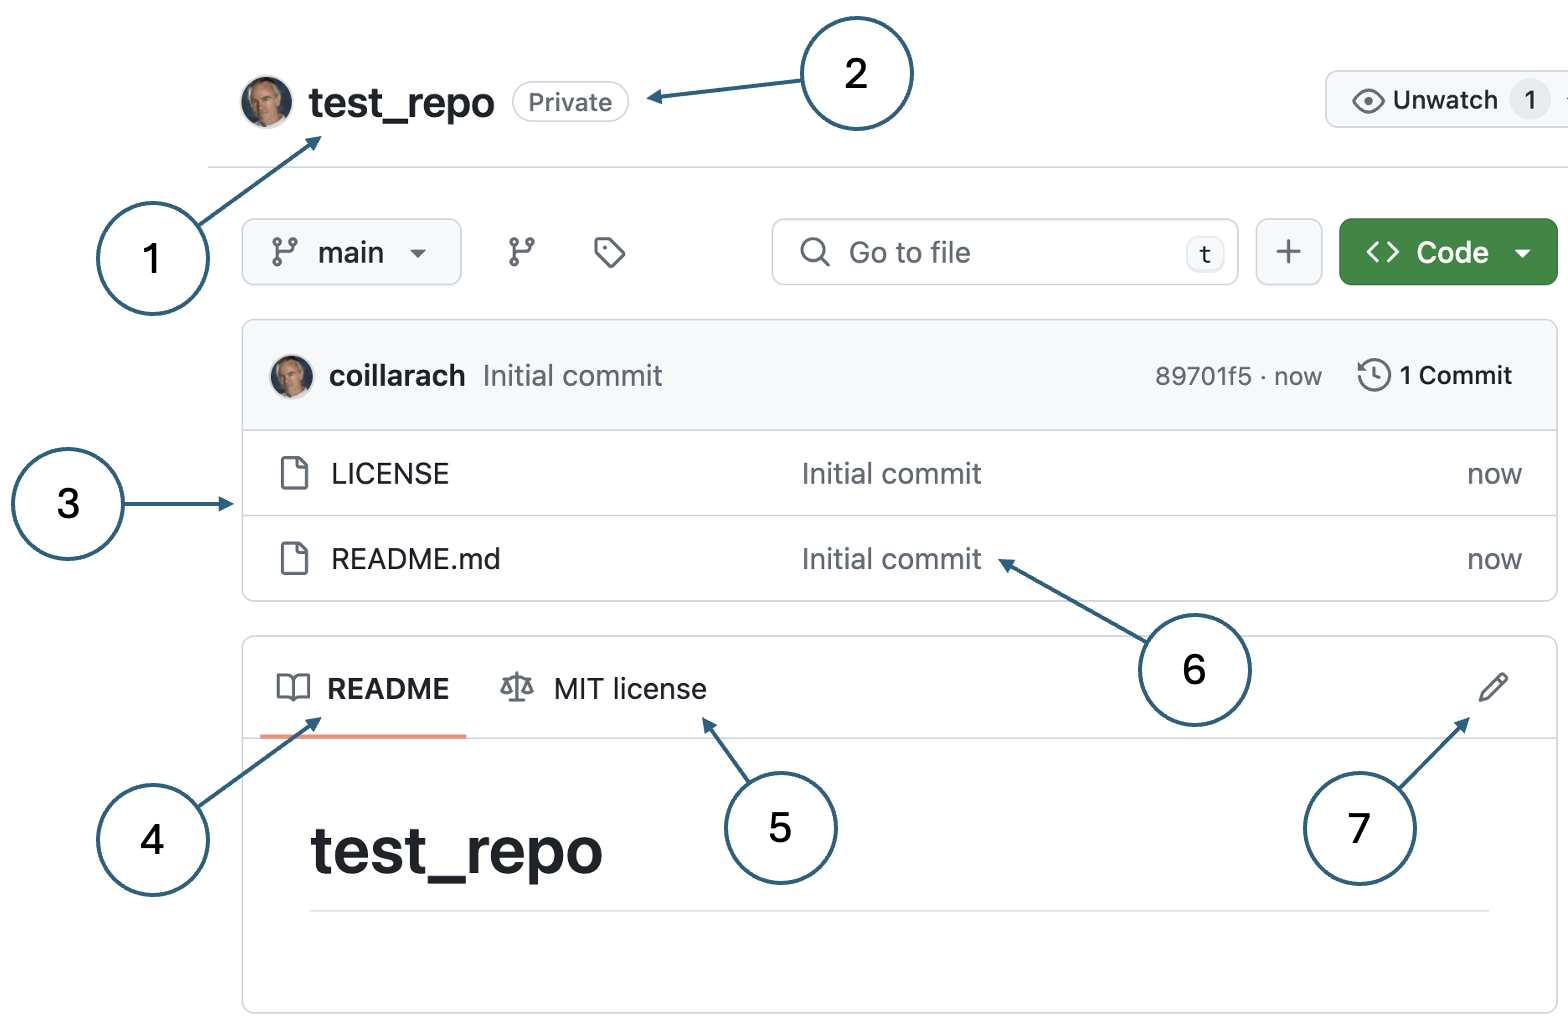
Fig. 3. Repository main page - The name of the repo
- The visibility setting
- List of files in the repo
- The name of the file currently being displayed (README by default)
- The licence that applies to the repo
- The comment associated with the change that last affected the relevant file
- Icon that allows you to edit the currently displayed file directly in GitHub
2 Working with files
Version control is the most basic function of git and GitHub. It eliminates most problems related to file changes by saving stable versions at known checkpoints. Say you are working on a file. You make your changes, do your tests, do a little debugging and then when you have a stable version you save it to your code repository in an action called a commit. Thus a complete history of the file from one stable version to the next is preserved in the repo and you can always recover an earlier version if you need to.

It is important to provide a meaningful comment with every successive commit. A good comment gives anyone looking back at the file history a clear understanding of what changes were made and why. This of course depends on how conscientious the developer is.
Follow the steps below to create a new version of the README file.
-
Click on the pencil icon to edit the file.
The contents of the file is written in markdown, a simplified version of HTML.
-
Edit the contents of the file to match Fig. 5. and use the Preview button to see the effect.
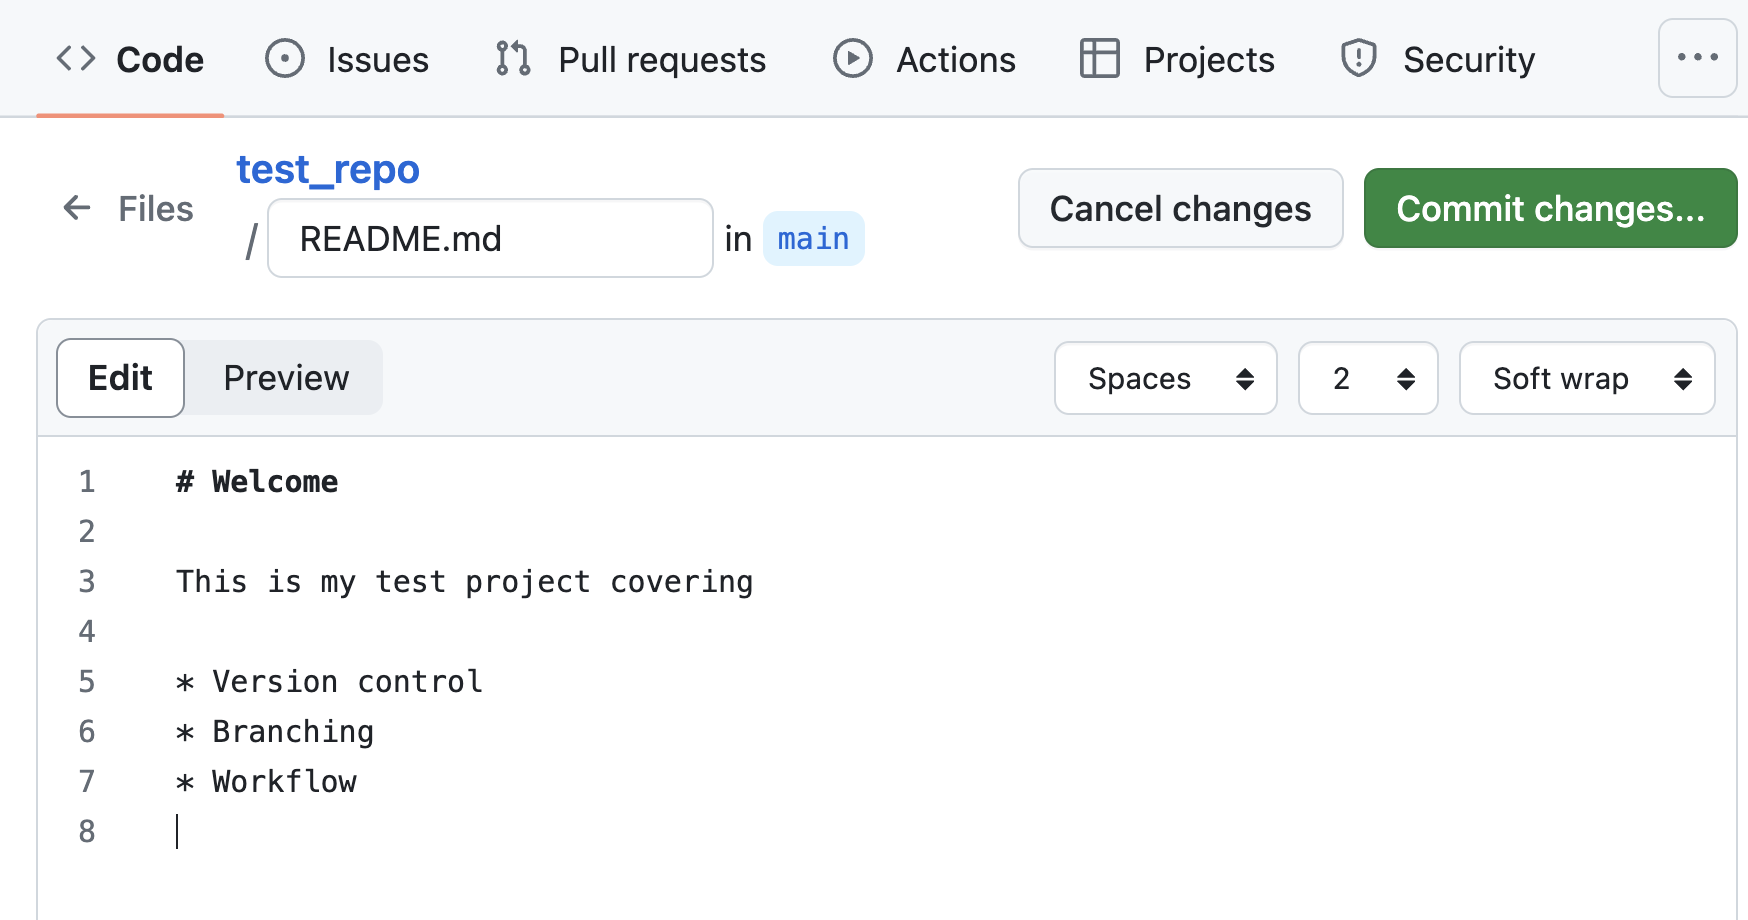
Fig. 5. Editing a file -
Click the green Commit changes… button.
-
In the commit dialog, make the commit message more meaningful - why did you make the changes?
For more complicated changes, you can use the commit message as a summary and put more detail into the Extended description field.
Notice that you can choose to create a new branch on committing the changes. Branching is covered later, so for now just commit to the main branch.
-
Click the green Commit changes button.
After committing, the file is displayed in preview as shown in Fig. 6.
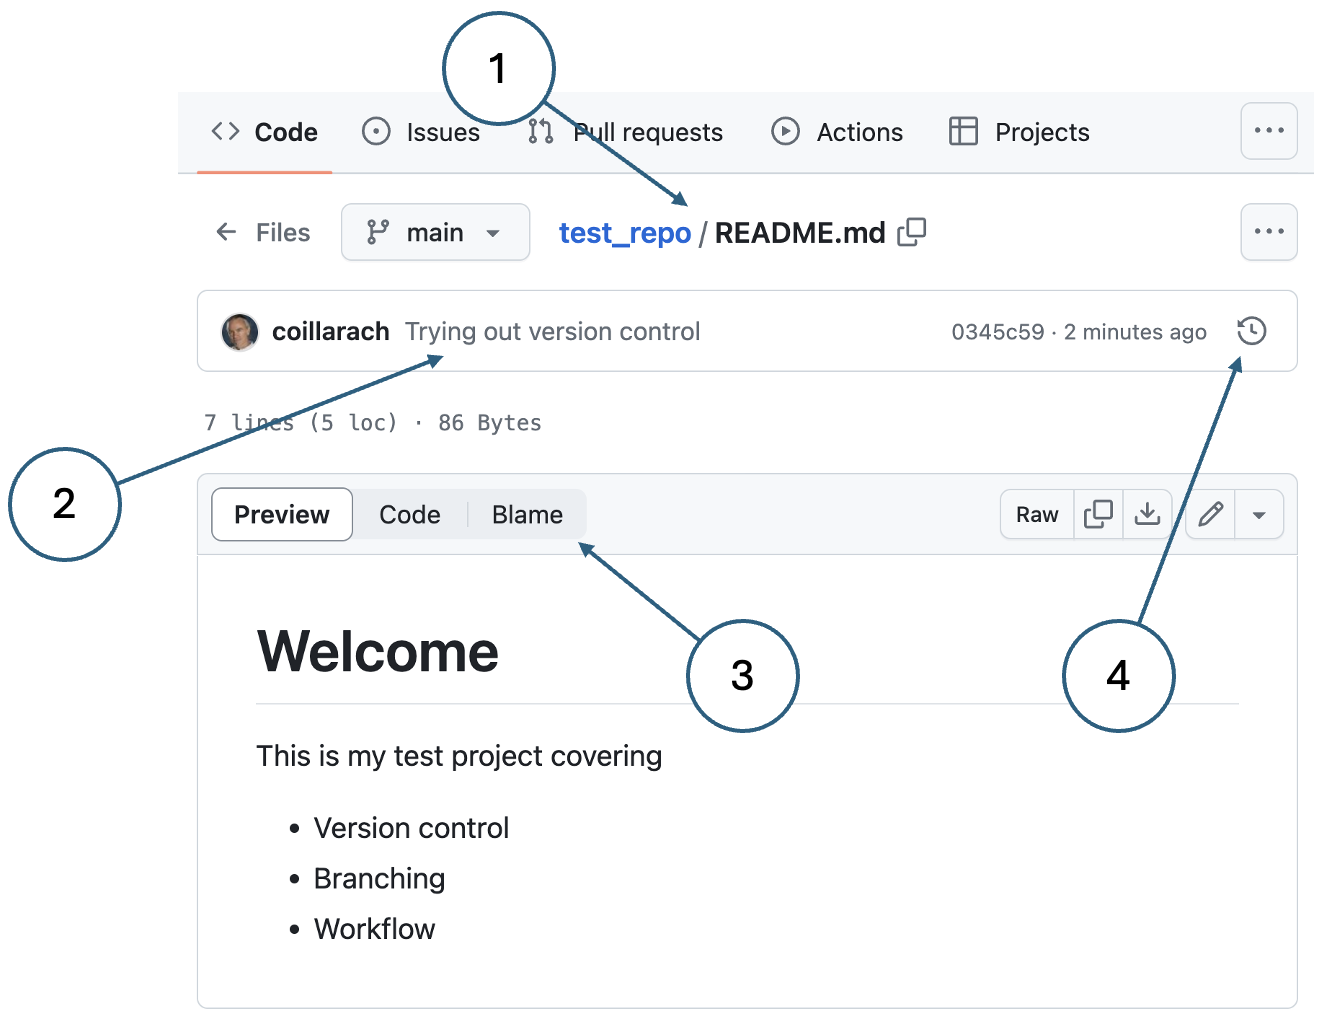
- The breadcrumbs for this file. Any subdirectories would be included here.
- The commit message that was entered.
- The Blame button - this allows you to see a summary history of the file one commit at a time.
- The History button - this allows you to see all previous versions of the file and recover them if necessary.
Experiment with the Blame and History functions to see what they do.
Committing multiple files from VSCode
A unit of development work typically requires changes to more than one file and they are all committed at the same time. Also, it is unusual to edit files directly in GitHub - it is much more common to make the changes in your code editor or IDE and use the integration features to manage communication with GitHub. Follow the instructions below to clone your repo on your laptop and manage changes using VSCode.
-
Clone your repository on your laptop.
Follow the instructions in the Getting started tutorial if you do not remember how to do this.
When you clone a repo, a link is stored on your local machine back to the remote one on GitHub. You can see the details of the remote repo by executing the following command inn the project root folder in a command shell or terminal window:
git remote -v
-
Open the root folder of your project in VSCode. The view should look similar to Fig. 7.
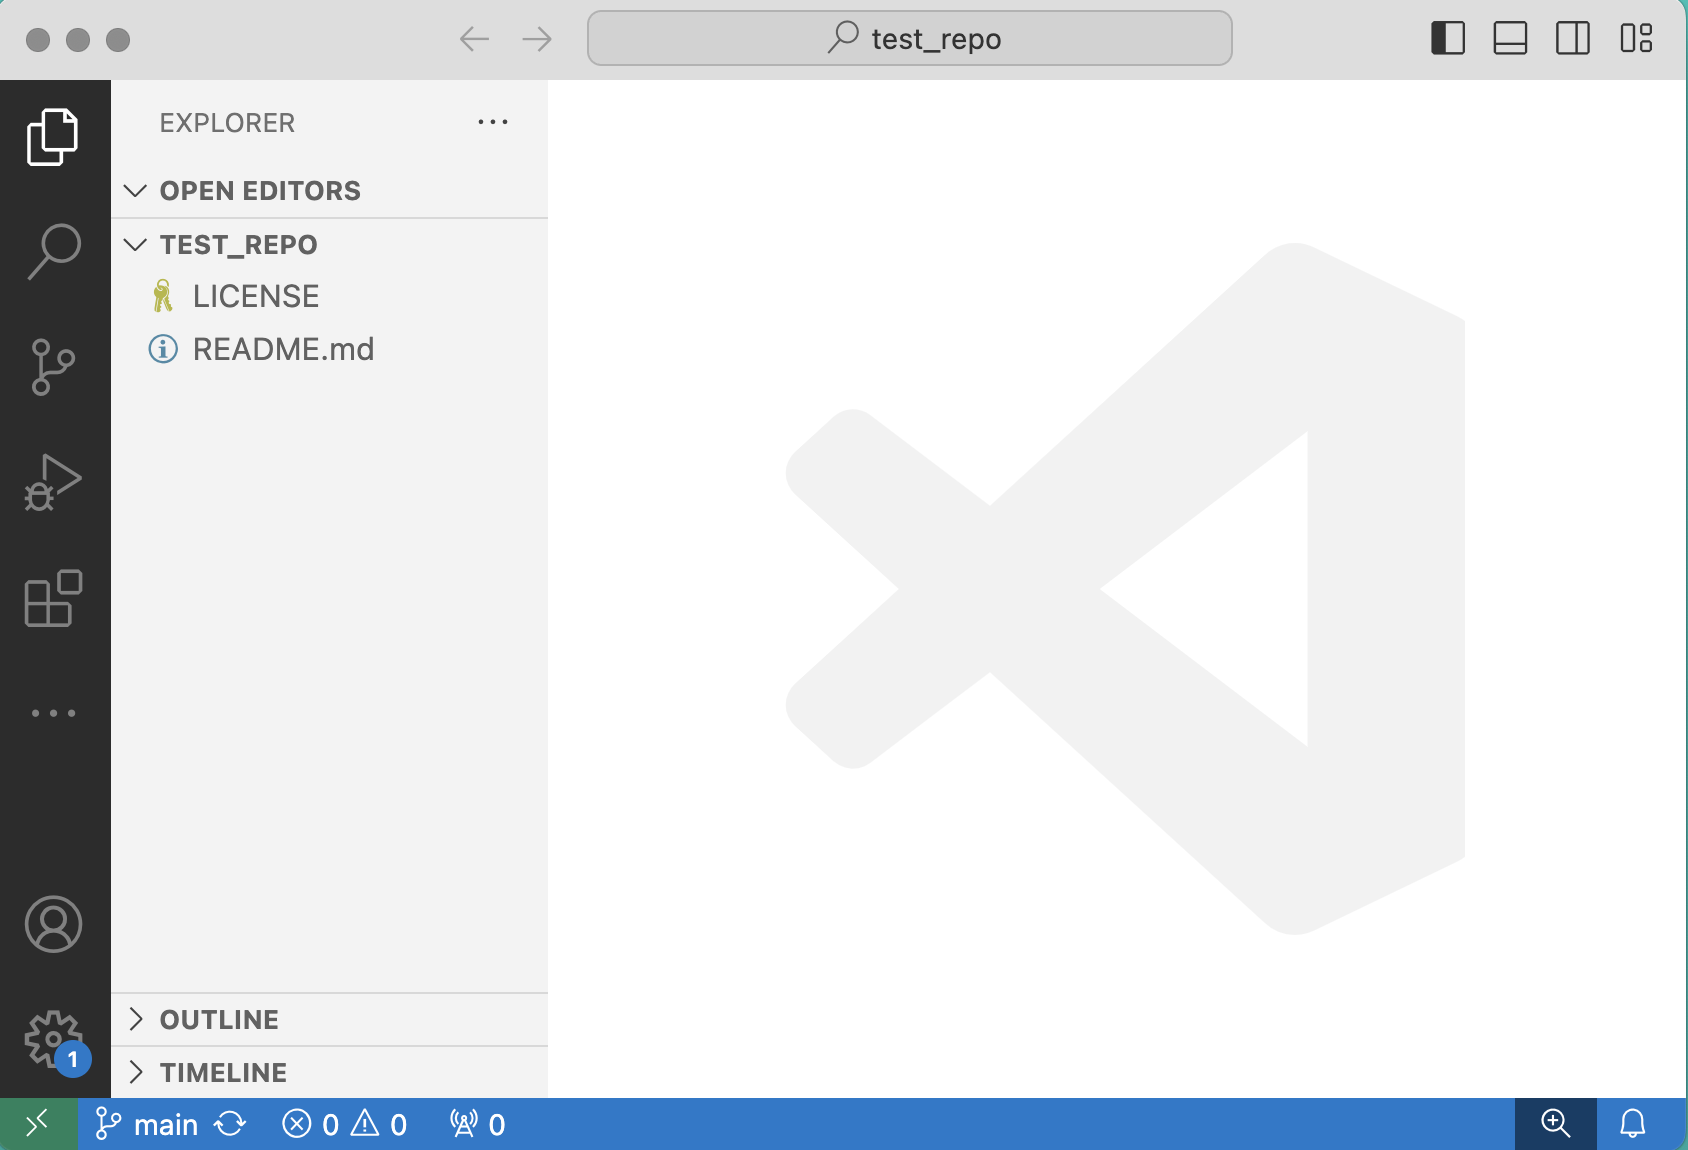
Fig. 7. Test project open in VSCode The structure is much simpler than the .NET MAUI project you are working on and there is no Solution Explorer. That is a feature added by the .NET Development Kit extension for .NET projects only.
-
Create a .gitignore file.
Create the file as shown in Fig. 8. First, click on the new file icon and then enter the file name and press ENTER. The new file will automatically open in the editor pane.
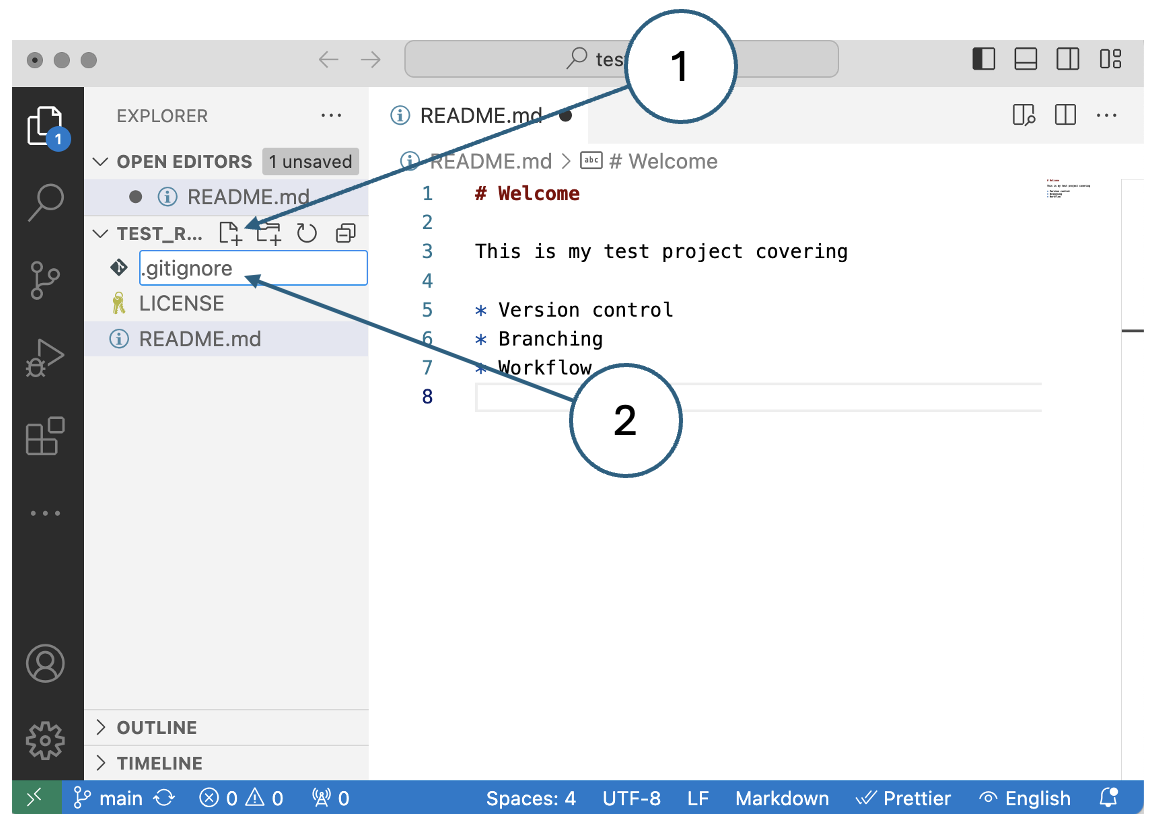
Fig. 8. Creating a file in VSCode -
Add content to the file.
Even though this is not a .NET MAUI project, we will take the opportunity to create a .gitignore file with content appropriate for .NET.
In the GitHub gitignore repo, click on the file core.gitignore to view its contents. This is what we need, but copying at this stage will include line numbers and a lot of other things we don’t want. Click the Raw button to get a view of just the file contents, copy that and paste it into your new .gitignore file.
-
Save the file
Add some more detail to the README file and save it.
You now have two changed files waiting to be committed as indicated by the annotation on the source control icon. Click that icon as shown in Fig. 9.
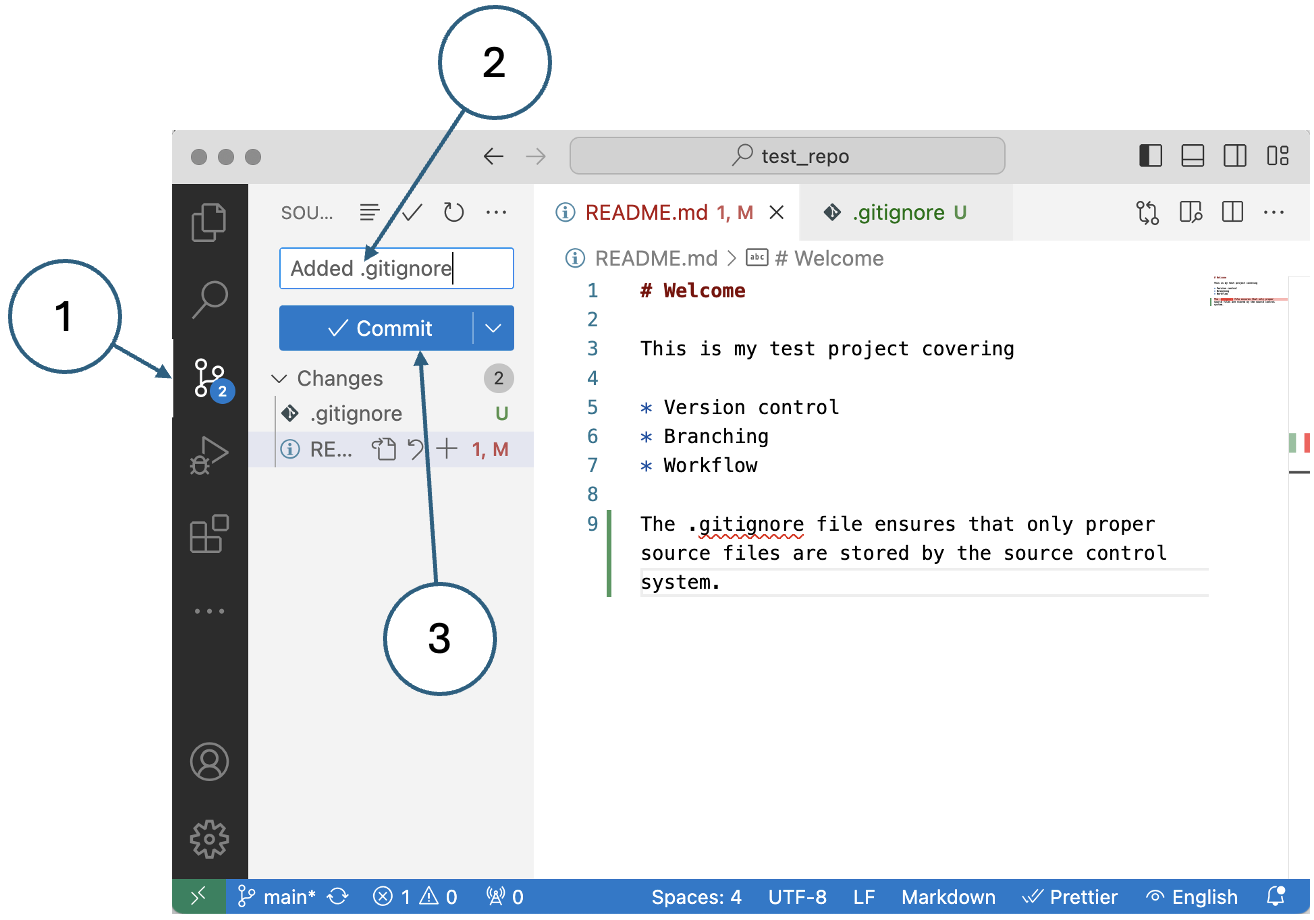
- Click source control icon
- Enter commit message
- Click Commit
Answer Yes when prompted to commit the changes directly.
Your changes are now committed to your local git repository. Because git is a distributed system, however, the remote repo on GitHub still needs to be synchronised with the local one. This is done through a Push operation as visualised in Fig. 10.
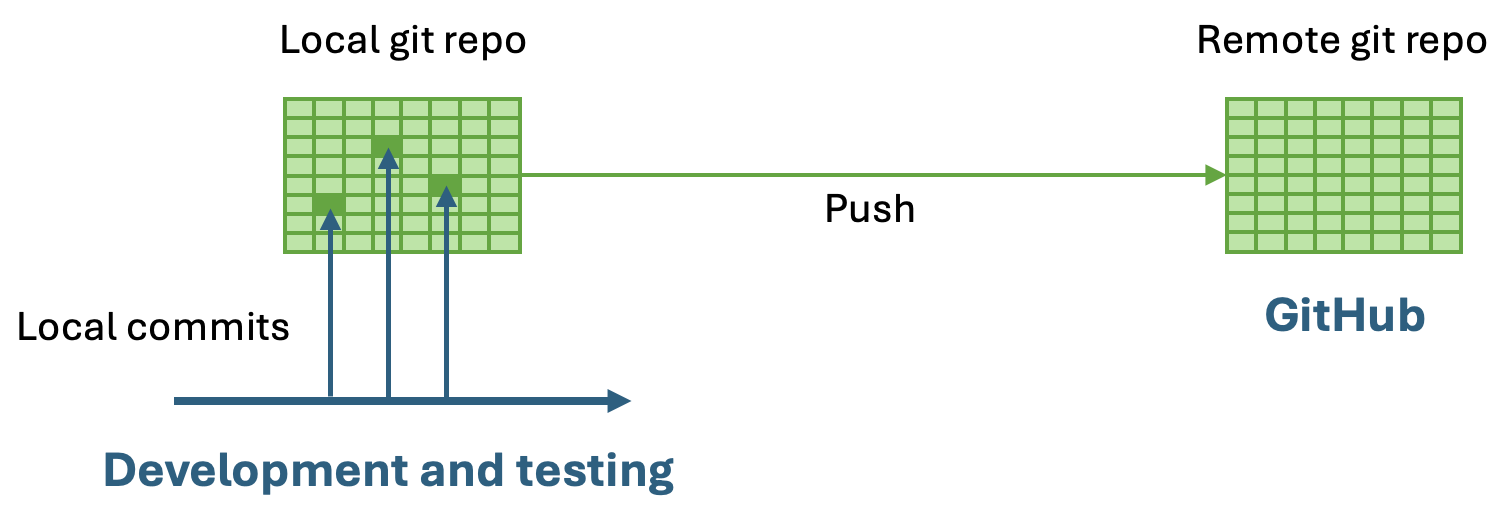
After committing locally, VSCode prompts you to push your changes by displaying a Sync Changes button. Click the button and answer OK when prompted to push to the main branch.
Note
You may need to go through the process of authenticating with GitHub. Follow any instructions that are displayed for generating a personal access token to allow VSCode to interact with the GitHub API.
All done! You can now view your changes on GitHub in your browser.
3 Working with branches
Use a branch to isolate development work without affecting other branches in the repository. Each repository has one default branch, and can have multiple other branches.
One of the main problems that can occur in a team of developers is one person overwriting the work of someone else. Git solves this problem by isolating one person’s changes on a separate branch. Different strategies can be used for integrating branches into a team workflow. In this tutorial, we will take a simple approach.
Create a new branch in GitHub
Branches can be created in many ways but they always fulfil the same function. Here, we will use the GitHub web interface.
-
On your repo’s main page, click the branch button as shown in Fig. 11. The button is labelled with the name of the current branch which in this case is main.
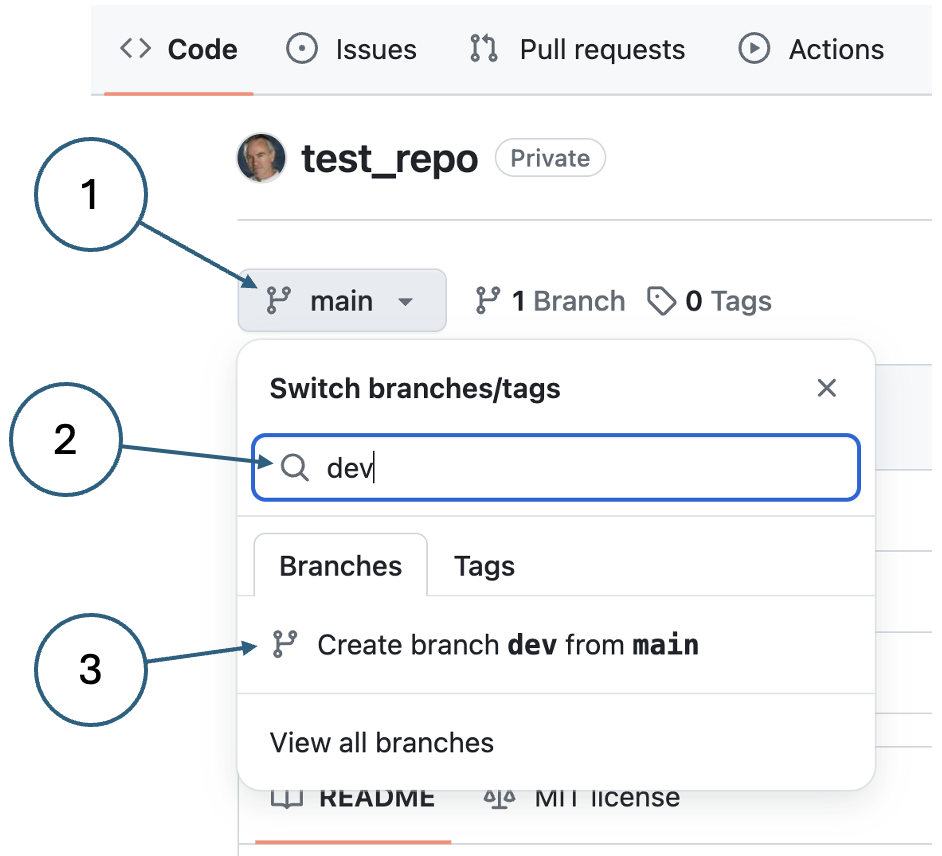
Fig. 11. Creating a branch in GitHub -
Next, enter the name of the new branch you want to create. Here, we are using dev. This may or may not be appropriate in a team situation - each team will have their own conventions for branch naming.
-
Finally, click as shown to create the new branch.
After creating the new branch it is automatically set as the default branch. This will allow you to see any file changes that have been committed and pushed to the dev branch. You can change back to viewing the main branch at any time. Currently, the two branches are identical.
Delete the branch
Sometimes, it can be convenient to abandon a change in progress. Using branches makes this easy: you simply delete the branch and any changes are history.
-
List the current branches by clicking the link next to the branch button which currently shows that there are two branches.
-
Next, click the dustbin icon on the row corresponding to the dev branch to delete it.
-
Navigate back to the repo main page and you will see that all references to the branch have gone.
Create a new branch in VSCode
When working on a project, you spend most of your time in your code editor or IDE. It is therefore convenient to perform all of the basic code control operations from within that tool.
-
In VSCode, display the command palette by clicking SHIFT+CTRL+P (Windows) or SHIFT+CMD+P (Mac). Enter branch into the filter field as shown in Fig. 12 and select the Git: Create Branch… option.
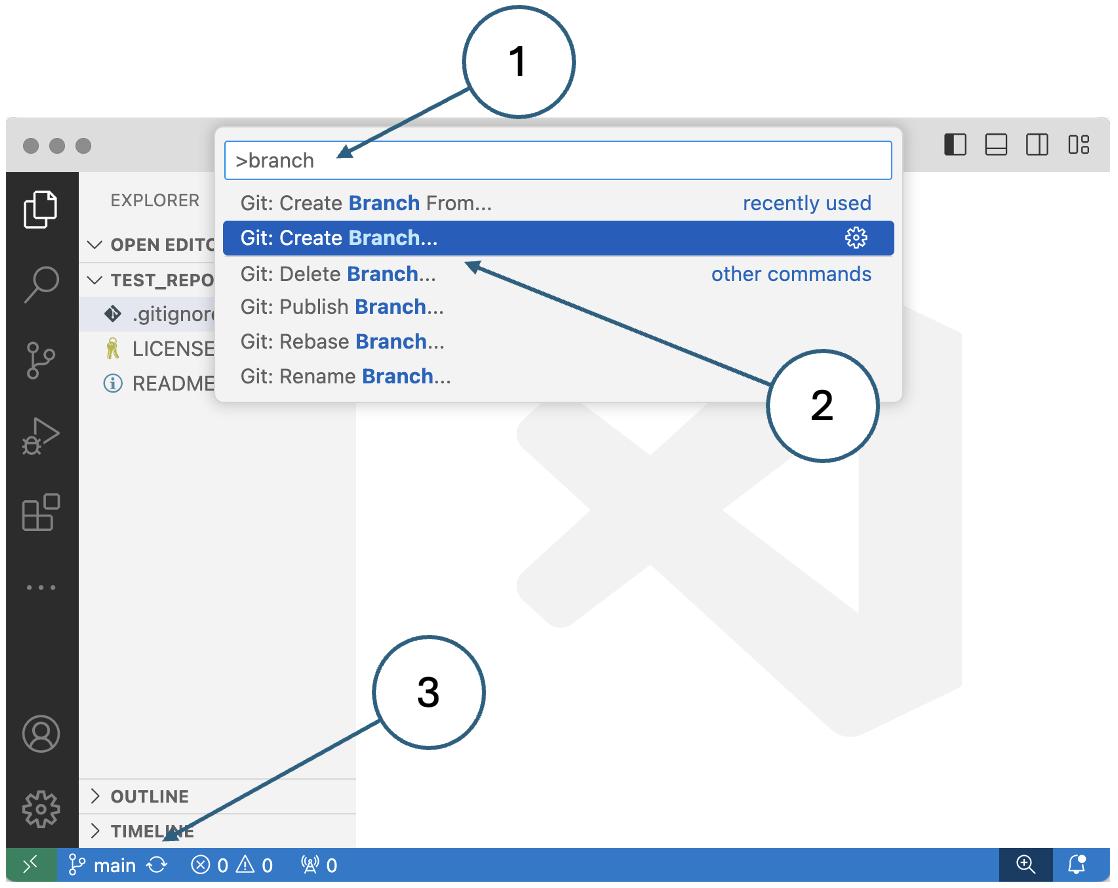
Fig. 12. Creating a new branch in VSCode -
Enter dev as the name of the new branch when prompted and press ENTER. This will create the new branch and set it as your current default just like in GitHub.
You can change back to the main branch using the link in the bottom left-hand corner of the VSCode display labelled (3) in Fig. 12. As you will see if you click it, this link also provides an alternative way to create a new branch.
Commit on the dev branch
Currently the dev branch only exists in your local repo - it has not been duplicated on GitHub yet. The simplest way to create the branch on GitHub is to introduce a change to the codebase and push it to the remote repo. As an example, we will add an image subdirectory to our project.
-
Create a directory called images by clicking the New folder icon in VSCode.
-
Place an image file into the new directory
You can do this either by dragging and dropping an image file from your computer’s file browser into the directory in VSCode, or by copying the file into the directory entirely within the file browser. The background change will be automatically picked up by VSCode.
The relationship between the two branches is visualised in Fig. 13.
---
title: Two code branches
---
gitGraph
    commit id: " "
    commit id: "initial"
    branch dev
    checkout dev
    commit id: "change 1"
    checkout main
    commit id: " "
Fig. 13. Two code branches
-
Commit the change to the dev branch in VSCode.
This time, instead of a simple prompt to synchronise with the remote repo, VSCode offers the action to Publish branch. Click the button and then go to GitHub in your browser to see the new branch with its changes.
-
Merge the changes
In GitHub, you should see an alert like the one in Fig. 14. Click the green Compare & pull request button.
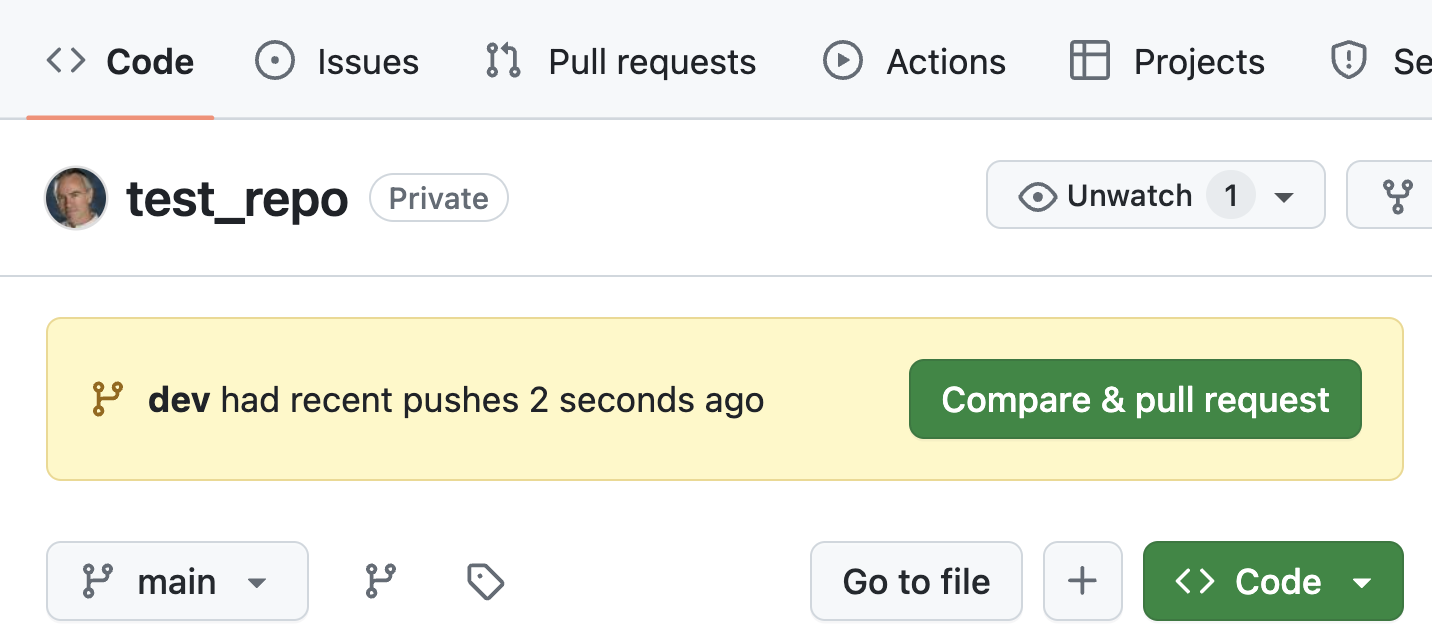
Fig. 14. GitHub detecting a pushed branch The next page shows that the dev branch can be merged with the main branch because it has no merge conflicts. We will investigate those in the next stage. For the time being, click the green button at the foot of the page labelled Create pull request. A pull request (PR) is exactly what it says: a request from the developer to have their changes pulled into a different branch. This effectively merges the branches as visualised in Fig. 15.
---
title: Merging two code branches
---
gitGraph
   commit id: " "
   commit id: "initial"
   commit id: "checkou"
   branch dev
   checkout dev
   commit id: "change"
   checkout main
   merge dev id: "merge"
   commit id: " "
Fig. 15. Merging two code branches
On the next page, click the green Merge pull request button, and then click the green Confirm merge button on the subsequent page.
-
Finally, you see a confirmation message with the option to delete the merged branch as shown in Fig. 16.

Fig. 16. Merge confirmation Whether or not to delete the branch depends on the branching strategy your team is using. It is possible that the branch will be re-used for another change in which case it should not be deleted. In an alternative approach, a separate branch might be created for each change. In that case, this branch will no longer be needed and it can be deleted. This is the option we will choose in this tutorial, so go ahead and delete the branch.
Synchronise the local repository
If you have been paying close attention, you will realise that the merge has only occurred on the remote repo but not in your local copy. Follow the steps below to bring your local repo up to date.
-
Click the code control icon in VSCode as shown in Fig. 17 and then change to the main branch.
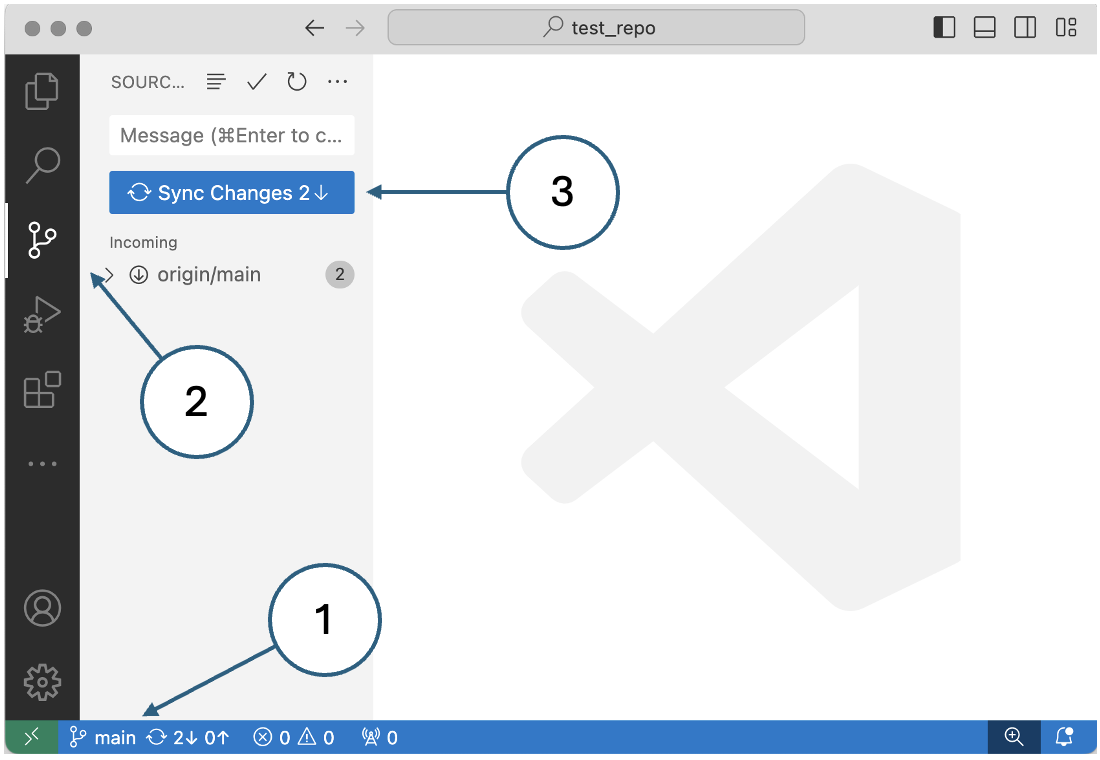
Fig. 17. Synchronising the local repository Click the blue Sync Changes button and answer Yes when prompted to confirm. Your main and dev branches are now identical and contain the merged changes. You can check this by changing from one branch to the other and making sure that both branches contain the new images subdirectory.
-
Delete the local branch
The file changes resulting from the merge have been synchronised, but the dev branch still exists locally. This provides you with some options. For example, if the team branching strategy is that each developer will re-use their own branch and the developer’s name is used as the branch name, the local branch might be used for the next change as well. When that change is pushed, the developer’s branch will be re-created on the remote repo showing that the developer has changes waiting to be merged. This approach could have some drawbacks, however, and in this tutorial we will delete the local branch to match the remote.
Make sure that your current branch is main by clicking the branch selection link in VSCode as shown in Fig. 18. You are not allowed to delete the current branch. Then invoke the command palette and find the Git: Delete Branch… option as shown and use it to delete the dev branch.
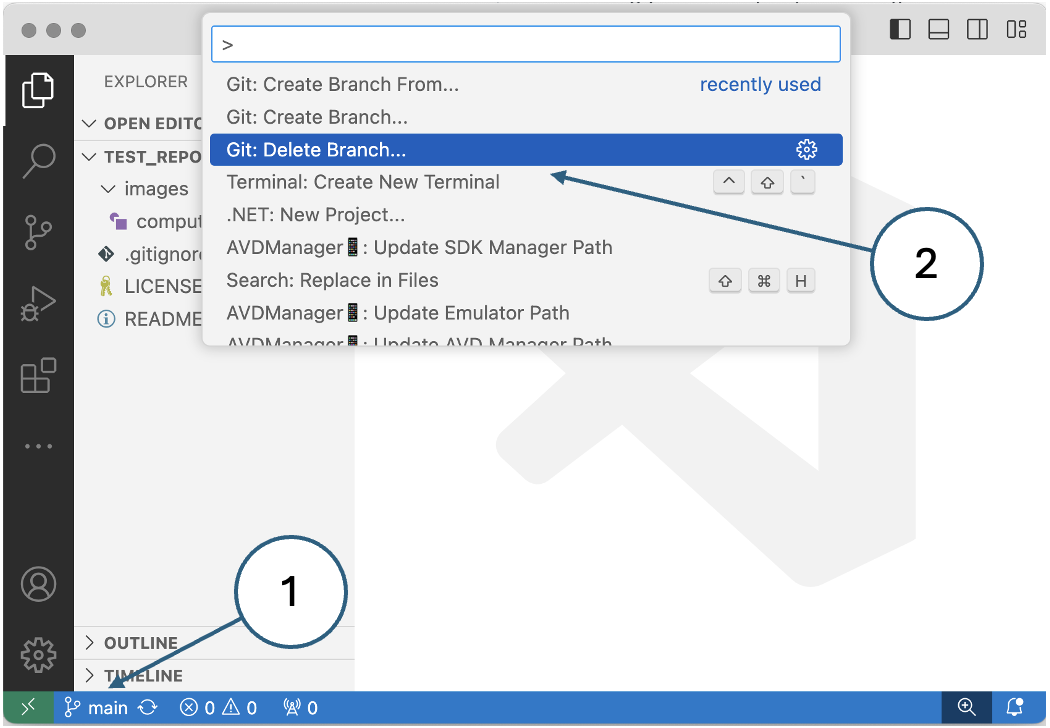
Fig. 18. Deleting a local branch in VSCode
4 Handling merge conflicts
In simple cases such as creating a new file or when only one person is making changes to a repo, GitHub is able to merge branches automatically. We demonstrated this in the previous section. In a team situation, however, it is perfectly possible for two developers to make changes to the same file. If they are changing different parts of the file, an automatic merge may still be possible. If they are changing the same lines in the file things are more complicated. The system cannot resolve the changes automatically and that gives rise to a merge conflict that requires human intervention.
The examples below set up a merge conflict and take you through the process of resolving it via GitHub and locally in VSCode.
Resolving a merge conflict in GitHub
-
Create a new file to work with.
In GitHub, create the file hello.cs and paste in the following content:
using System;
namespace HelloWorld { class Program { static void Main(string[] args) { Console.WriteLine(“Hello World!”);
} } }Enter an appropriate message and commit the change.
-
Sync the changes in VSCode
Either click the code control icon and then click on the blue Sync Changes button, or invoke the command palette and select the Git: Sync command. Synchronising your local repo will pull the new file from the remote.
-
Create two development branches
Each branch will simulate a different developer. You can either use the branch selection link in the bottom left-hand corner of the VSCode window, or you can invoke the command palette and select the Git: Create Branch… command. Name one branch dev1 and the other dev2.
-
Make the first change
With the dev1 branch active, edit the file hello.cs and change the word World to Galaxy. Save the file and then click the code control icon as shown in Fig. 19.
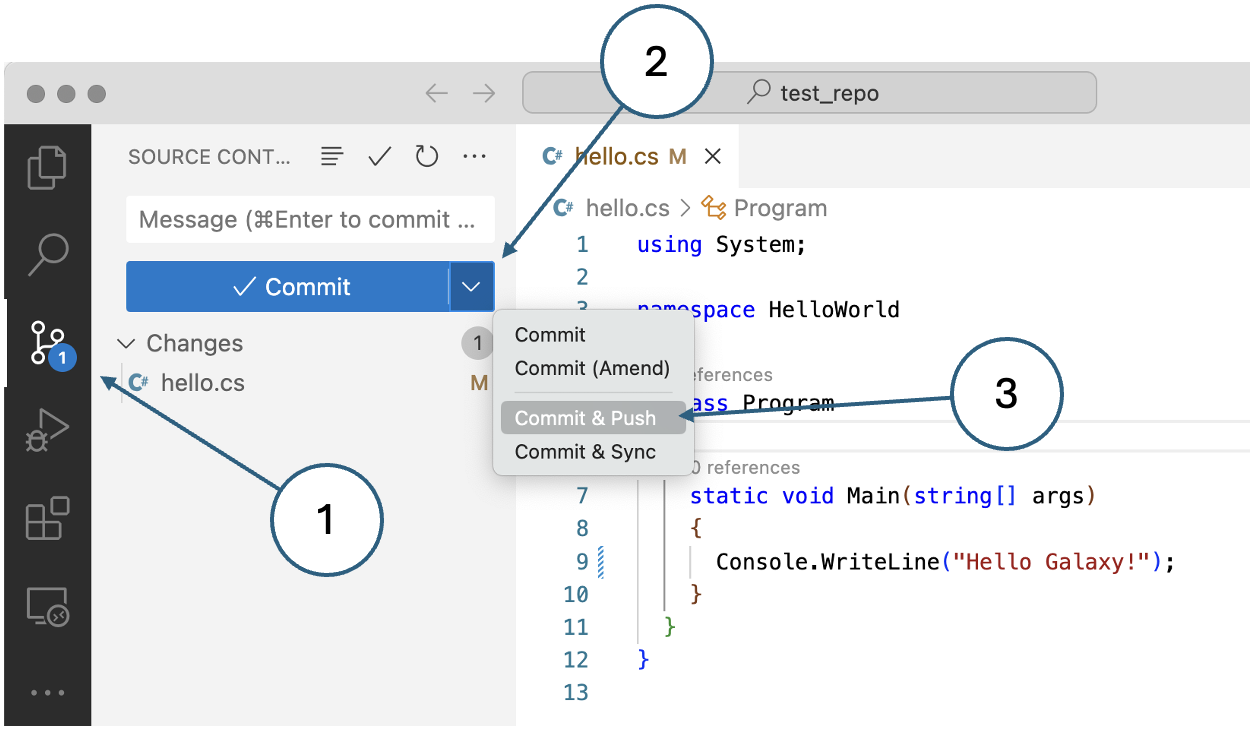
Fig. 19. Committing and pushing in a single operation Select the combined commit and push operation as shown. If you did not specify a commit message, you will be prompted to enter one in the main file editor pane. The cursor is automatically on the first line - just enter an appropriate message, save and close the file.
-
Make the second change
Activate the dev2 branch. If you still have hello.cs open in the editor, you should see the content change back to saying
Hello World!rather thanHello Galaxy!. You are now viewing the copy of the file contained by the dev2 branch which has not yet been modified.Change the word World to Universe. Save the file and commit the change as before making sure to push the change to the remote.
-
Merge the first change in GitHub
Go to GitHub. You should see two alerts, one for each of the changes you have made as shown in Fig. 20.

Fig. 20. Two alerts in GitHub Click the green Compare & pull request button in the alert for dev1. You should be able to follow the merge process through as before because the dev1 branch has no conflicts with main.
Delete the branch as you did previously and go back to the repo main page by clicking the Code link in the top left-hand corner of the GitHub window.
-
Attempt to merge the second change
Use the green Compare & pull request button to launch the merge process for the dev2 change. You will see a red warning message saying that the branch cannot be automatically merged. However, you can still create the PR, so go ahead and click the green button at the foot of the page.
This time, you will see a warning that the branch cannot be merged automatically as shown in Fig. 21. Click the button labelled Resolve conflicts.

Fig. 21. Merge conflict warning in VSCode -
Resolve the conflict
The next page presents you with a file editor showing the file containing the conflict:
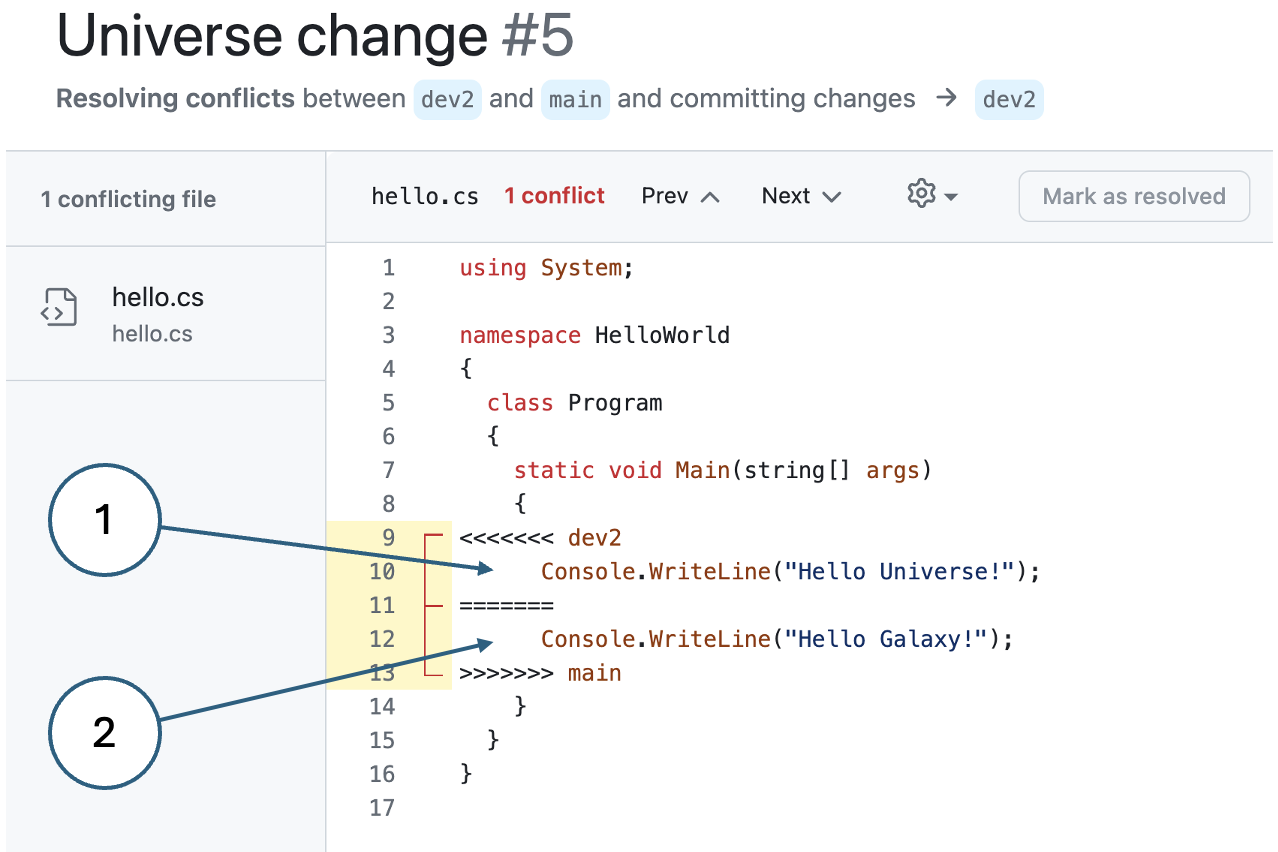
Fig. 22. Editing a merge conflict - Incoming change from the dev2 branch
- Existing line in the main branch (previously merged from dev1)
To resolve the conflict, you need to decide which version of the line you want to keep and remove the other one. Obviously, you also remove the delimiting lines 9, 11 and 13 leaving a correctly formatted C# file.
Keep the incoming change (
Hello Universe!) and then click Mark as resolved and commit the change when prompted. You will then be returned to the merge page where you can complete the merge operation.Delete the branch and return to the repo’s main page where you will see that the main branch is the only one remaining.
Resolving a merge conflict in VSCode
Here, we will repeat the process with the same example merge conflict but we will use the integration features of VSCode to perform the merges. There are a few things to do to set up the exercise before you start:
-
Activate your main branch and synchronise it with the changes in the remote. To do this, click the code control icon and then click the blue Sync Changes button.
-
Delete the dev1 and dev2 branches from the local repository.
This allows you to start from a clean slate. It is more complicated trying to re-use the existing branches since they no longer exist on the remote.
-
Install the GitHub pull request extension
PR functionality is not part of the core code control support in VSCode. Using the extensions pane, find and install the one you need as shown in Fig. 23.
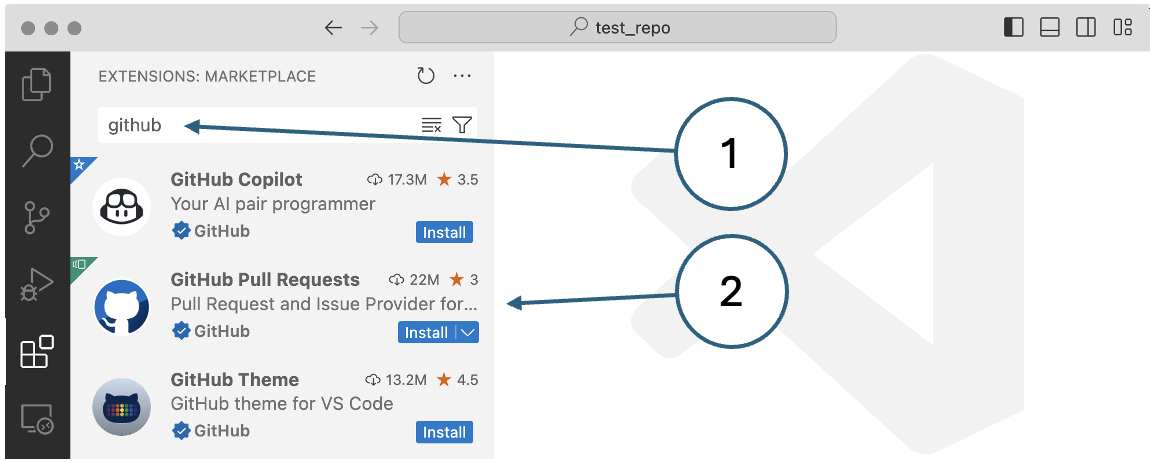
Fig. 23. Installing the GitHub Pull Requests extension You can see the new features provided by the extension by activating the code control panel as shown in Fig. 24:
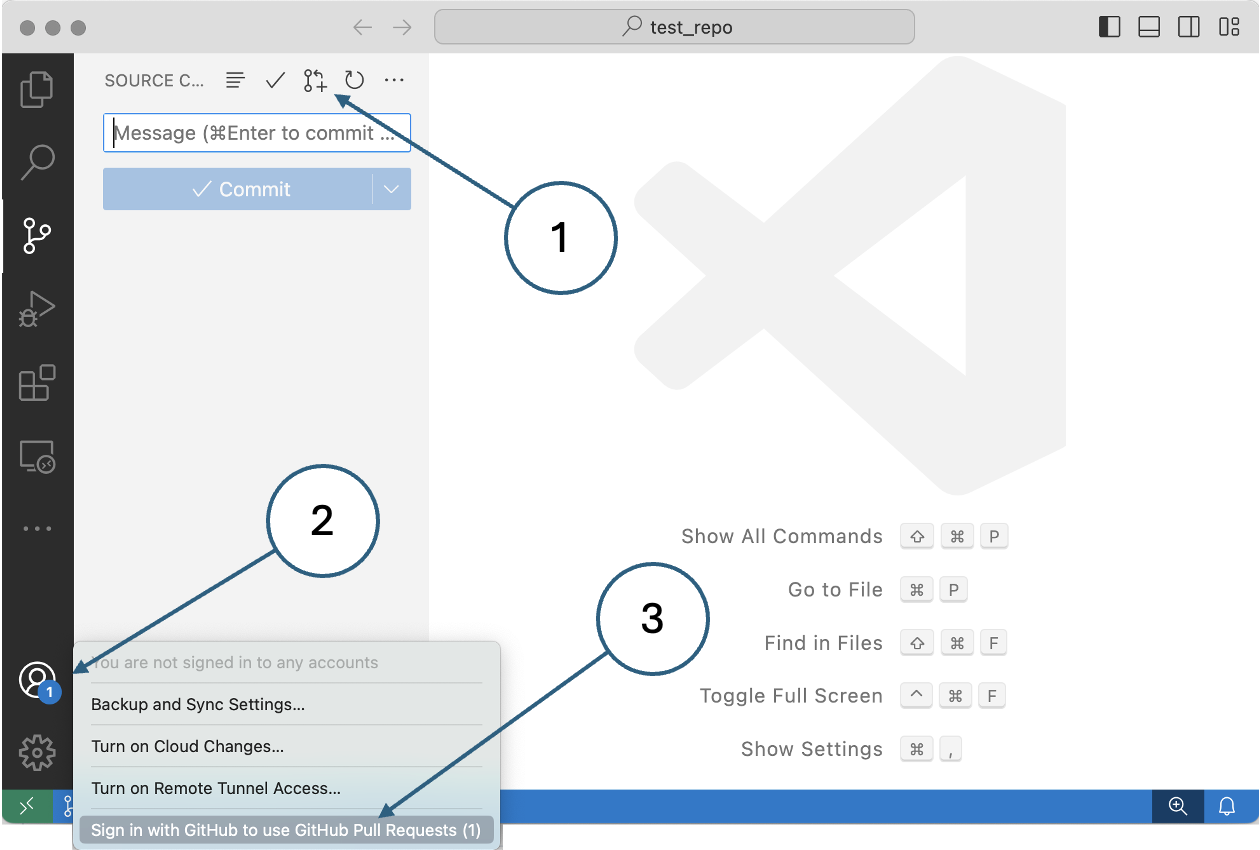
Fig. 24. The GitHub Pull Requests extension - The pull request icon
- Account notification
- Link to sign in to GitHub
Sign into GitHub as prompted.
The scene is now set for merging the changes through the VSCode interface without needing to go to GitHub. This is often a more convenient way of working because it means that you do not have to leave your code editor.
Follow the steps below to see how the pull requests extension works.
-
Make the first change
Activate dev1 and modify the file. Save it and activate the code control pane.
As before, select the Commit & Push option.
After the push has been completed, the new extension offers the opportunity to create a pull request:

Fig. 25. Prompt to create a pull request Click the blue Create Pull Request… button. If the alert times out before you have a chance to click it, use the pull request button shown in Fig. 24.
-
Create the pull request
Just as last time, the first change has no conflicts with the main branch and you can therefore just click once to create the PR as shown in Fig. 26 and then click to create the merge commit on the next dialog. Note that this is the end of the process - the subsequent view of the PR extension shows this in the confirmation message labelled (3) in Fig. 26. The other controls such as Create New Pull Request… are there for you to start a new operation. You can, however, go ahead and delete the dev1 branch on both the local and remote repos by clicking the Delete Banch… button labelled (4) in the figure.
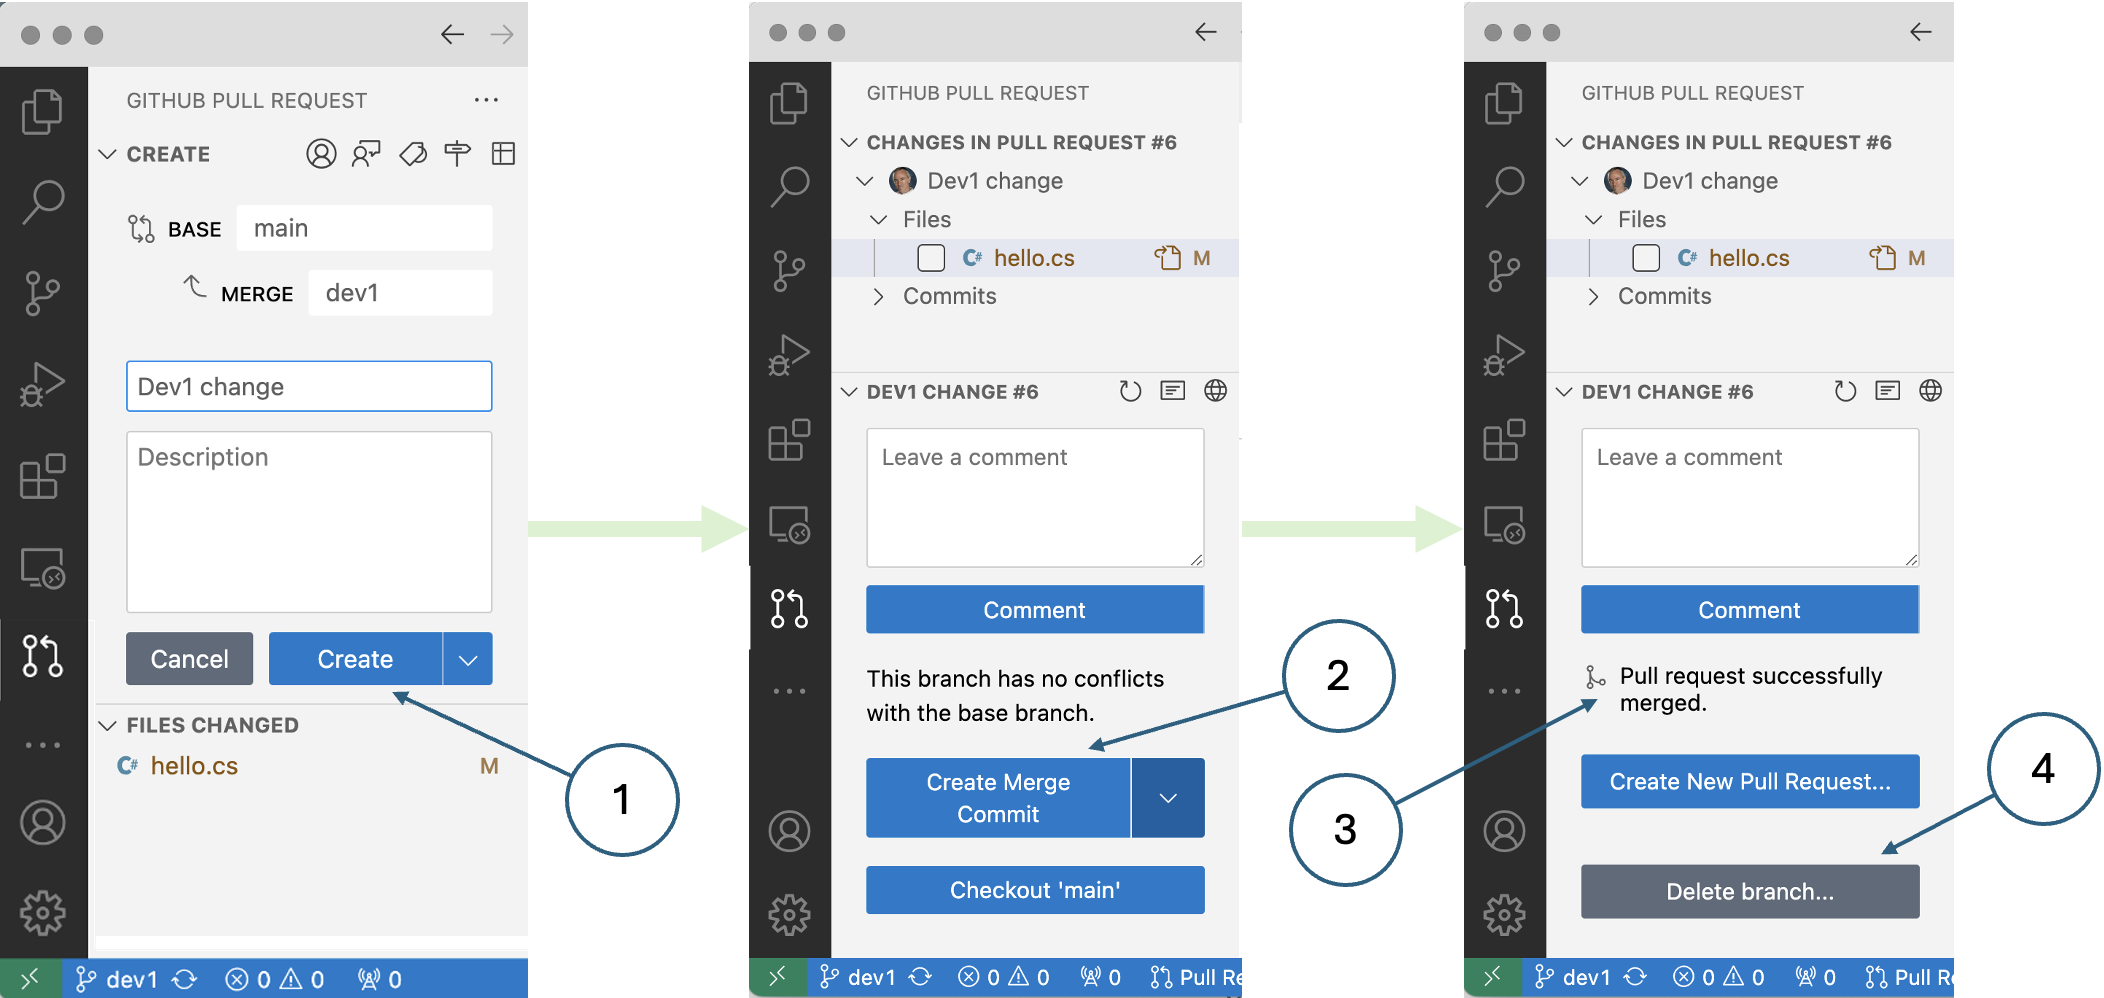
Fig. 26. Creating a pull request in VSCode -
Activate your main branch and synchronise the changes from the remote.
-
Make the second change
Activate the dev2 branch and modify hello.cs. Save the file, commit the change and push it to the remote as before. Create the pull request when prompted. After creating the PR, VSCode will warn you about the merge conflict as shown in Fig. 27.
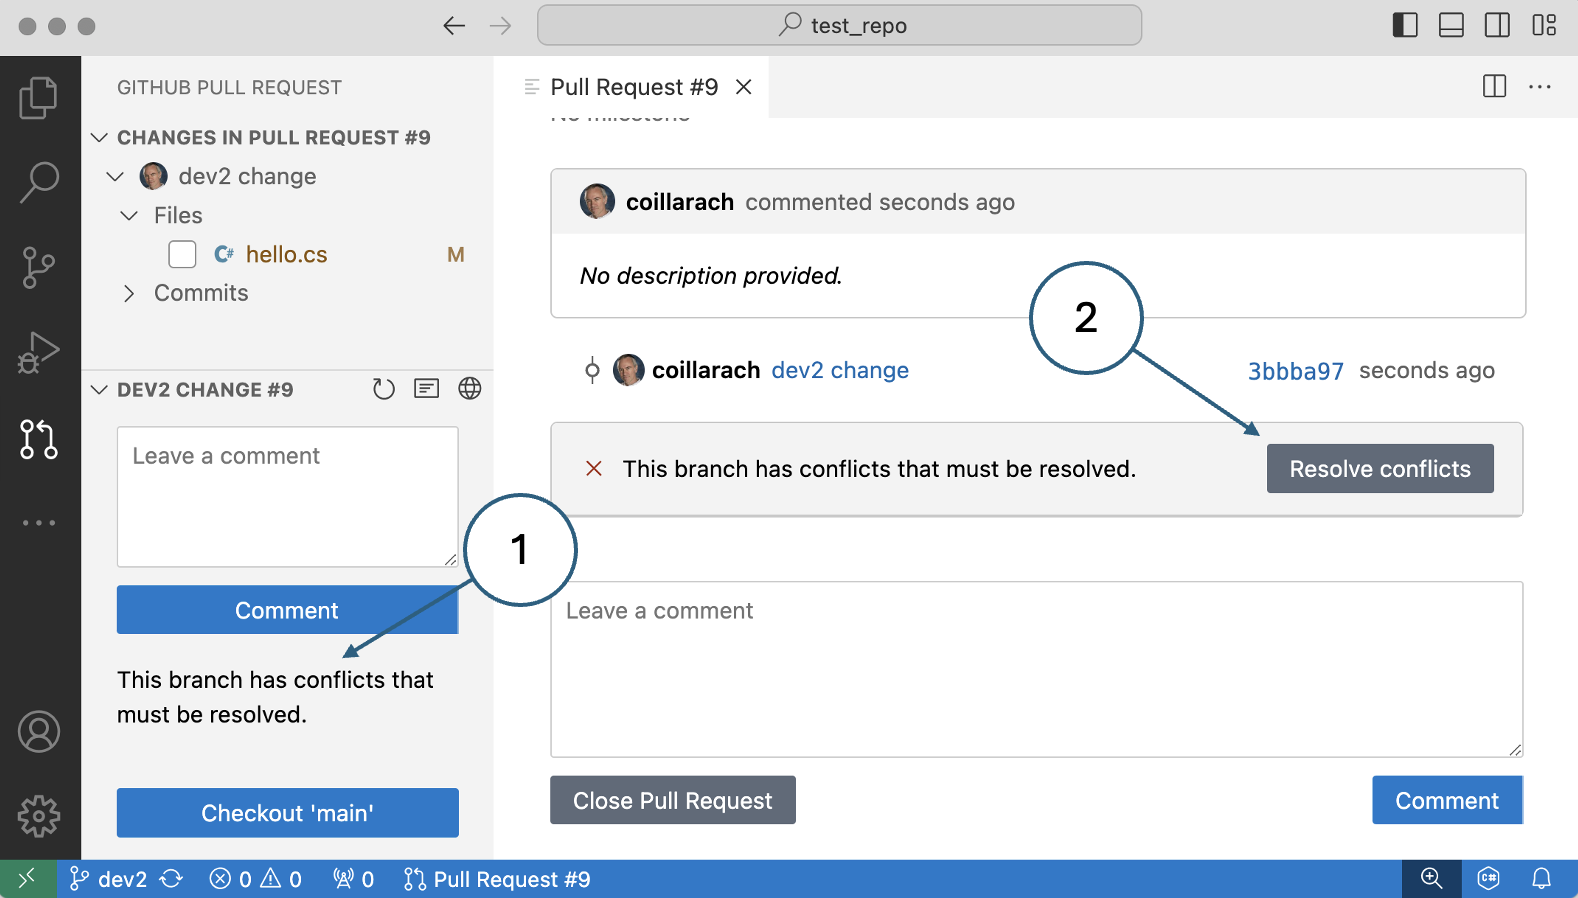
Fig. 27. Merge conflict notification in VSCode Note
You may need to close the lower pane on the right-hand side of this view and scroll down to see the Resolve conflicts button.
-
Resolve the conflict
Click on the Resolve conflicts button to enter a file editor like the one shown in Fig. 28.
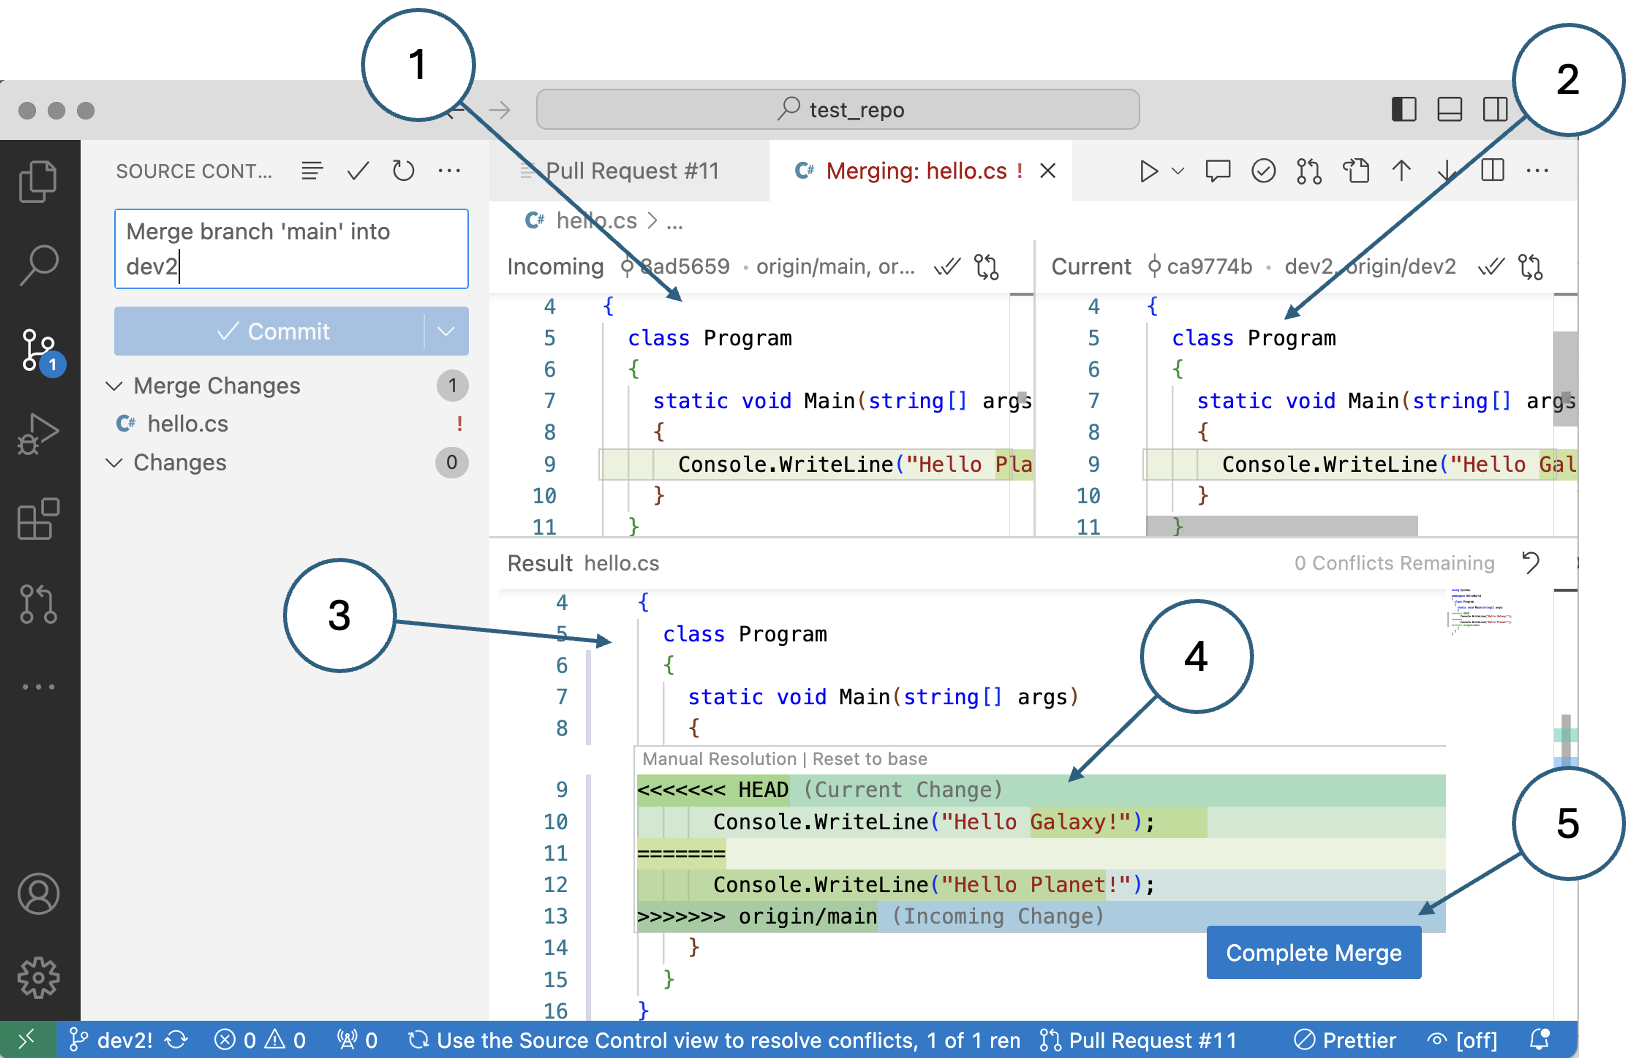
Fig. 28. The conflict resolution view in VSCode - Content of the file containing the incoming change (dev2)
- Content of the existing version of the file in main
- Conflict resolution editor
- Conflicting lines using the same conventions as in GitHub
- Button to complete the merge once the conflict is resolved
Note
If an information message like this one obscures the editor pane, don’t click Cancel. Instead minimise the message using the icon in its top right-hand corner.

Modify the code as required and click the Complete Merge button. You can then commit the resolution change and complete the merge operation as before.
5 Workflow
In this section, we will go through the two main levels of control - the project level which involves the whole development team, and the issue level which affects only one developer (two if you include the code reviewer).
Project process
In an agile project, user stories are added to a project backlog as illustrated in Fig. 29. Throughout the project, developers take items from the backlog for implementation. The figure shows a stylised Kanban board being used to track an item’s progress from the backlog and through development to completion. The figure does not include the end of the project because this may be defined differently - one project might be time-limited and must stop when the time runs out regardless of whether there are still items in the backlog. Other projects might be scope-driven where the project ends when the backlog is cleared.

Follow the steps below to set up a project based on your test repo.
-
Create a project
With your test repo open in GitHub, click the Project link in the horizontal menu as shown in Fig. 30. Then click the drop-down options on the green button and select New project

Fig. 30. Creating a new project in GitHub After clicking the button, you are offered a choice from several different templates. We are going to choose the Team plannning template which has the simple three-column layout shown in Fig. 31.

Fig. 31. New project layout Click on the placeholder title of the project as shown in Fig. 31. to edit the project details.
-
Configure the project details
GitHub projects are very flexible and there are many ways to customise your project for a particular purpose. For the purposes of this tutorial, we only need to change the title to something meaningful and add a description and README. Enter some appropriate content into those three fields.
You should also take the opportunity to look at some of the other options available, especially the Manage access section where you can invite other people to collaborate on the project with you. You will need to use this options in your coursework.
When you are finished, click the Save changes button and return to the project’s main page.
-
Add an item to the project backlog
Each backlog item corresponds to an issue in the repository. You can add a new item/issue from the project view by clicking the Add item link at the foot of the Todo column as shown in Fig. 32.
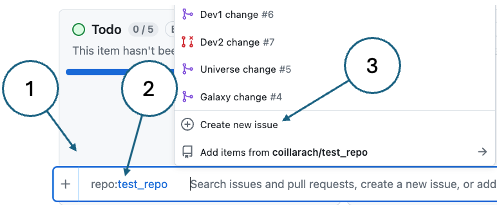
Fig. 32. Adding a backlog item - Click Add item
- Type a # character and select the name of your test repo from the list that appears
- Click on Create new issue
-
Add the item/issue details
Enter the details shown in Fig. 33. Then scroll down to the bottom of the dialog as shown in Fig. 34 and click the Assignees button to assign the issue to yourself. Click Create when you have finished.
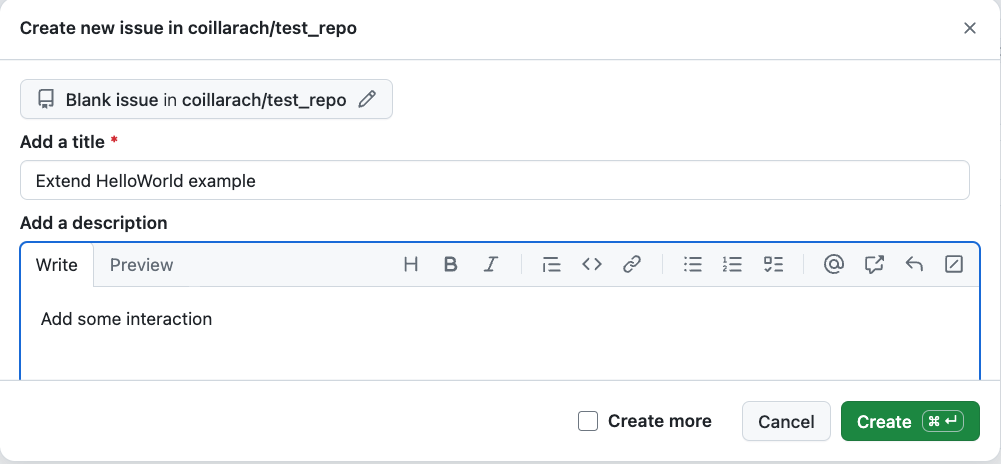
Fig. 33. Adding the item/issue details 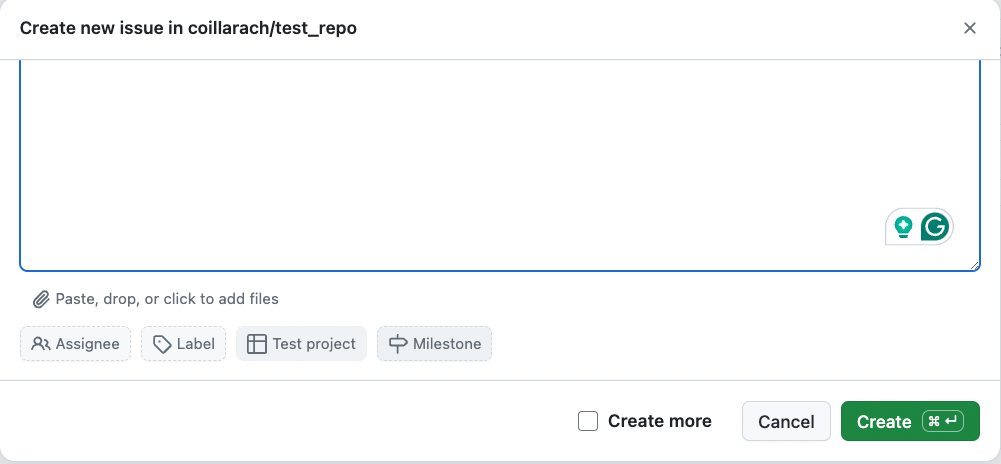
Fig. 34. Assigning the issue
After creation, the item is displayed in the Todo column. The next section picks up the story of what happens next. During the rest of the project, items are added to the Todo column and the goal is to migrate them across the board to the Done column.
Issue process: GitHub Flow
The term workflow is used in two different ways in the GitHub documentation. The GitHub actions section uses it to describe the way certain process can be automated. Here, we are using it in the simpler way to mean the branching strategy a developer uses when handling an issue.
There are various standard branching strategies and you can find comparisons on the internet. Here, we are going to be using a relatively simple one called GitHub Flow whose main steps are:
- Create a branch
- Make code changes
- Create a pull request
- Address review comments
- Merge your pull request
- Delete your branch
The steps below extend the basic GitHub Flow by including some additional actions that the developer might be required to carry out.
-
Drag the item card from the Todo column into the In Progress column.
This shows other people on the team that you have started work on the item/issue. It is important for team communications that you do not do this in advance, and that you add detail to the item as agreed in your team workflow.
-
Elaborate the issue
Elaboration is about developing the detail of the task in hand to get a better understanding of the requirements. At the moment, the issue description is quite vague.
Click the item/issue title to open a details dialog. There are two ways that you could add more detail here. One is to edit the item description and replace “Add some interaction” with a more detailed specification. The other is to leave the original description and add a comment with the additional detail. Which one you choose should be dictated by your team’s agreed workflow. Here, we will use the comment option. Add a comment as shown in Fig. 35

Fig. 35. Detailed requirements in a comment Bear in mind that this is a very simple example. In a more realistic situation, you would spend time investigating the requirements and potentially produce some documentation such as UML diagrams. Comments are written in markdown which allows you to add images and links to external documents. If you are using a tools such as StarUML, you diagrams may exist as separate documents or image files. The goal when documenting an issue is to make sure that all the relevant information is available to anyone looking at it. Exactly how to link in UML diagrams should be agree in you team’s workflow.
Another interesting option for adding diagrams to markdown is to use mermaid markup. If you use that option, you should consider whether you will need the generated diagrams in any other formats such as image files of PDF documents and plan accordingly.
-
Start work on the item in VSCode
Although you could use the GitHub web interface to create a new code branch for your issue, it can be more convenient to do this from your editor. In VSCode, activate the GitHub extension as shown in Fig. 36 and notice that the issue you just created appears in the list. That is because it is assigned to you. Click the arrow icon next to the new issue to create a new branch and start work on the issue. The new branch is automatically activated as shown at the bottom of the window in Fig. 36.
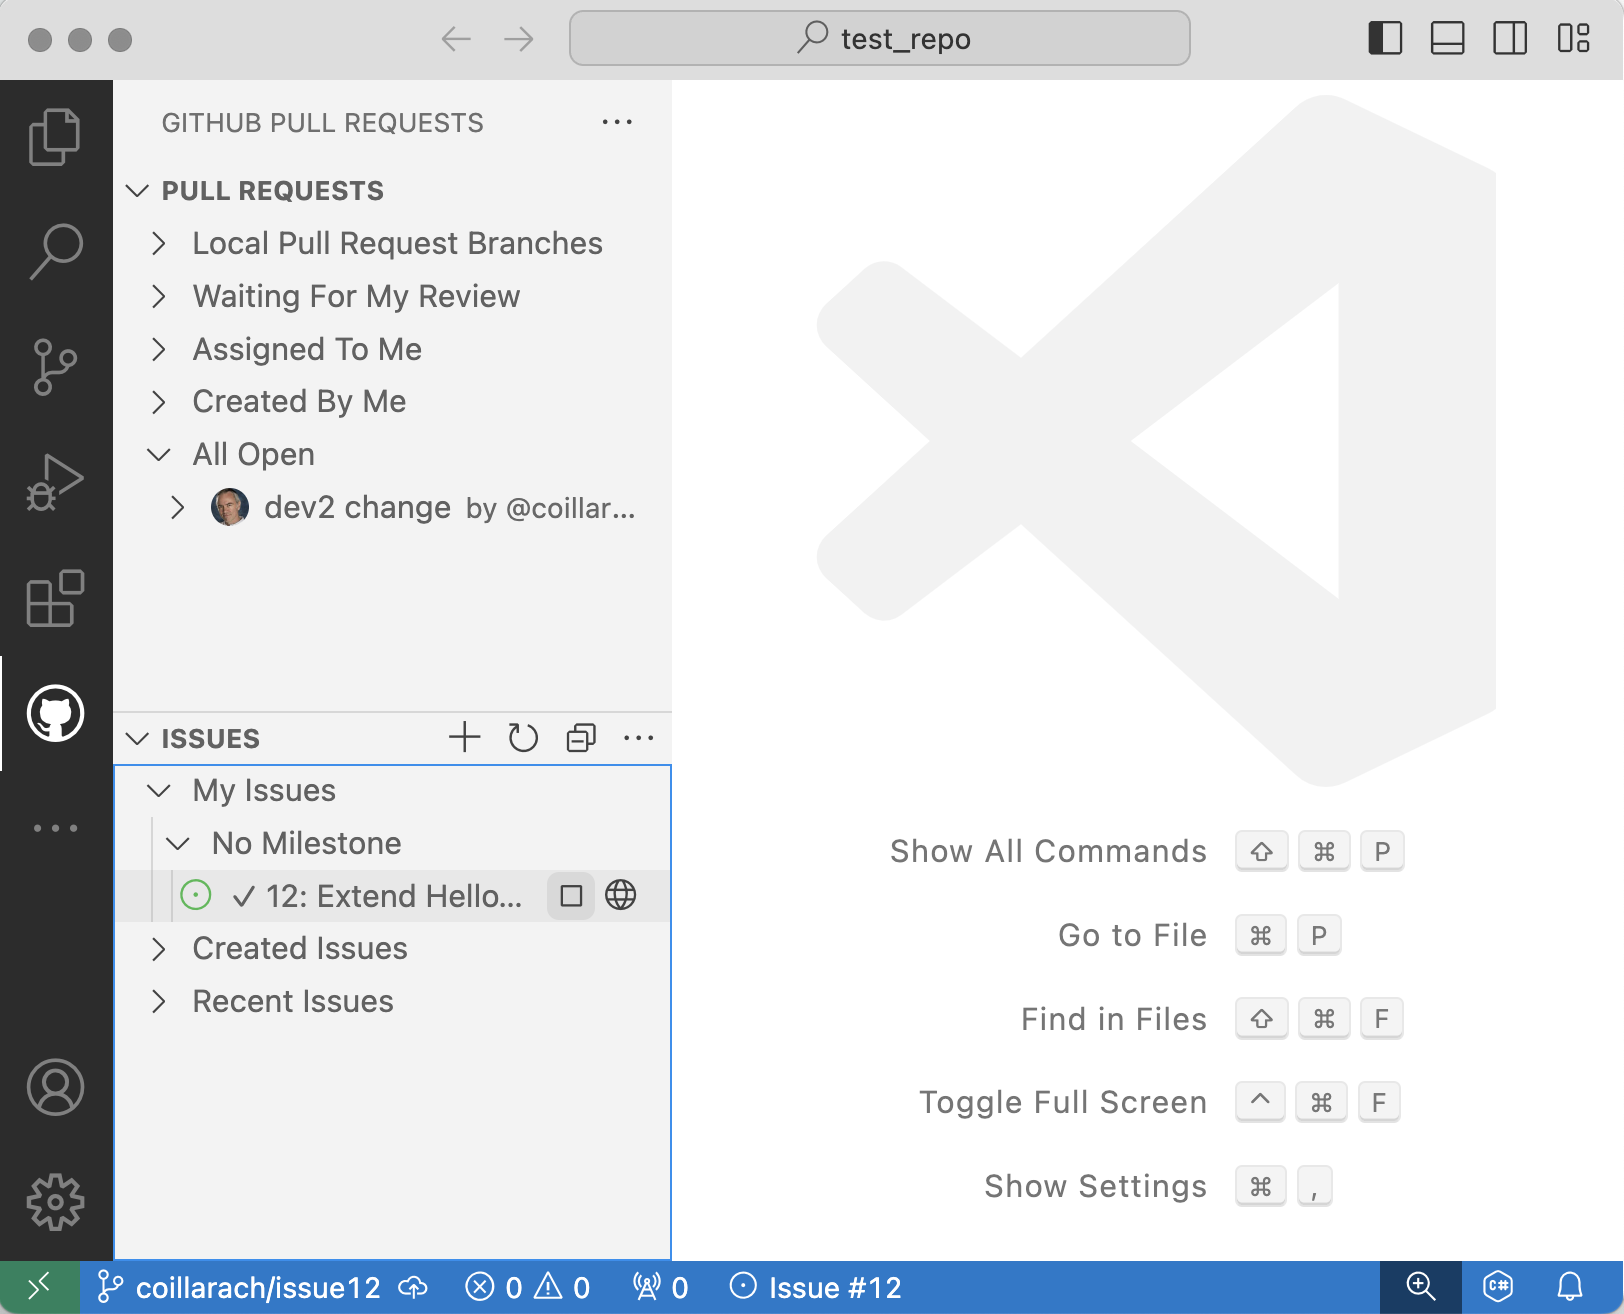
Fig. 36. Starting work on an issue in VSCode The name of the new branch is automatically generated and includes you GitHub username and the number of the issue.
-
Make your code changes.
Replace the content of hello.cs with the following code.
using System;
namespace HelloWorld { class Program { static void Main() { // Original greeting Console.WriteLine(“Hello, World!”);
1
2
3
4
5
6
7
8
9
  // Asking for the user's name
  Console.Write("What is your name? ");

  // Reading user input
  string userName = Console.ReadLine();

  // Personalized greeting
  Console.WriteLine($"Hello, {userName}!");
}   } }
With a more complex issue than this example, you would also create unit tests for your code at this stage.
-
Save the file and commit the change. Notice that the commit message is also generated automatically. Rather than selecting Commit & Push, this time select Commit & Create Pull Request instead as shown in Fig. 37.
Warning
Once the new pull request appears in the main VSCode pane stop!
Do not merge your branch yet - this is only done after a code review.
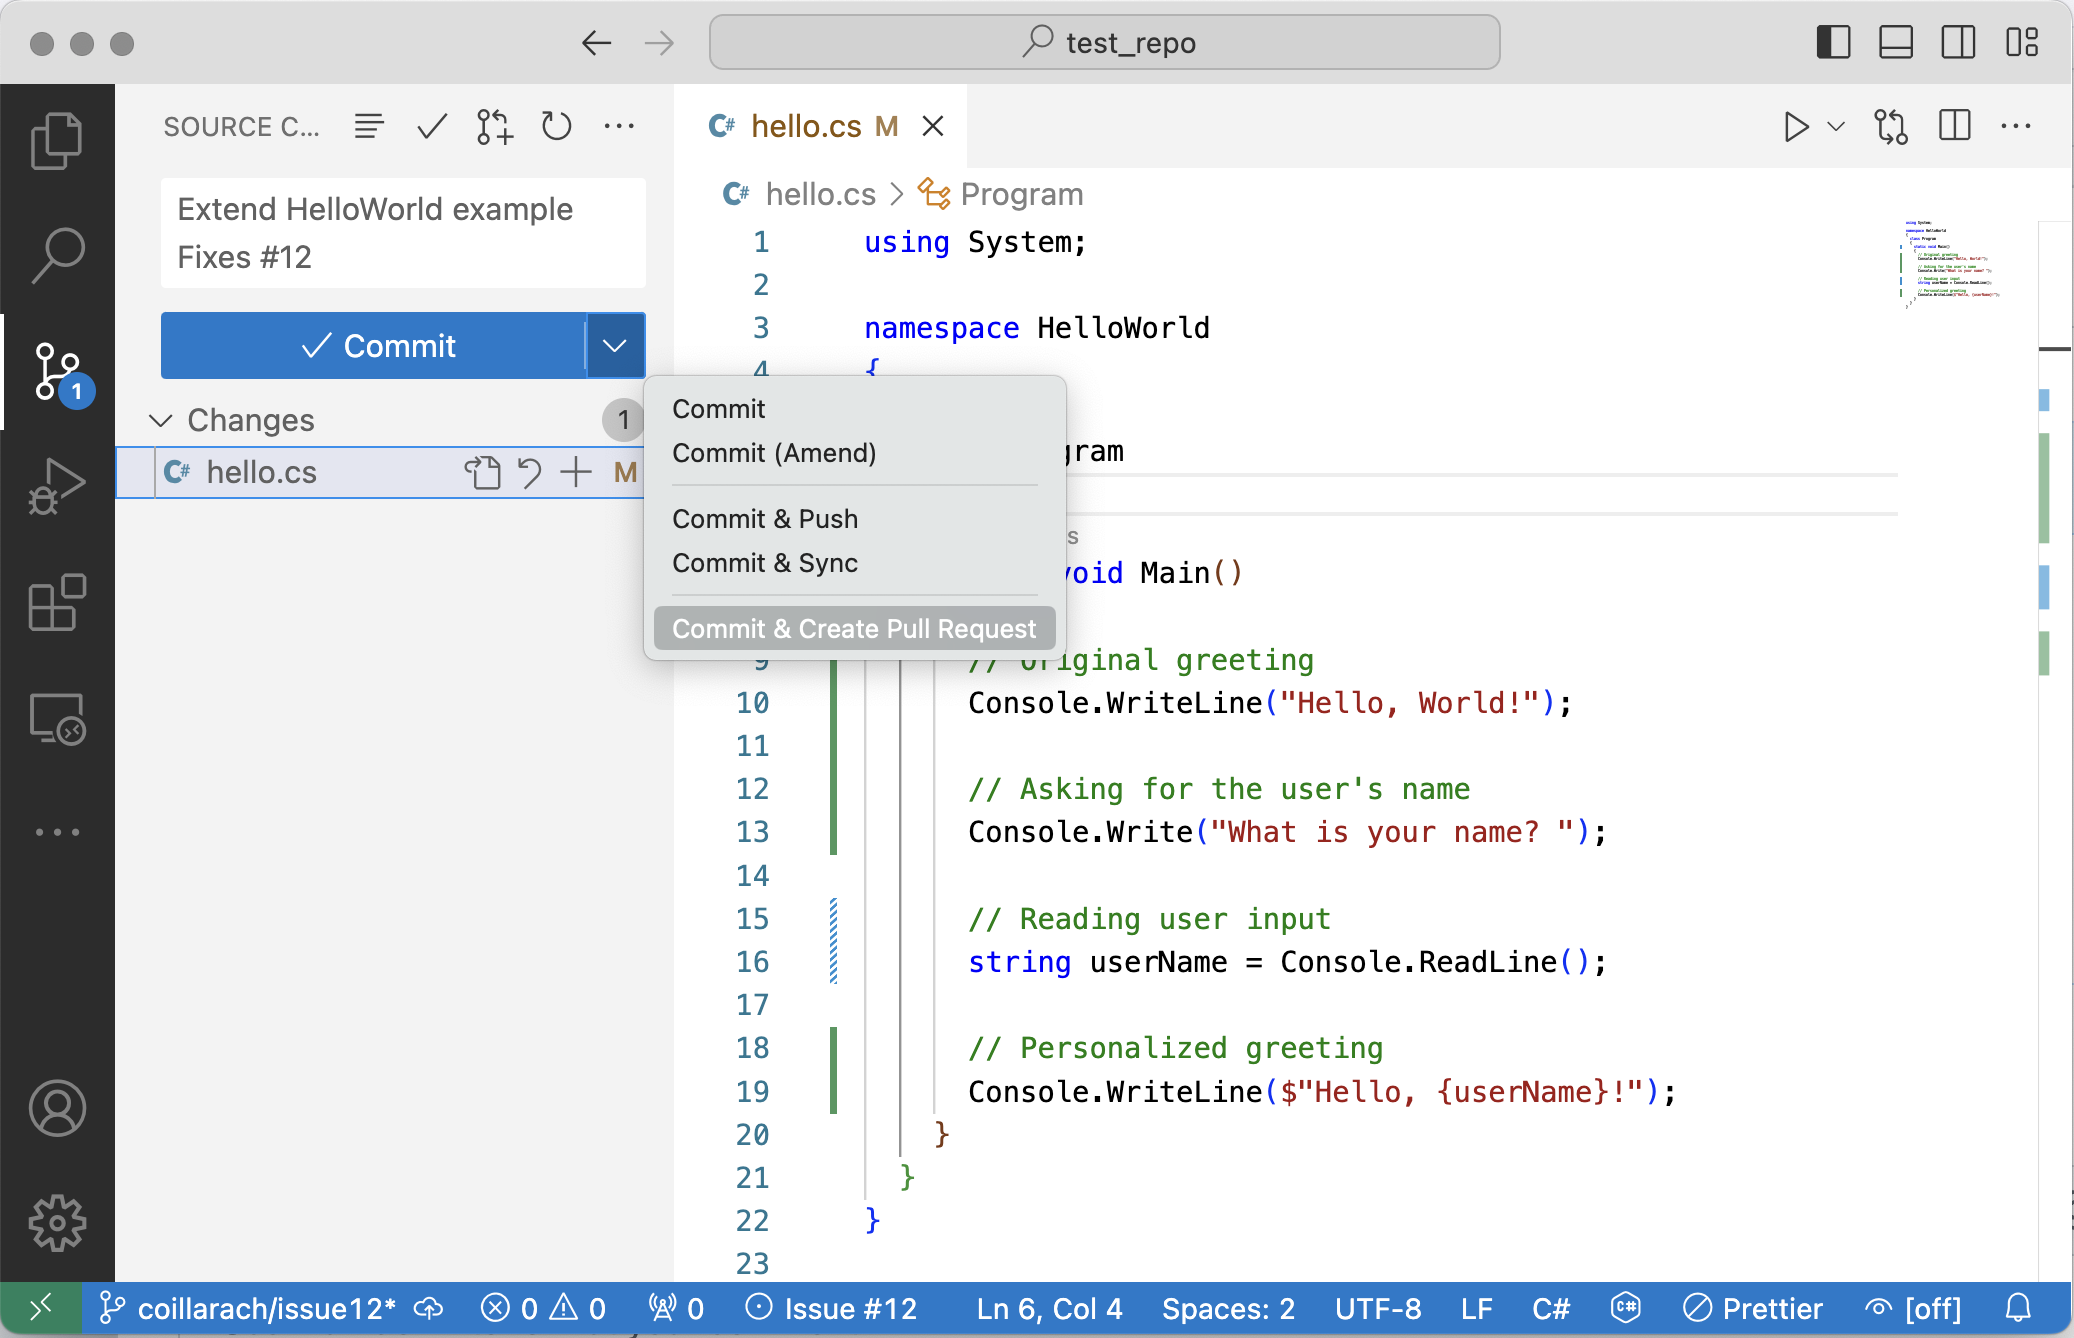
Fig. 37. Commit and create a pull request as a single operation -
Assign a reviewer.
Code review is an essential part of working on a development team. It is a way of spreading good practice as well as consolidating familiarity with the team’s coding conventions and ensuring code quality.
In the pull request view, do not be tempted to click the Create Merge Commit button at this stage as shown in Fig. 38. Instead, click the settings icon next to Reviewers and select the name of an appropriate team member to review your code. At the moment, you are working with a private repository with no collaborators. For this reason, the list of reviewers will be empty as shown in Fig. 38. It is therefore not possible to ask for a code review - this will be something that you will do for real when working with your team on the coursework project.
Another thing you should do at this stage is explicitly associate the pull request with the project. You can do this by clicking the settings icon next to Project as shown. If you see the message that you need to log in with more permissions, clicking on the icon will take you through the GitHub authentication process. After that, clicking on the settings icon again will let you select the project and associate the pull request with it.
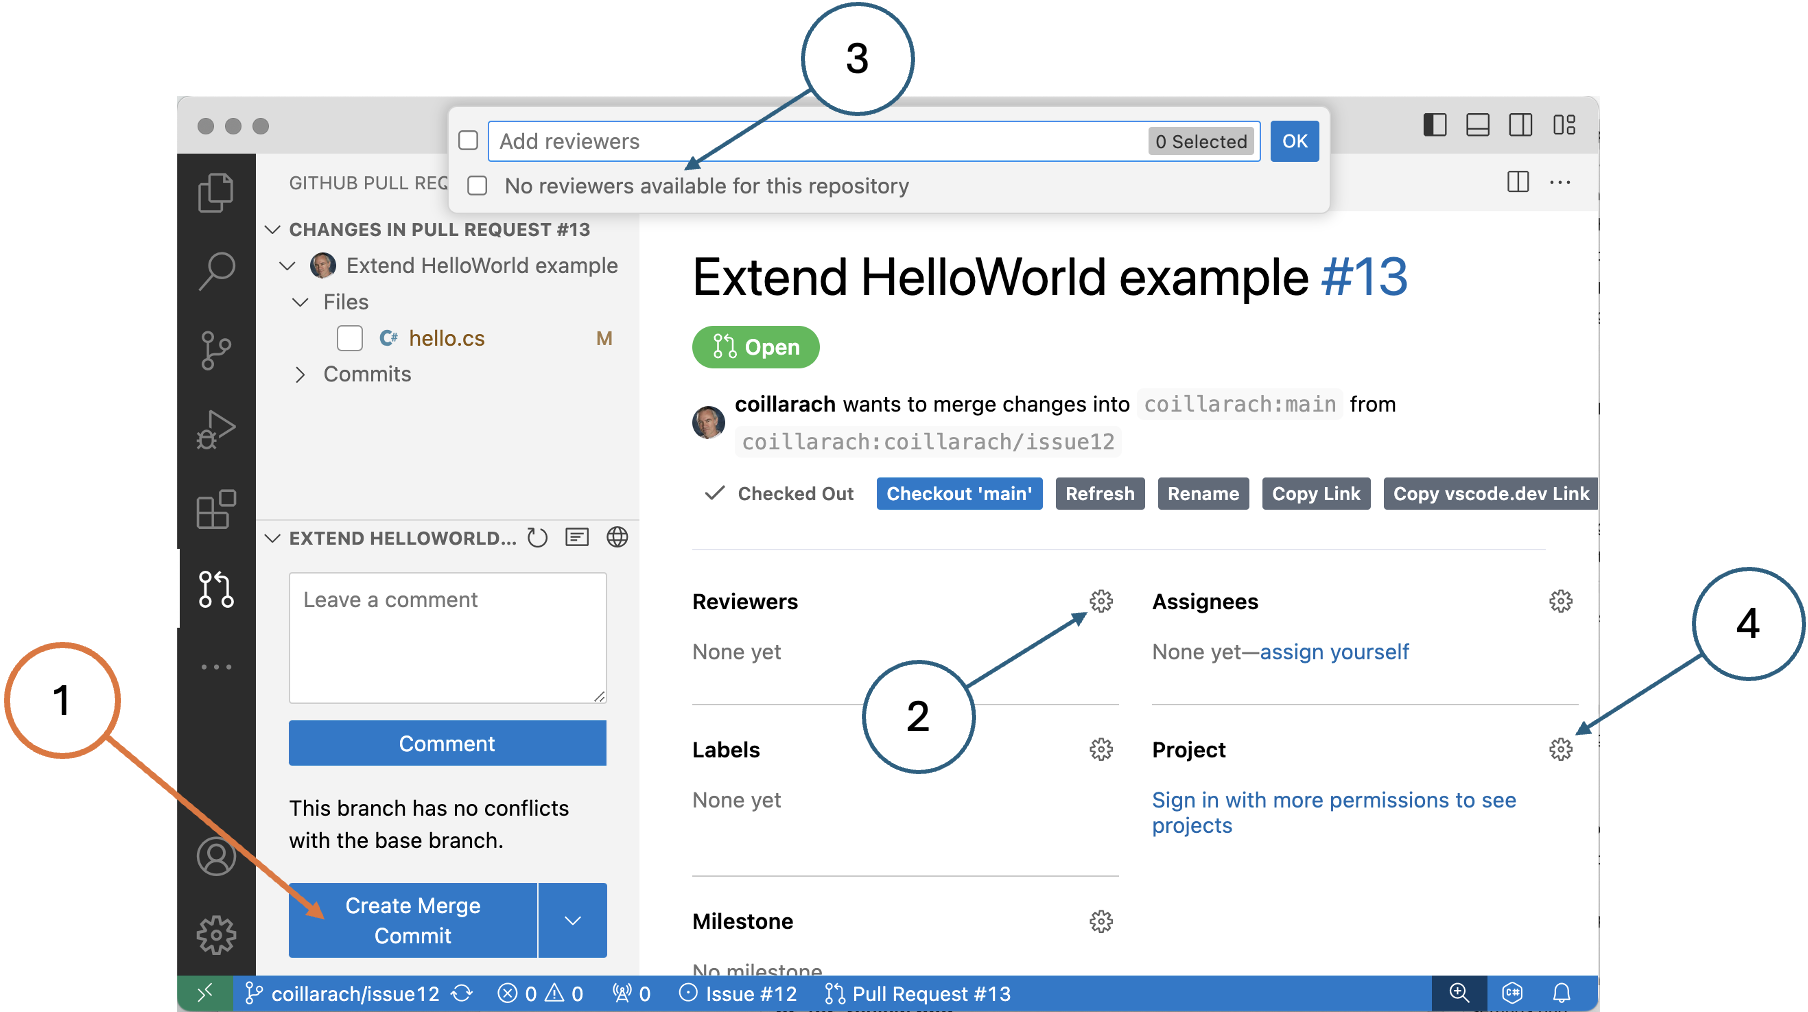
Fig. 38. Assigning a reviewer to a pull request -
Act on review feedback and merge your branch.
The reviewer’s job is to check the quality of your code. They might identify conceptual errors that need to be fixed, but it is not their job to test whether the code works. Review feedback might point out weaknesses of various kinds such as those related to software engineering principles or code smells. This is typically done as a conversation using the comments on the pull request. You can see the comments either using the GitHub web interface or the pull requests extension in VSCode.
-
Merge your branch.
Once you have addressed all of the issues, you can then go ahead and merge your branch.
-
Move the item card into the Done column.
This action lets the rest of the team know that the item has been completed.
We have now covered the basic GitHub features and operations that we will need in this module. However, there are many details that are not covered. Code repositories like GitHub have become essential tools to streamline and coordinate software development. You should make a point of finding out more about then and what they can do for you.