Note for JKCC and D2 computers
To keep projects saved on your account you need to put them on the H:\ drive. However, to work you need to have your current project on the :\ drive So, I would advise that you copy or clone your project in the C:\ drive before starting to work.
You will need Git installed. You can use a Git GUI (e.g sourcetree). However I will work with and show the cmd-line commands.
Create a repo
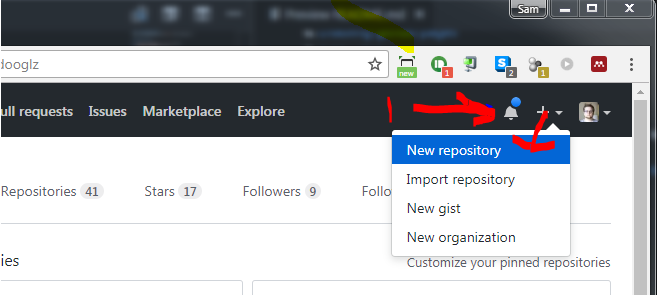
When get onto move advanced topics, we will provide some code for you. For now you should create a blank Git repo on you Git host of choice (Github, BitBucket).
For the rest of this process I’m assuming you are using GitHub. If you have not already created a GitHub account, create one and sign in.
( As a student you get some cool swag from GitHub: education.github.com/pack )
-
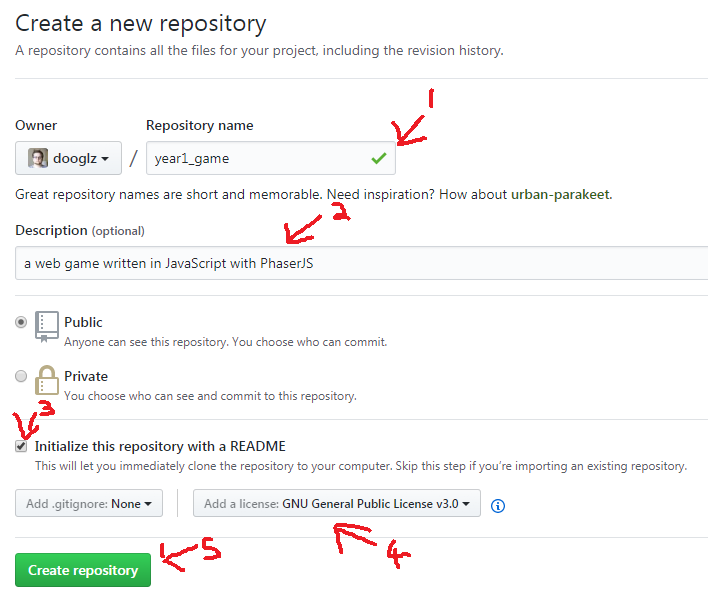
Give your repo a simple name
-
Check - Initialize with a readme
-
Choose an open source license, so people can’t legally steal your work without crediting you. The inbuilt guide from GitHub covers this neatly, when in doubt: choose MIT license.
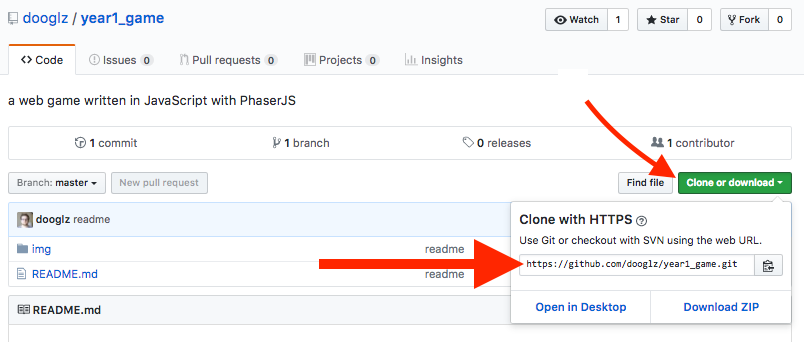
After this stage Github will create the repo for you and you should see something like the following image, now it’s time to clone the repo down so you can start to work within it. Click the green clone button and copy the link within the box
Setting up the project with Git
Get git from AppsAnywhere
(If you are on your own PC, go to the next section Install Git )
On the machine of the JKCC, you cannot install git but you can get it from AppsAnywhere.
Search for git in AppsAnywhere and launch it. Then, it will be available in the cmd line and PowerShell.
Clone the repo
Open a cmd, PowerShell or git-bash window somewhere (desktop is best). Now clone your repo
git clone https://github.com/yourUsername/yourRepo.git
This will create a folder named yourRepo (or whatever you called you repo). Let’s move into that folder in the terminal
cd yourRepo
Now if you run
git status
You should see something similar to
On branch master
Your branch is up-to-date with 'origin/master'.
nothing to commit, working tree clean
Now we can Start to get to work properly.
Setup project structure
Create the following empty folders.
- resources - (where resources go, like images and fonts)
- lib - (libraries that we need)
.gitignore
Next, create a .gitignore file, open with a text editor. Navigate to gitignore.io and create an ignore file for “C++” and the IDE you intend to use, i.e “Visual Studio”. Copy the generated file into your gitignore file and save it. Git will not look at or track any files that match the rules in the gitignore file, keeping junk you don’t need out of your repo.
Get SFML
We will be building SFML from source, which means we need to get the code. We will be doing this via Git Submodules, which makes it look like the SFML code is now copied into your repo, but is actually saved a virtual link to the separate SFML repo.
mkdir lib && cd lib
git submodule add https://github.com/SFML/SFML.git
cd SFML
git checkout 2.6.2
cd ../..
Note, you need to be in the root directory of your repository for this to work!
Install git (personal computer)
- Go on this link and download git for Windows.
- Go in your download folder and move the downloaded file Git-version-64-bit.exe in your Home drive. So you don’t have download it again.
- Launch the .exe file by double-clicking on it. Keep all the default options.
- Launch git bash
If everything goes well should have a command line poping up.
Setting Up the project without Git.
If you do not have git installed on your machine and you cannot install it. It the case, at the moment on the JKCC machines. Then follow the instructions below. It is assumed that you have created an online repo.
Clone the repo
- Open visual studio for appsanywhere: Visual Studio Community 2022 C++ cli.
- Choose the option clone remote repository.
- Copy paste the address of your repo in the first field
- In the second field path put a folder in your H drive:
H:\any_folder_you_want\name_of_your_repo
At this stage you should have an empty project opened.
Create two empty folder:
- resources - (where resources go, like images and fonts)
- lib - (libraries that we need)
Get SFML (Manually)
- Go to the SFML github page https://github.com/SFML/SFML
- On the right side of the page click on releases.
- Scroll down to the version 2.6.2
- In the assets section, download the Source code (zip)
- Unzip it in your lib folder.
Now you should be at the same stage than with git.
Just be carefull to not push the SFML folder to your repo.
For later, Push the code to the repo
Without gitbash or cmd line, you can do it inside Visual Studio.
Next step: build setup