This lab is design to introduce you to: Object Orientation(OO) in C++, Working with C++ header files, and a small amount of memory and resource management.
Create a new project
- Copy and paste the files from the previous lab.
- Rename the project
project(space_invaders) - Change the name of the executable
add_executable(space_invaders main.cpp) - Don’t forget to change the name of executable everywere it is mentionned.
Runtime Resources
We will be loading a bunch of files from disk, you need to make sure the resources are in the right place. Take a look here Runtime Resources tips and tricks
Don’t skip this section, it’s important
Sprite-sheets
Before we get stuck in, you should have already have a standard boiler plate gameloop written to open a window and poll for events. You can use some of what you wrote for your Pong game!
A common technique for 2D art assets in games is to combine what would be many separate images into one "sprite sheet". This saves time when loading in files, and a small amount of graphics memory. Images are places into tiles within a larger image, sprites are rendered by taking a ‘cut out’ of the larger image. In terms of optimisation this makes life very easy for the GPU – as it doesn’t have to switch texture units.
The primary benefit of sprite sheets however is sprite-animation. It is commonplace to have each tile in the sheet be the same square size. With this restriction in place, picking the dimensions to ‘cut’ are a simple multiplication operation. Rendering a sequence of frames as an animation is as simple as moving the ‘cut’ windows to the right each frame.


Animation Frames : Sonic will be rendered using different frames from the sprite-sheet each frame, looping to the start once all frame have been rendered. Creating the illusion of fluid movement

Our Space Invaders Sprite-sheet : It’s actually a transparent image - grey background just for clarity.
Save This image to your repo’s res folder
(Yeah, I know there are some issues with using the Space Invaders designs. We’re using them as they are simple - don’t do this in your coursework submission!)
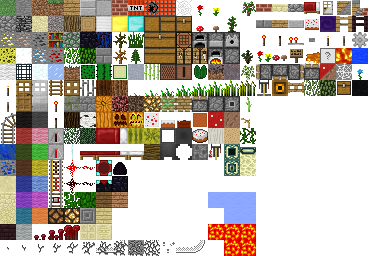
Minecraft’s Textures : Having all the textures in one image allows for easy mod-ability. The multiple squares of water and lava are animation frames.
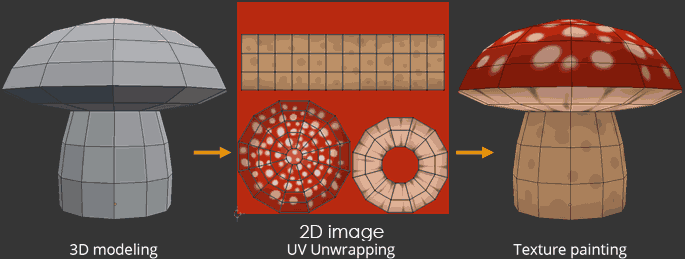
UV Maps : Sprite sheets are not UV maps - Although visually similar - don’t confuse sprite-sheets for unwrapped UV textures. These are used to apply a texture to a 3d model. Sprite-sheets are for 2d sprites
Loading a sprite-sheet
Working with Sprite-sheets in SFML couldn’t be easier. Take a look at this:
//main.cpp
sf::Texture spritesheet;
sf::Sprite invader;

void init() {
  if (!spritesheet.loadFromFile("res/img/invaders_sheet.png")) {
    std::cerr << "Failed to load spritesheet!" << std::endl;
  }
  invader.setTexture(spritesheet);
  invader.setTextureRect(IntRect(Vector2i(0, 0), Vector2i(32, 32)));
}

void render() {
  window.draw(invader);
}
At this stage, you might find your code doesn’t run because of the cerr call. That’s normal, and it is to do with the fact that the cerr is not part of core C++, it’s a helper object from the standard (std) library. To explain it fully would be out of the scope of this lab, so you can think of it as being the equivalent of the System.out.println or Debug.Log functions you might be more used to - it allows us to print to the console. As such, it is IO functionality, and so we need to include the correct library for this to work: #include <iostream>
std::cout << "print on the standard output of the console" <<  std::endl; //end of line
std::cerr << "print on the error output of the console" << std::endl;
Take note of this line:
sprite.setTextureRect(IntRect(Vector2i(0, 0), Vector2i(32, 32)));
The rectangle structure takes the form of (Left, Top, Width, Height). Our sprite-sheet is devided into squares of 32x32 pixels. So this line of code set the ‘cut’ do be the top left square in the image, aka. The first invader sprite. Remember, you should be looking up the SFML API to find out things like this yourself going forwards
Note that the invader doesn’t take up the whole 32x32 square, it’s surrounded by transparent pixels. SFML takes care of doing the rendering with correct modes so as to cuts out the background, but we may have to be careful when it comes to physics and collision code.
Checkpoint
You should have a separate project setup and working, and showing this:
![]()
Don’t continue on until you have this working
Oh… it’s not working? I’m just getting a white square…
If this happens, it’s most likely that you are failing to load the sprite sheet image properly. Check the other window that opens when you run an application. Is there an error in there? Does it say something like ‘Failed to load image’? If so, there are four things to check:
- You did actually download the image, right?
- You did point your code to the correct name/location of the file, didn’t you?
- You have updated your CMake code to ensure that your new project’s resources are copied correctly, yeah?
- It’s most likely point 3 that you forgot (speaking from experience), so check again!
For point 3, remember to go and read Runtime Resources tips and tricks again. The process should be easier once that is done, compared to the manual process you did with fonts in the Pong example! Remember, you don’t need to replicate the following part:
add_custom_target(copy_resources...
That is like a method (kinda) in CMake. You DO, however, have to call that method and set the working directory for each project (set_target_properties() and add_dependencies()). Make sure you remember to rename the PRACTICAL_1 parts in the new CMake lines to the right name
You can (and should) have all your projects defined in a single CMakesList file!
If you’ve set up everything correctly, you should be able to run the .exe in your build folder directly, without copying files yourself!
Previous step: Pong 3
Next step: Space Invaders 2