# Lecture 17 - State Machines ### SET09121 - Games Engineering <br /><br /> Leni Le Goff <br /> School of Computing. Edinburgh Napier University --- # Recommended Reading - Artificial Intelligence for Games. Second Edition. Millington and Funge (2009).  --- ## Review - State and State Machines --- # Review - State Diagrams - State modelling is one of most the important aspects in computing! - Software development (object/component state). - AI (state machines). - Networking (protocol and hardware development). - Software verification (state-space search). - Understanding and modelling application state is one of the most important skills and tasks you can do. - State modelling also provides dynamic behaviour. --- # Review - State Diagrams 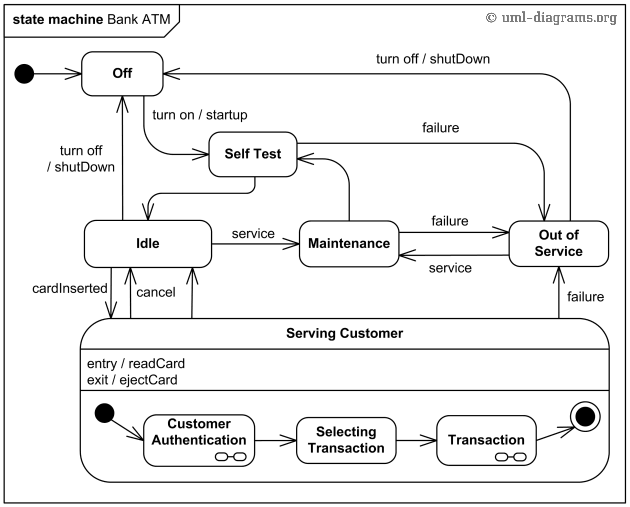 <!-- .element height="70%" --> --- # Review - State Design Pattern - The state design pattern allows us to encapsulate an object's state within another object. - We can switch the state object at any time during runtime - changing the behaviour of the object. - For example the ghosts in PacMan change behaviour. - Different behaviours are programmed in different objects - the ghost simply calls the state class when it updates. --- # Review - State Design Pattern 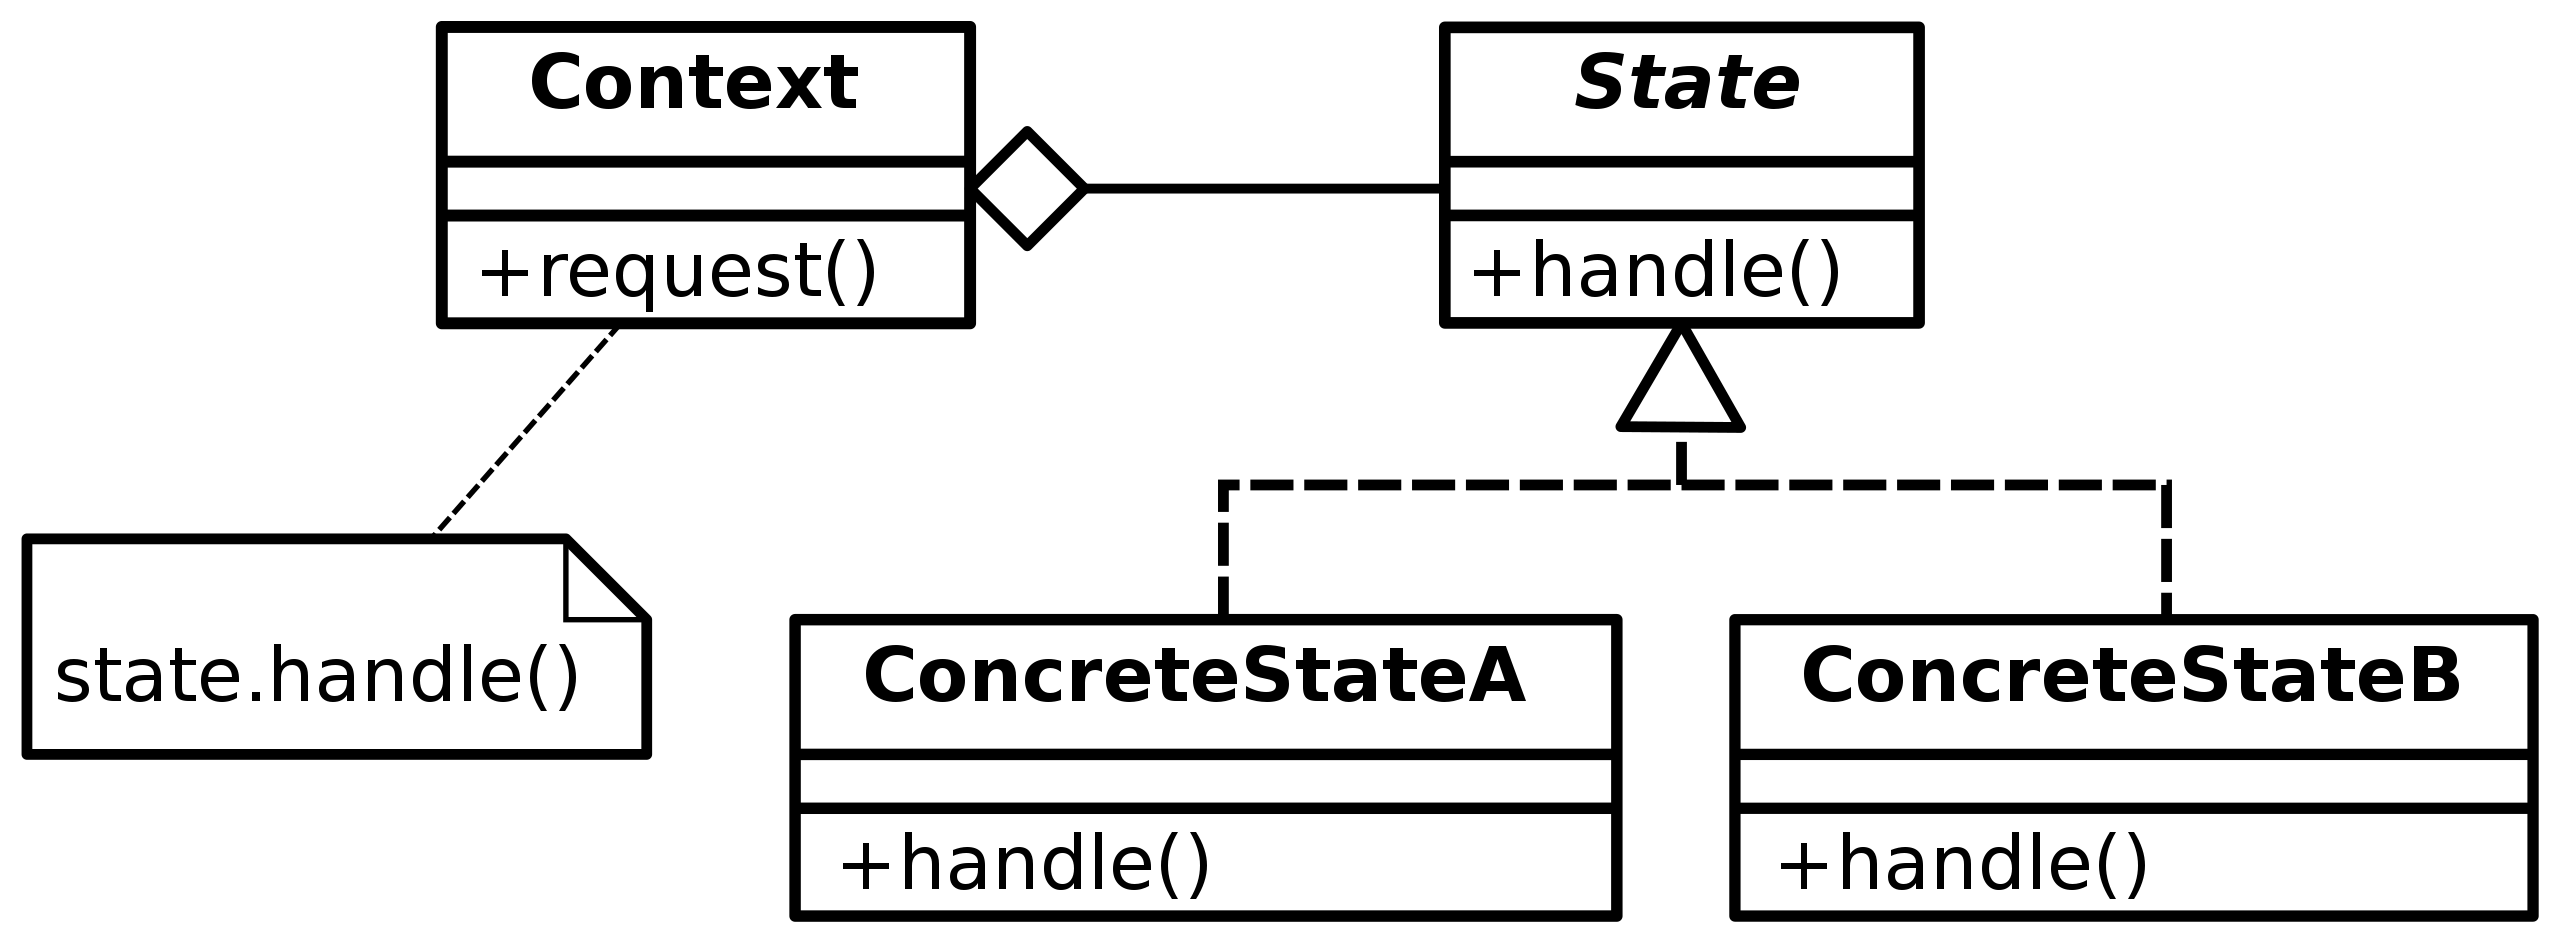 --- # Review - AI Techniques - There are numerous usable AI techniques applicable to games development. - Classical, deterministic techniques - popular. - Academic, non-deterministic techniques - useful in some areas. - Different techniques accomplish different aspects of game behaviour. - Movement. - Decision making. - Strategy. - Learning. - Today we will look at the basics of decisions via state machines. --- # Example - Batman: Arkham Asylum <iframe width="1400" height="800" src="https://www.youtube.com/embed/hNs-orQHaKU" frameborder="0" allow="accelerometer; autoplay; encrypted-media; gyroscope; picture-in-picture" allowfullscreen=""></iframe> --- # What are State Machines? - A state machine is a technique of describing and modelling the state (e.g. behaviour, control, etc.) of a system in a mathematical manner. - The system is modelled with a number of states and the transitions between these states. - The idea of a graph of states can come into play here - remember our description of a graph last week. - Finite number of states → Finite State Machine (FSM) --- # State Machines for AI - Let us return to the guard concept we presented last week. - We will take a simple view so we can just focus on state. - The guard has some basic actions: - The guard patrols between point A and point B. - If the guard is shot at, the guard will stop patrolling, engage the player, and fire back. - If the guard loses sight of the player, the guard will return to patrolling between point A and point B. - If the guard is hit, the guard will fall onto the ground and die. --- # State Machines for AI 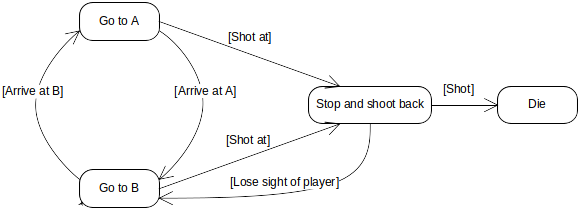 <!-- .element width="100%" --> --- # State Machines for AI 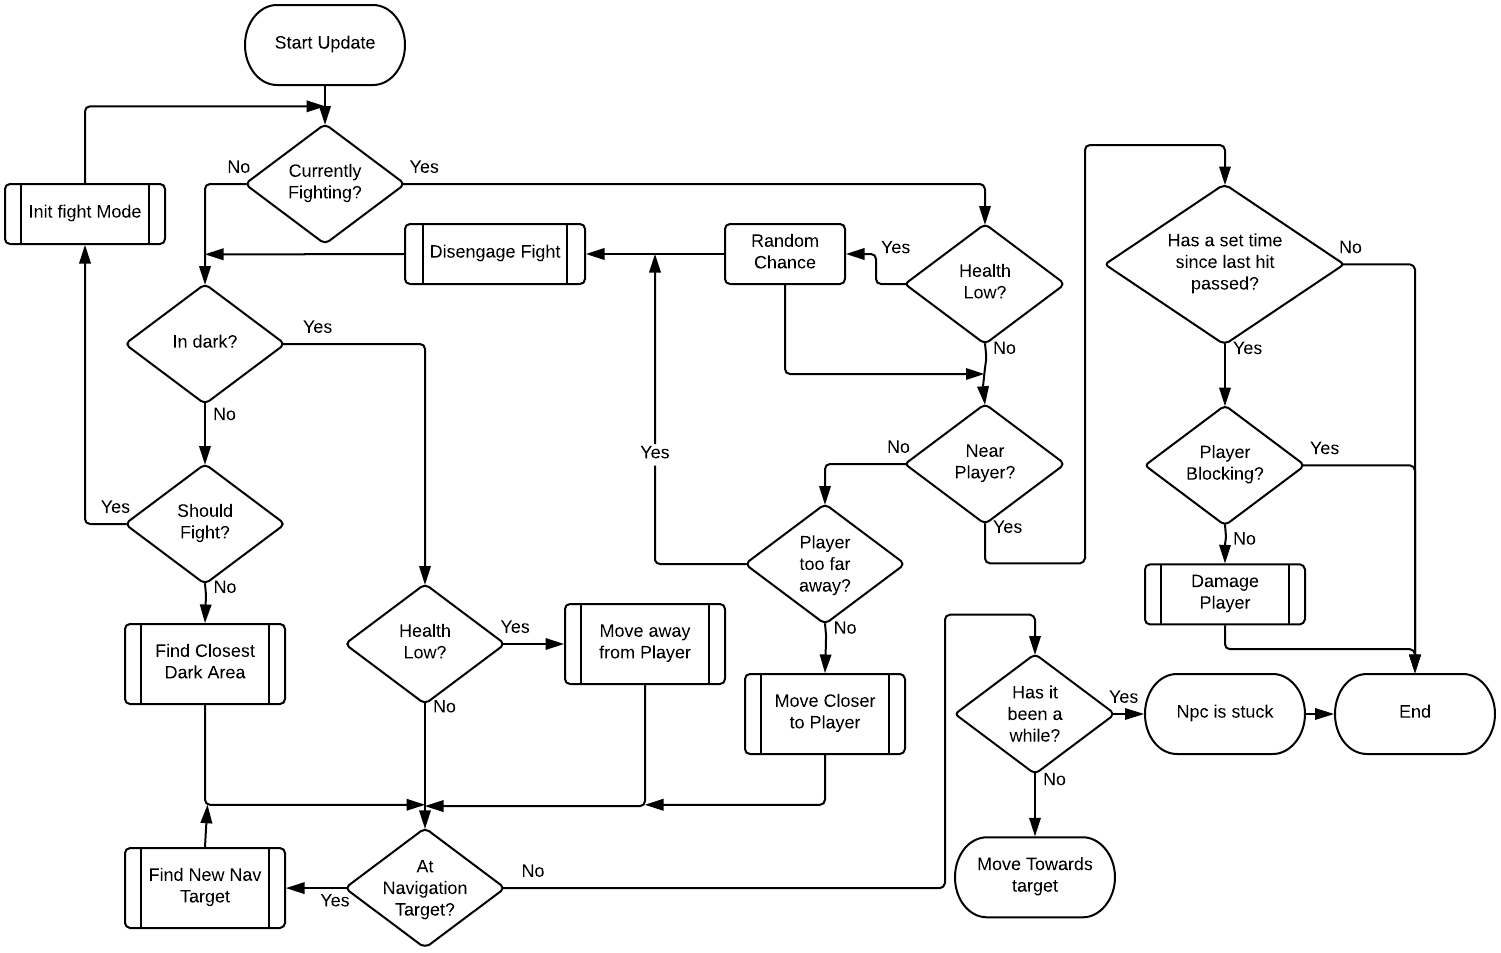 <!-- .element width="100%" --> --- # Example - Maze Solving 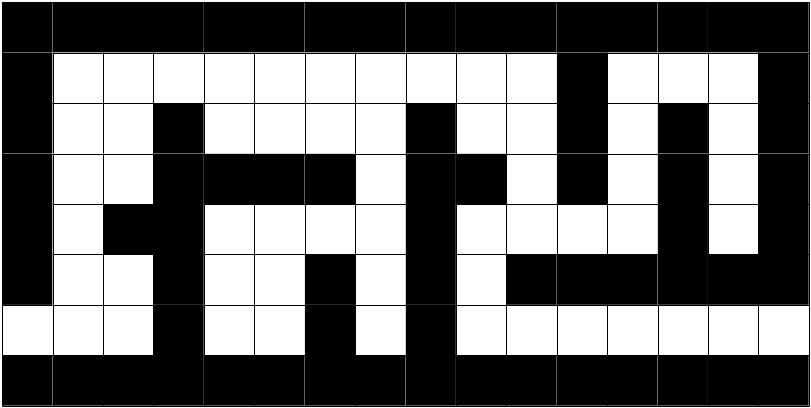 <!-- .element width="100%" --> --- # Example - Maze Solving - To solve a maze we can use a particular trick. - This only works if the maze is simply connected, i.e., all the walls are connected to each other (taking into account the outer boundary). - "Follow the wall" strategy: - Walk forward from the entrance until you hit a wall. - Turn left. - Now keep your right hand on a wall at all times. - You will eventually reach the other exit. - Although it will not necessarily be the fastest route. - This obviously also works if you swap left and right. --- # Example - Maze Solving 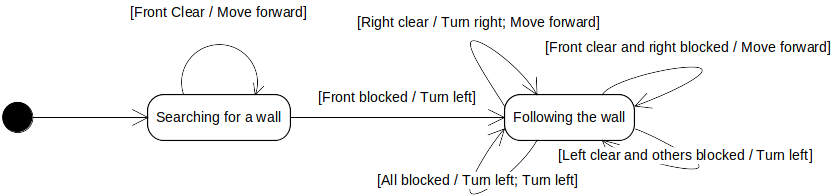 <!-- .element width="100%" --> --- # State Machines in Our Game Engine - We will be implementing a basic, reusable state machine behaviour in our game engine. - We want reusablility so that it is simple for us to extend the functionality, if required. - We have already identified the state design pattern as a likely candidate for implementation of state machine behaviour. - What we need to do is implement this pattern in a manner that works in our game engine. --- # State Pattern in Our Engine 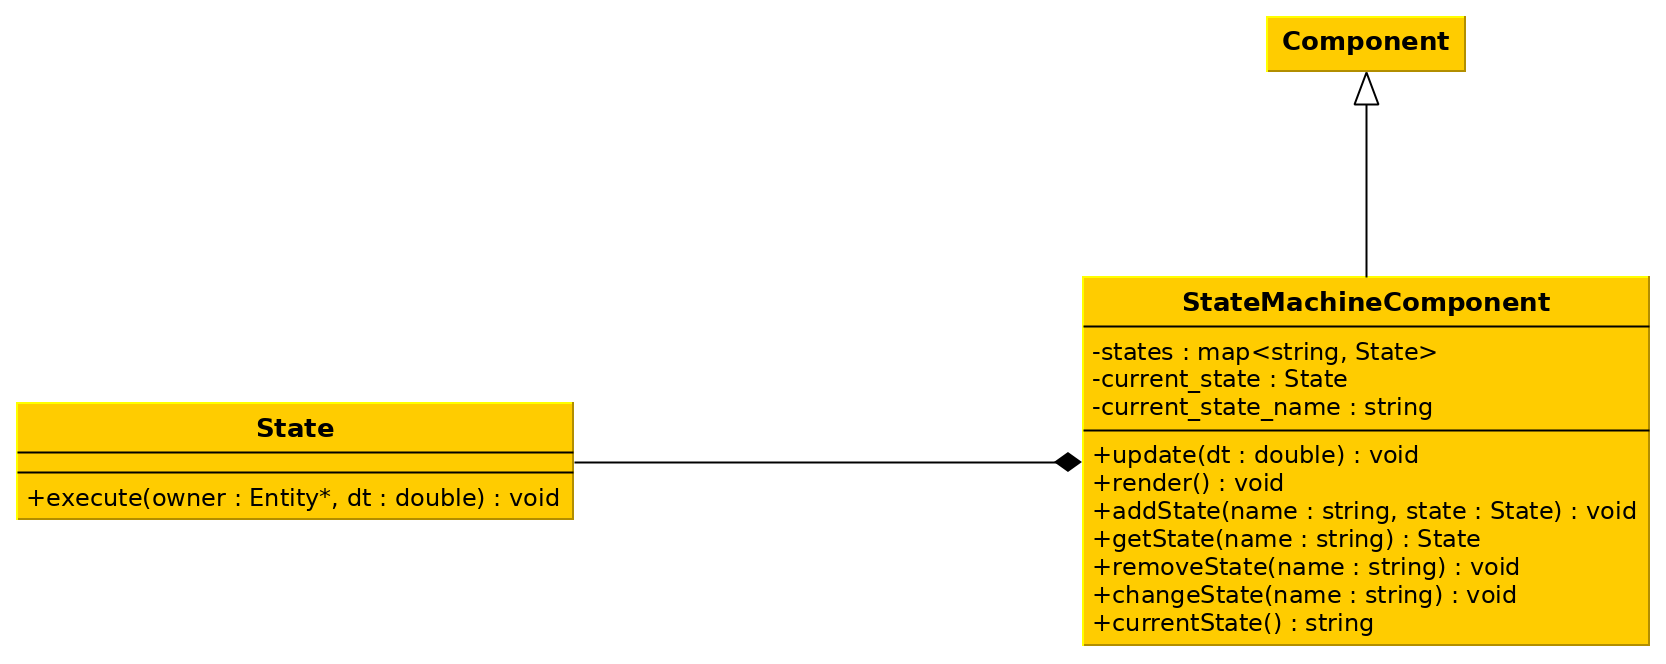 <!-- .element width="100%" --> --- # `State` Interface - The `State` interface only defines one method: - `Execute` - This method executes the behaviour associated with that state upon the owner of the state. - We pass as arguments the `Entity` that owns the state and the delta time `dt`. - This way, the state can operate on the owner in each frame. 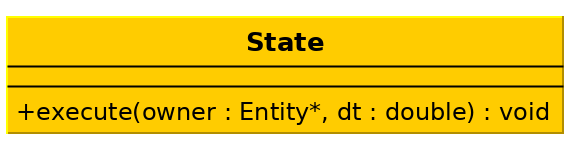 --- # `StateMachineComponent` Class - The `StateMachineComponent` is a `Component` that we can attach to an `Entity`. - The component contains and manages a collection of states. - The component calls the `execute` method on the current state. 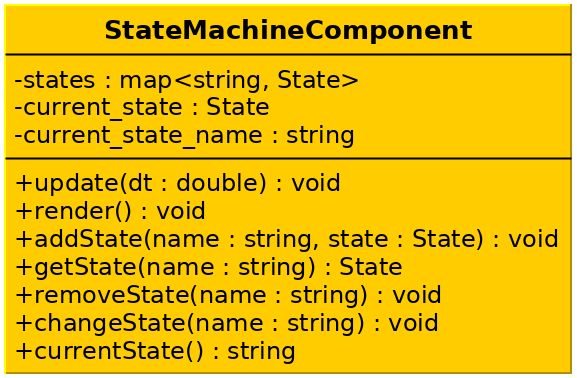 --- # `Update` - `Update` is where the main functionality of the state machine occurs. - It is just one line of code: - Execute the current state. - We call `ChangeState` to change the current state. - We call `Update` to execute the current state. - Although simple, the key work we have done is to separate out and encapsulate the different behaviours into different objects. --- # Decomposing State Machines - If a model has two or more properties it is worthwhile looking to see if they are independent. - If the properties are independent, it simplifies the logic to separate them into different state machines. - You can do this - just have two `StateMachineComponent`s attached to an `Entity`. - For example: - A ranger wanders in the wilderness. - If the ranger is hungry, the ranger eats. - If it is night, the ranger lights a torch to see. --- # Decomposing State Machines 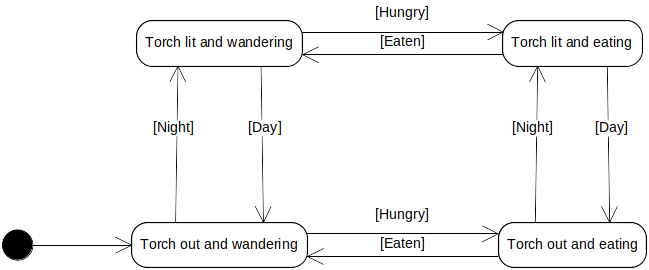 <!-- .element width="65%" --> 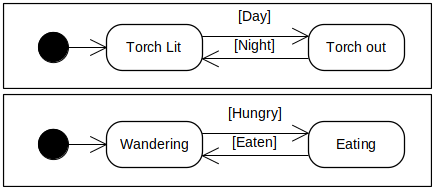 <!-- .element width="65%" --> --- # Comments on State Machines - FSMs are simple to use and understand. - Advantageous in lots of circumstances. - If you require degrees of intensity or "fuzziness" you will require a different AI technique. - FSMs are difficult to modify once in place. - Small changes usually affect the entire FSM. - You will generally need to rethink and rewrite your FSM code. --- # State Machines for Game Control - We can extend our state machine implementation to work as a game controller. - All you need is an update and a render method for each state, and call these in the main game's relevant method. - This allows you to trivially implement game screens: - Menu. - Main gameplay. - etc. - The main game only calls update and draw on these elements of the game based on the state. - This is effectively what the scene management system is doing. --- ## Summary --- # Summary - We've taken a broad look at state machines and how they work. - We have also taken a look at how we will implement them in our game engine. - Really, the ideas here will be more understandable when you implement the system and play around with the functionality. - This can be used to underpin much of the AI behaviour we will look at - much like steering behaviours.