CI/CD with GitHub Actions
This tutorial will demonstrate how you can create a continuous integration pipeline using GitHub Actions and set up some external tools that will be used in the pipeline.
In this tutorial, you will learn how to:
- Create a GitHub Actions workflow file.
- Run your pipeline in the cloud.
- Set up automated builds and testing.
- Add useful external tools:
- Sonar static analysis
- Doxygen documentation
Before you start
Before you start working through this tutorial, it might be useful to take a look at the notes about Continuous Integration/Deployment, and DevOps in general. This will explain the concepts we use in this tutorial.
Important
The steps in this tutorial have been tested on the version of the project that includes database migrations and unit testing. If you haven’t worked through these tutorials, the pipeline might not work as expected. You are therefore encouraged to go back and worked through them first.
GitHub organisation
Certain parts of the tutorial require your repository to be a part of a GitHub organisation. Follow the steps below to move your current repository to a new organisation.
First, you need to create your new organisation.
-
In GitHub, click on your profile picture in the top right corner

Fig. 1: GitHub profile link -
In the side menu, select Your organisations
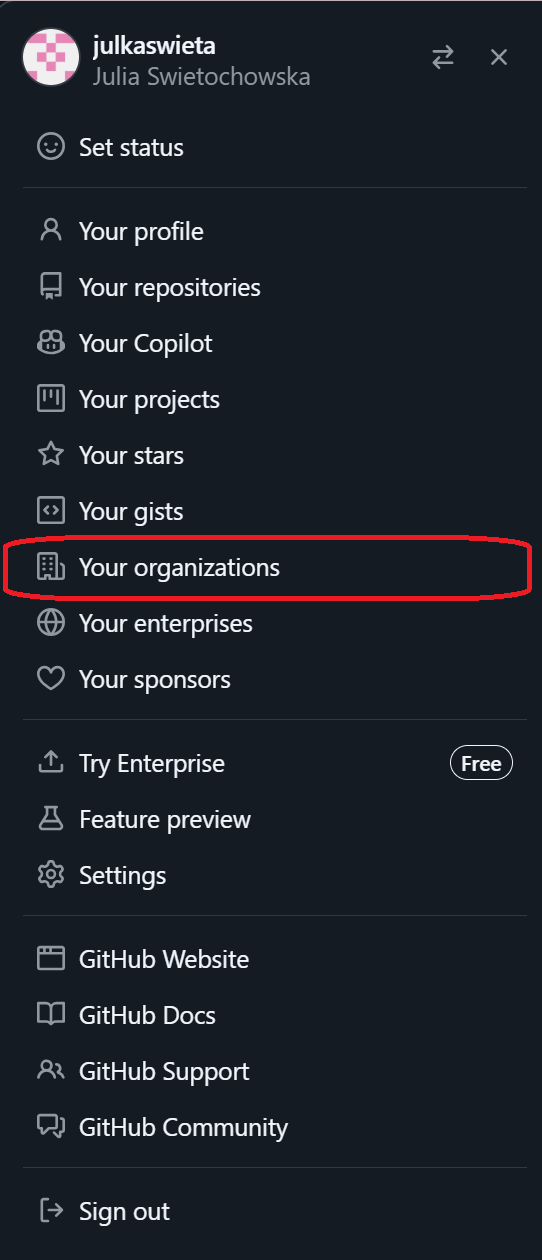
Fig. 2: Your Organisations menu item -
On the next page, select New organisation

Fig. 3: Creating a new organisation -
Next, make sure you select Create a free organisation so you don’t incure any additional costs.
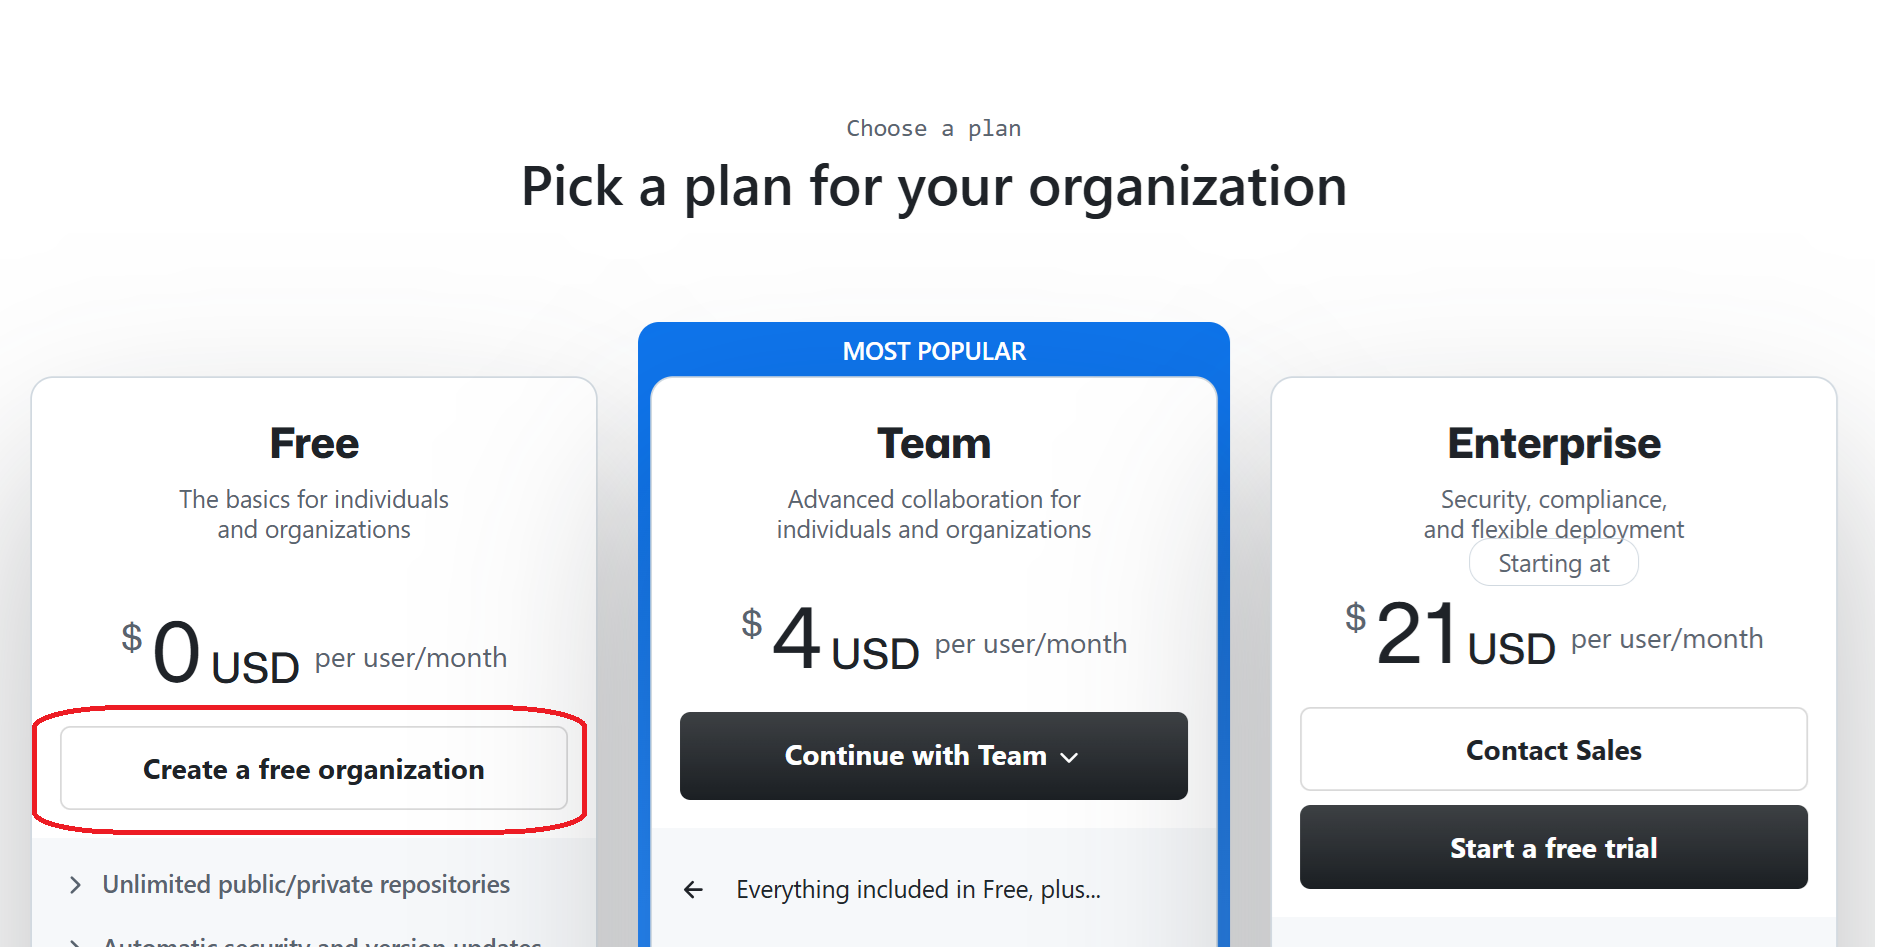
Fig. 4: Choosing the free option -
On the next page, give your organisation a name (this must be unique across all GitHub organisations so might be a bit tricky), provide an email address (this can be your university email) and make sure to select My personal account as the owner. Then, you might have to verify you are not a robot and accept the terms and conditions at the bottom. When you have all the details, select Next at the bottom of the page.
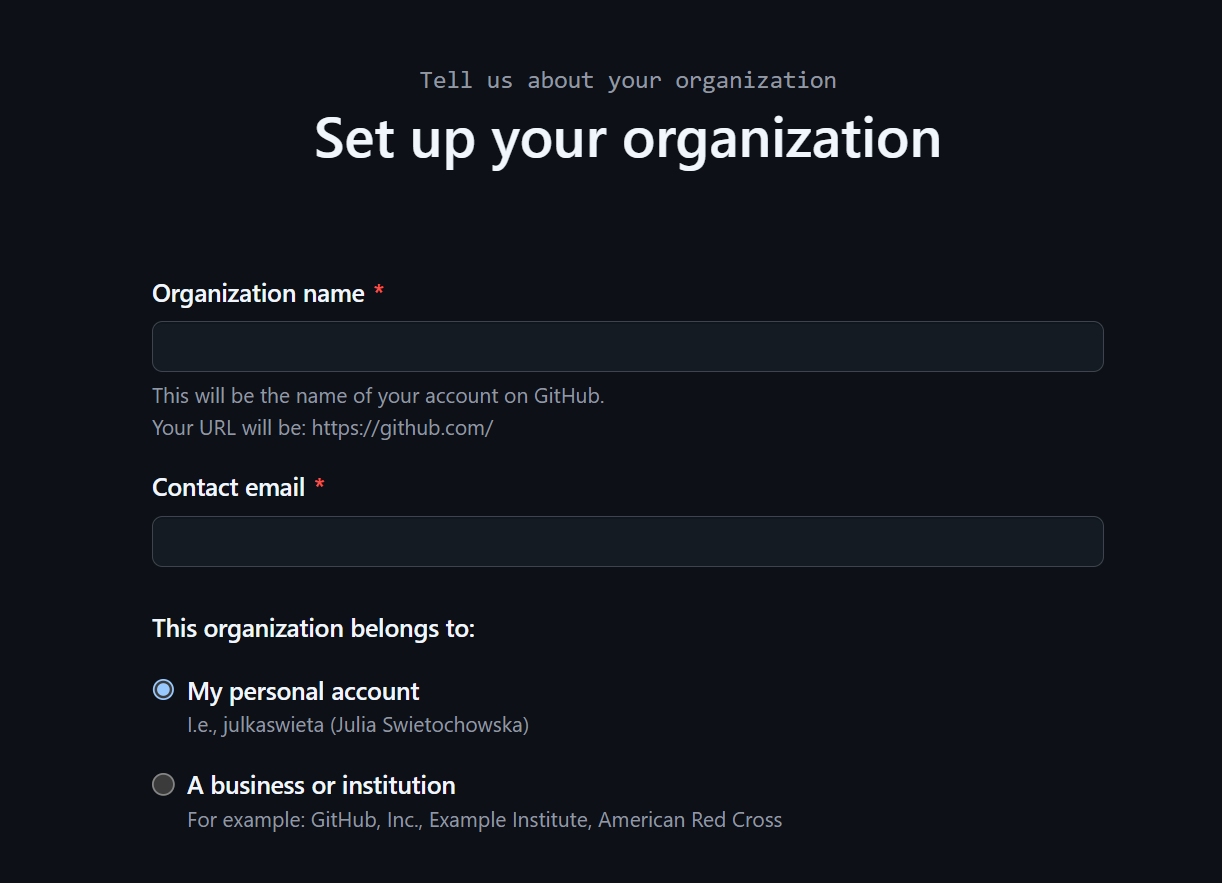
Fig. 5: Organisation details -
After that, you will be given an option to invite other collaborators but for the purpose of this tutorial, select Skip this step
Now that you have set up a new organisation, you can move your existing repository to the organisation. To do this, follow the steps below:
-
Navigate to your repository homepage and select Settings from the tabs

Fig. 6: Settings link -
Scroll down to the bottom, where you will see the red Danger Zone. Select the Transfer option to move the repository.
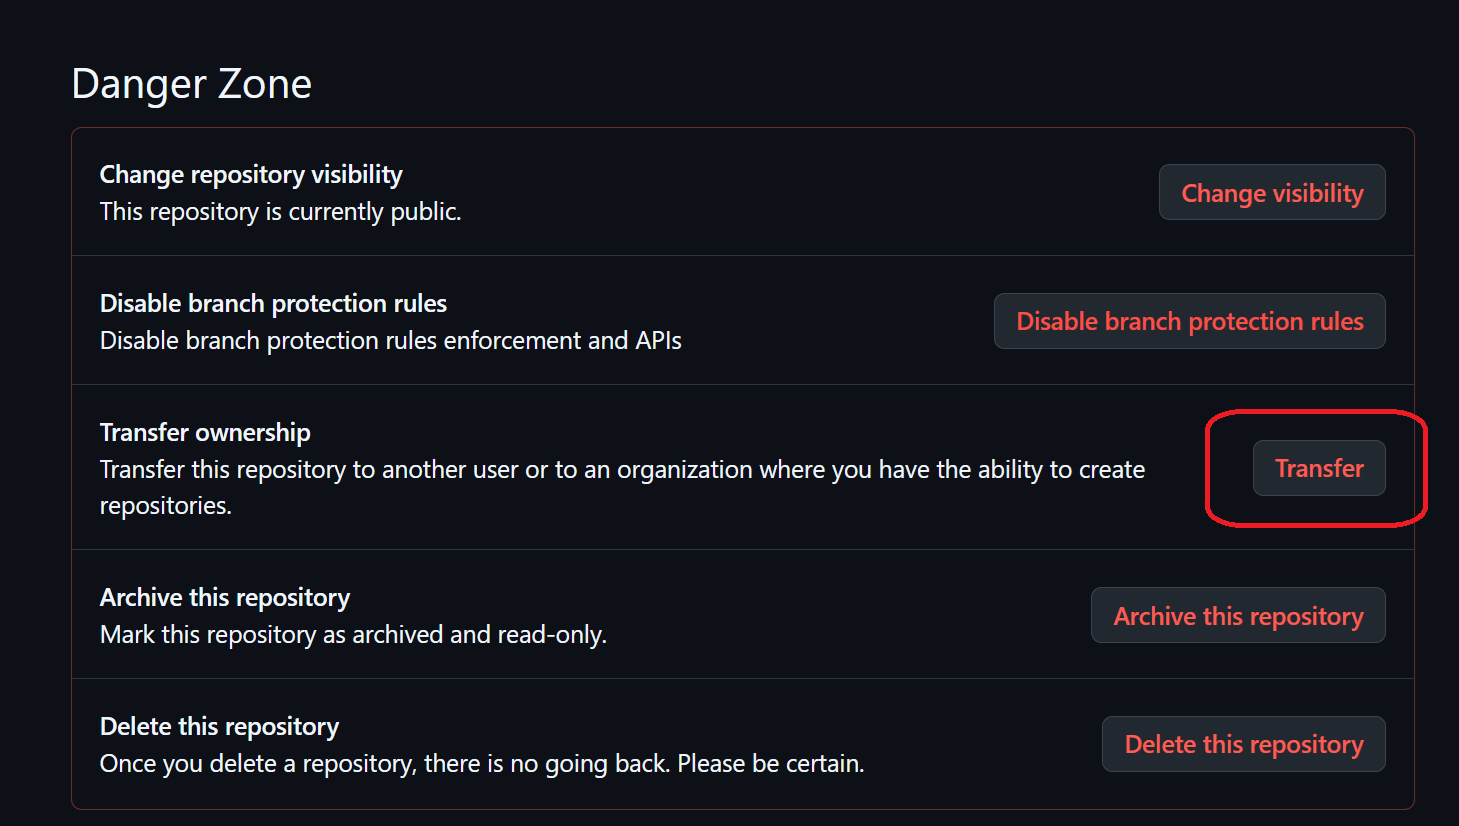
Fig. 7: Danger Zone -
On the next page, pick Select one of my own organisations and choose the one you have just created from the drop-down menu. You will have to type in your username and repository name before continuing to confirm you are sure of the operation. Once you’ve done this, select I understand, transfer repository to continue.
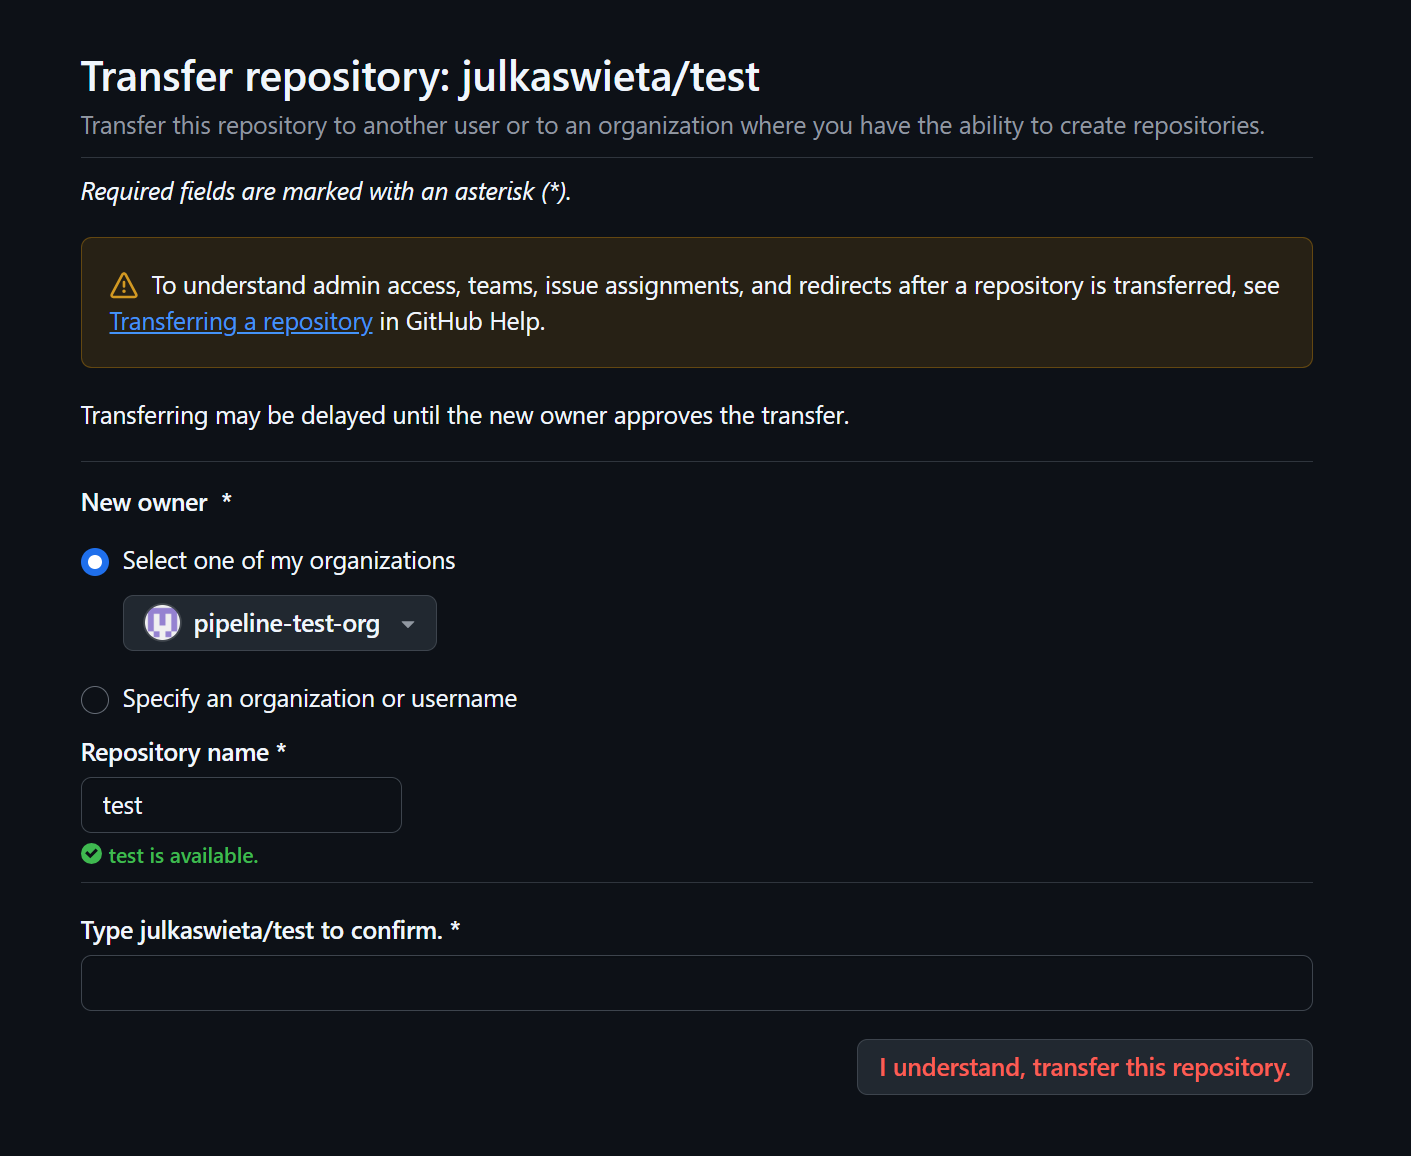
Fig. 8: Transferring ownership
Now you should be ready to proceed with setting up your CI/CD workflow.
1. GitHub Actions
GitHub Actions is a powerful CI/CD solution integrated into GitHub repositories. It allows developers to create workflows that run when certain events occur within a repository. A workflow is GitHub’s name for a pipeline. For example, you can have a workflow that runs anytime new code is pushed to the master branch and checks whether the code builds and runs correctly.
GitHub Actions can be used for free by anyone as long as the project is open-source. That means that the repository that hosts your code must be public. Otherwise, every workflow run incurs additional costs.
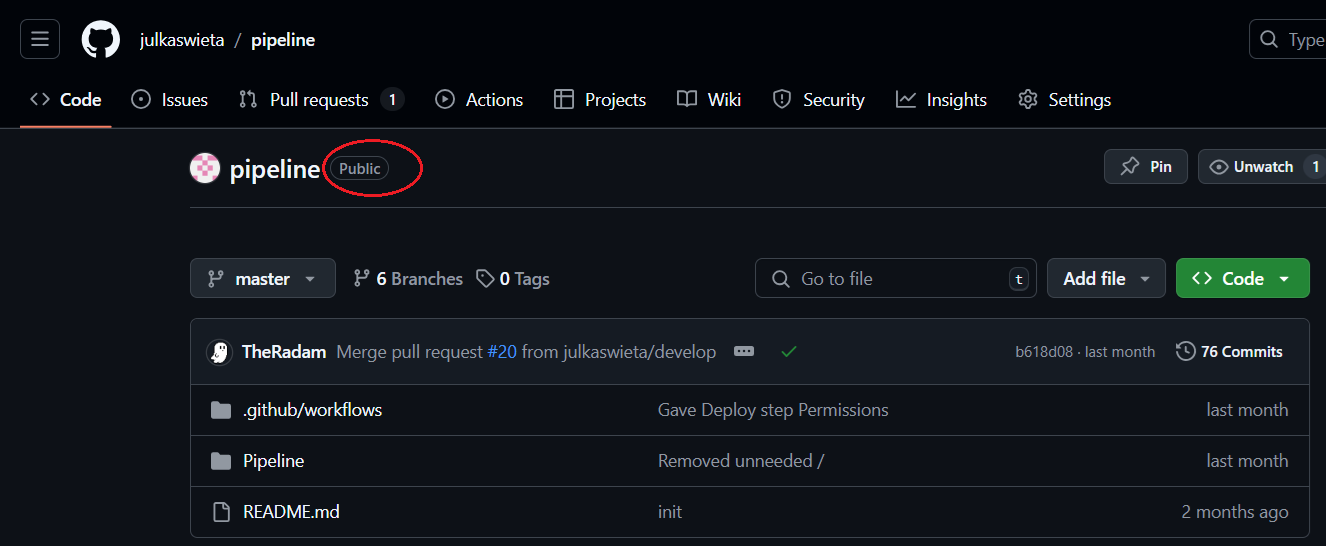
You can check that your repository for this project is public by going to its main page in GitHub. If it is, a “Public” badge will be displayed next to the repository’s name.
Workflow File
Creating a standard workflow in GitHub Actions is easy. GitHub provides a wide array of templates for creating a new workflow. It can even suggest the most suitable template based on the languages you use in your project. In every GitHub repository, there is an Actions tab where you can set up a new workflow or monitor your current ones.

In this tutorial, you will write your own workflow file from scratch to get an in-depth understanding of what each line does. If you decide you want to know a bit more about Actions, GitHub has a very comprehensive documentation, which you can find here: GitHub Actions documentation.
Every workflow file is in the YAML format, which is commonly used for configuration and uses minimal syntax. YAML files can have either the .yaml or .yml extension. Both are accepted by GitHub Actions - the choice is personal preference.
Syntax
Even though most CI/CD runners use YAML files for their step definitions, each requires a different syntax. GitHub Actions is event-oriented, which means that it defines the event that will trigger the jobs first. The table below outlines different keywords used in GitHub’s workflow files that will be used in this tutorial. A full list is available in the documentation: GitHub Actions Syntax Docs.
| Keyword | Description |
|---|---|
| name | Sets the name of the workflow, which is used by GitHub Actions to identify specific workflows. |
| on | Declares what events will cause the pipeline defined in the file to run. There can be one or more of these. Examples of events include pushes or pull requests. |
| jobs | A collection of high-level stages in the pipeline. Each job has a set of steps to execute. For example, you can have a build job and a deploy job. |
| runs-on | Specifies which operating system will run your job. |
| steps | List of steps contained in a job. Each step starts with - name: <name of step>. Each step has its own commands to run or configurations to set up. |
| uses | Specifies an existing action to be used within the step. They can come from GitHub’s marketplace or a repository. |
| run | Runs a command or script. Tip: You can run a sequence of commands using pipes. |
| with | Typically used in conjunction with uses, it provides input parameters for an action to configure how it runs. |
| if | Adds a conditional statement to a job or a step. |
| env | Defines environment variables for a job or a step. This can be used to pass parameters to a command, script or action. |
| permissions | Specifies what resources the job can access within the repository. |
| needs | Specifies job dependencies, which means that the job after the keyword must run first in order for this job to run successfully. Essentially declares the order of execution. |
Note
When you specify multiple events after the
onkeyword, all jobs contained in the same workflow file will run whenever any of those events occur. If you need different workflows to run on occurrence of different events, you will need to include multiple workflow files.
Here is a template for a basic workflow file:
1
2
3
4
5
6
7
8
9
10
11
12
13
14
15
16
17
18
name: <Name of your pipeline>

# What events cause the pipeline to run
on:
  push:
    branches:
      - master # Will only run when a change is made to master (including a merge)

jobs:
  <Name of job>:

    # The OS that the runner will use
    runs-on: ubuntu-latest

    # A list of steps to run
    steps:
      - name: <Name of step>
        run: echo "Some command"
Secrets and environment variables
You might sometimes need to use sensitive values to configure your CI/CD pipelines successfully. Since they should be kept private, it is a very bad idea to commit them to a repository, especially if it’s public. Locally, you can manually create configuration files and fill in the sensitive information yourself, or if you are working in a company this might be sent to you over secure channels.
CI/CD pipelines run automatically in the cloud so they don’t have access to those local files. GitHub provides us with secrets. They are encrypted values used to store sensitive information securely. They are not visible in the repository, but Actions can still access them.
You should use secrets for anything that could be exploited to gain unauthorised access, e.g. connection strings, API keys, passwords, access tokens etc. We’ll flag it up when you need to do this for this project.
2. Basic workflow setup
Now that you understand the syntax used in workflow files, you can move on to implementing your own workflow.
Important
Before you start making any changes, create a new branch e.g.
feature/workflow.
Setting up your workflow file
To set up your first GitHub Actions workflow manually:
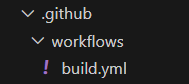
- Create a
.githubdirectory in the root folder of your repository (note the leading dot) - Then, create a
workflowsdirectory inside the.githubfolder. - Finally, create a file named
build.ymlwhich will store all instructions for your pipeline. Any.ymlor.yamlfile in this folder will be interpreted as a workflow in GitHub Actions. This file structure is defined by GitHub and must be followed to trigger automatic runs.
Your file structure should look like this:
The first step in creating pipelines is deciding what events will trigger the runs. It could run anytime something is pushed to any of the branches, or only to some selected branches. Another option is to run the workflow on pull requests, which we will use as an example in this tutorial. A full breakdown can be found in the documentation: Triggering a workflow.
Start defining you workflow by putting the following code in the build.yml file:
1
2
3
4
name: Build & Test Workflow

on:
  [pull_request]
The name of your workflow can be anything you want so feel free to replace Build & Test Workflow with something else of your choosing.
Important
Indentation plays an important role in
.yaml/.ymlfiles so make sure you copy the code correctly.
Setting up the environment
-
Now that you have defined when the workflow will be triggered, you can move on to defining what jobs and actions will be executed in the workflow. You also need to decide what operating system will be used for the runner. For this project, we will use the lastest version of Ubuntu Linux.
Add this code to your workflow file:
1
2
3
4
5
6
7
8
9
   name: Build & Test Workflow

   on:
     [pull_request]

   jobs:
     build:

       runs-on: ubuntu-latest
Note
Even though it may seem that build is a keyword in the code above, it is not. It is just a name of a job. As we’ve explained, you can have many jobs in your workflow file, and each needs a name, which can be anything, so feel free to change it to experiment. Since this job’s primary function is to build the code, we have chosen build as the name.
-
You can start defining the order of the steps in the job. Usually, the starting point is ensuring that the workflow can access the source code. In GitHub Actions, you can use a standard action that checks out the code from the repository.
Update your code to look like this:
1
2
3
4
5
6
7
8
9
10
11
12
 name: Build & Test Workflow

 on:
       [pull_request]
 jobs:
   build:

     runs-on: windows-latest

     steps:
     - name: Checkout code
       uses: actions/checkout@v4
The next step is ensuring that the environment is set up properly and all tools needed to build the code are installed. In .NET projects, this involves setting up the .NET SDK, and restoring workloads and dependencies.
-
To set up the SDK, you can use a standard action and provide it with the version of .NET that you require, in this case 8.0. Add this code below the previous step:
1
2
3
4
     - name: Setup .NET
       uses: actions/setup-dotnet@v4
       with:
         dotnet-version: 9.0
-
To restore .NET workloads, add this step, making sure you provide the path to the Notes.csproj file:
1
2
     - name: Restore workloads
       run: dotnet workload restore <Path to .csproj>
Workloads in .NET projects are various additional tools, libraries or features that are not included in the SDK by default, for example, MAUI. They are defined in the
.csprojfile so the command needs a correct path to that file.Note
It’s important to remember that all commands in the workflow will be executed from the root of your project, so you must supply a relative path to your
.csprojfile, e.g../Notes/Notes.csproj. Make sure the paths are relative to the root of the project, not the workflows folder. -
Apart from restoring workloads, you must also restore dependencies to ensure the project works properly. Add this step and again make sure the path to the main
.csprojfile is correct1 2
- name: Restore dependencies run: dotnet restore <Path to .csproj>
Building the project
-
Now that you’ve got the source code checked out and the environment set up, you can move on to building the project. Add the following build step to your workflow:
1
2
     - name: Build project
       run: dotnet build <path to .csproj file> --framework net9.0
Checkpoint: At this point, your workflow file should look like this (the paths to the
.csprojfile might be different):
1
2
3
4
5
6
7
8
9
10
11
12
13
14
15
16
17
18
19
20
21
22
23
24
25
name: Build & Test Workflow

on: [pull_request]

jobs:
    build:
        runs-on: ubuntu-latest

        steps:
        - name: Checkout code
          uses: actions/checkout@v4

        - name: Setup .NET
          uses: actions/setup-dotnet@v4
          with:
            dotnet-version: 9.0

        - name: Restore workloads
          run: dotnet workload restore ./Notes/Notes.csproj

        - name: Restore dependencies
          run: dotnet restore ./Notes/Notes.csproj

        - name: Build project
          run: dotnet build ./Notes/Notes.csproj --framework net9.0
Optional: Adding environment variables to GitHub
Note
This part of the tutorial is optional, therefore can be skipped. Follow along if you want to make your workflow file more flexible and less error-prone.
You might notice that you are reusing certain values throughout your pipeline, such as the path to your project file. To encourage reuse, you can set up a variable in GitHub to make future modifications more efficient.
-
To add a variable, navigate to the Settings tab in the repository
Fig. 12: Settings tab in GitHub -
In the menu on the left, navigate to
Secrets and variables>Actions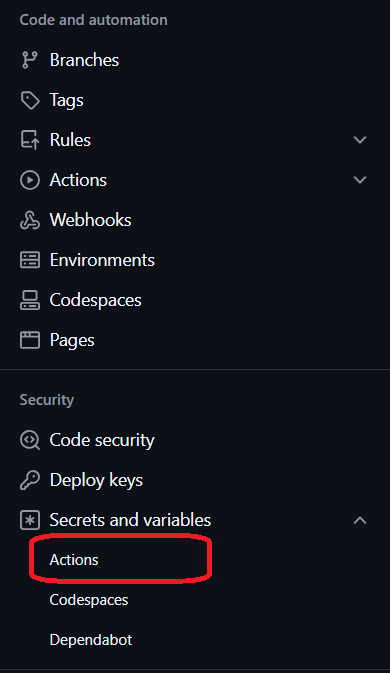
Fig. 13: Actions settings -
Switch to the
Variablestab and selectNew repository variable.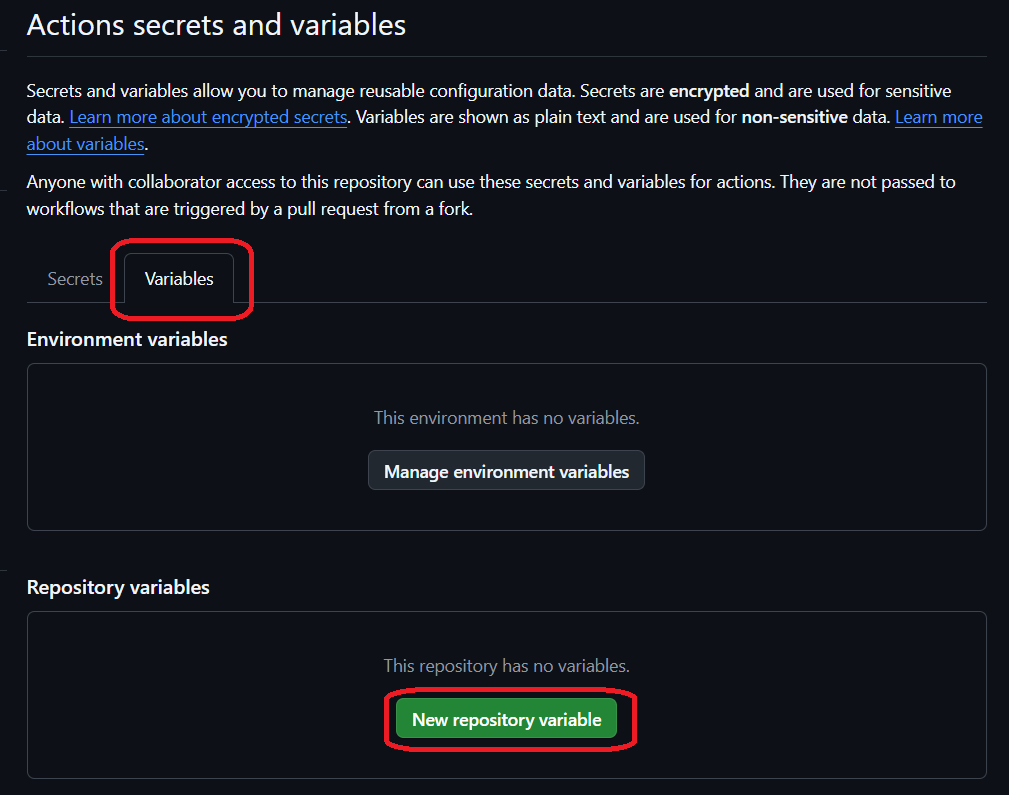
Fig. 14: Variables tab -
This will take you to a page where you give a name to your variable, e.g.
CSPROJ_PATH, and the value, which is the path to your.csprojfile in this example. Note: the path in Fig. 15 is just an example.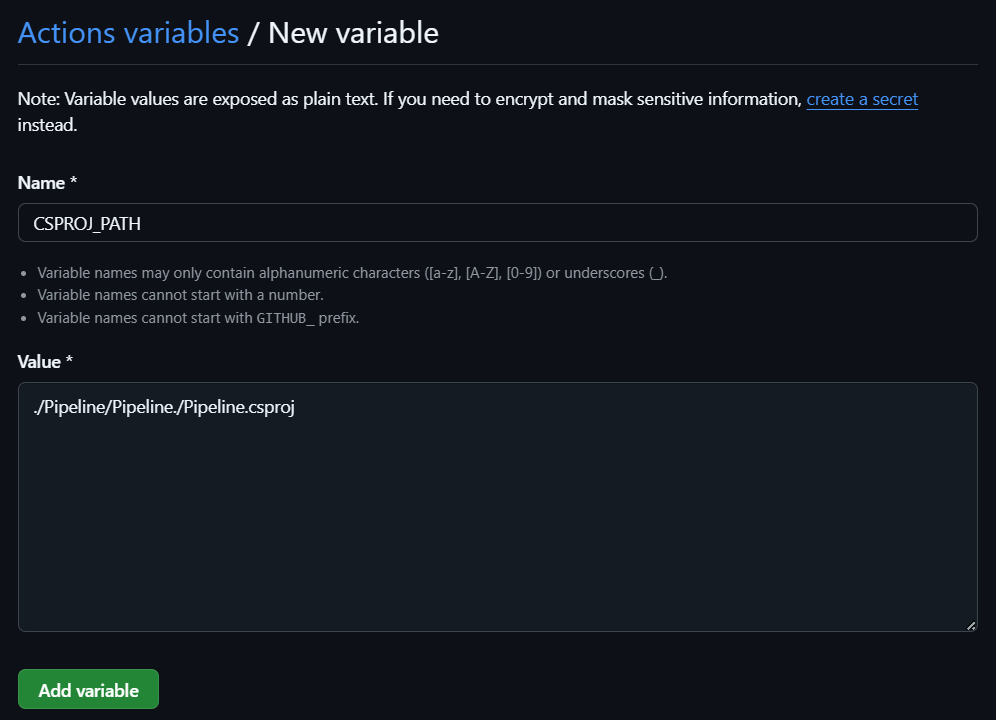
Fig. 15: Adding a variable
After you add the variable in GitHub, you can use it in your workflow file like this:
1
${{ vars.CSPROJ_PATH }}
So if you wish to replace your paths with the environment variable, you can replace them with the syntax above, for example, your build step could look like this:
1
2
 - name: Build project
   run: dotnet build ${{ vars.CSPROJ_PATH }} --framework net9.0
This is the end of the optional part of the tutorial
Testing the code
Testing is a critical element of any CI/CD pipeline. Automatically running a suite of tests speeds up development significantly, while ensuring that the application remains fully functional and the recent changes have not introduced any bugs (or at least the bugs covered by tests).
In GitHub Actions, you can run tests as part of the workflow. Usually, you’ll want to have a separate step for this after the build step. To test a .NET project, you can use the following command, which will run all tests included in the entire solution.
Important
Note: in all previous steps, you needed a path to the
.csprojfile, but in this case, it’s the.slnfile because tests will usually be defined in a separate project that makes use of the base project. The solution file brings them both together so they can communicate.
Add this code to the bottom of your workflow (remember about proper indentation):
1
2
    - name: test
      run: dotnet test <path to your notes.sln>
Adding database support to the workflow
In this application, the notes are saved to a database running inside a Docker container deployed on your local machine. Some of the tests that are defined in the Notes.Test project rely on the connection to that database. In order to properly run the tests, the workflow also needs connection to a database.
Just like in your dev-environment tutorial where you set up PostgreSQL using Docker Compose, GitHub Actions provides service containers that work in the same way. We’ll use a PostgreSQL 16 service container to create a test database for the workflow - this matches the PostgreSQL setup you’re already using locally.
Setting up PostgreSQL with Service Containers
-
Add a PostgreSQL service container to your workflow. Modify your workflow file to add the
servicessection between theruns-online and thestepssection:1 2 3 4 5 6 7 8 9 10 11 12 13 14 15 16 17 18 19 20 21
jobs: build: runs-on: ubuntu-latest services: postgres: image: postgres:16 env: POSTGRES_USER: test_user POSTGRES_PASSWORD: test_password POSTGRES_DB: testdb options: >- --health-cmd pg_isready --health-interval 10s --health-timeout 5s --health-retries 5 ports: - 5432:5432 steps: # Your steps go here...
This service container:
- Uses PostgreSQL 16 (same version as your dev-environment)
- Creates a database named
testdbautomatically - Uses
test_userandtest_passwordfor credentials - Includes health checks to ensure PostgreSQL is ready before tests run
- Exposes the database on port 5432
Note
Unlike SQL Server which required separate installation steps, the PostgreSQL service container handles everything automatically - the database is created and ready to use as soon as the workflow starts. This is the same pattern you used with Docker Compose in the dev-environment tutorial.
Connecting to the database for tests
Now your PostgreSQL database will be running on the workflow runner and will be ready for connections. However, your projects don’t know how to connect to it yet. Locally, we use ConnectionStrings stored in the appsettings.json file but it is very bad practice to commit them to the repository as they contain sensitive data, such as your IP address. GitHub addresses this by introducing repository secrets and supporting environment variables in their workflows.
To add a repository secret:
-
Navigate to the Settings tab of the repository. In the menu on the left, expand Secrets and variables and select Actions.
Fig. 16: Adding secrets in settings -
Ensure that the Secrets tab is highlighted and press New repository secret
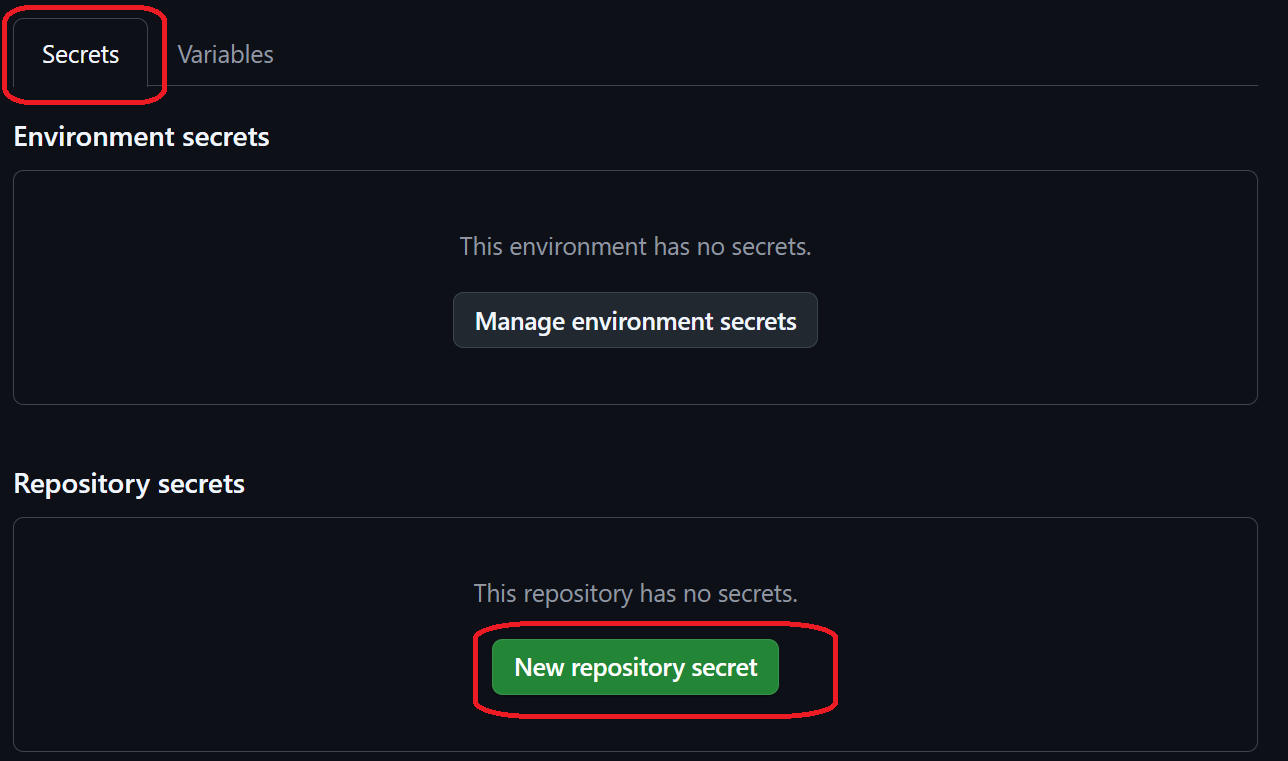
Fig. 17: Repository secrets -
Put
TestConnection_CONNECTION_STRINGas the name andHost=localhost;Port=5432;Username=test_user;Password=test_password;Database=testdb;as the Secret. Select Add secret.Note
This connection string format matches the PostgreSQL pattern used in StarterApp. The credentials match the service container configuration we defined earlier (
test_user,test_password,testdb).
To use the secret in the workflow, you can use the following syntax:
1
${{ secrets.TestConnection_CONNECTION_STRING }}
To make the .NET projects aware of the connection string stored in a secret, it needs to be added as an environment variable to all steps that need it. In the local setup, the C# code looks in the appsettings.json file under ConnectionString -> TestConnection, so we will stick to the same naming.
-
Update your Build project step to look like this:
1
2
3
4
 - name: Build project
   env:
     ConnectionStrings__TestConnection: ${{ secrets.TestConnection_CONNECTION_STRING }}
   run: dotnet build <Path to your Notes.csproj> --framework net9.0
-
Update your Test step to look like this:
1
2
3
4
 - name: Test
   env:
     ConnectionStrings__TestConnection: ${{ secrets.TestConnection_CONNECTION_STRING }}
   run: dotnet test <Path to your notes.sln> --framework net9.0
Important
Remember to use correct paths to the
.csprojand.slnfiles.
Checkpoint: Your workflow file should look like this now (the paths might be different):
1
2
3
4
5
6
7
8
9
10
11
12
13
14
15
16
17
18
19
20
21
22
23
24
25
26
27
28
29
30
31
32
33
34
35
36
37
38
39
40
41
42
43
44
45
46
47
name: Build & Test Workflow

on: [pull_request]

jobs:
    build:
        runs-on: ubuntu-latest

        services:
          postgres:
            image: postgres:16
            env:
              POSTGRES_USER: test_user
              POSTGRES_PASSWORD: test_password
              POSTGRES_DB: testdb
            options: >-
              --health-cmd pg_isready
              --health-interval 10s
              --health-timeout 5s
              --health-retries 5
            ports:
              - 5432:5432

        steps:
        - name: Checkout code
          uses: actions/checkout@v4

        - name: Setup .NET
          uses: actions/setup-dotnet@v4
          with:
            dotnet-version: 9.0

        - name: Restore workloads
          run: dotnet workload restore ./Notes/Notes.csproj

        - name: Restore dependencies
          run: dotnet restore ./Notes/Notes.csproj

        - name: Build project
          env:
            ConnectionStrings__TestConnection: ${{ secrets.TestConnection_CONNECTION_STRING }}
          run: dotnet build ./Notes/Notes.csproj --framework net9.0

        - name: Test
          env:
            ConnectionStrings__TestConnection: ${{ secrets.TestConnection_CONNECTION_STRING }}
          run: dotnet test ./notes.sln --framework net9.0
Lastly, we need to make a couple of changes in the code to ensure that the environment variable is picked up and used correctly, and to update the database provider from SQL Server to PostgreSQL.
-
Update the database provider package in Notes.Database/Notes.Database.csproj. Find the package reference for the SQL Server provider and replace it with the PostgreSQL provider:
Replace:
1
 <PackageReference Include="Microsoft.EntityFrameworkCore.SqlServer" Version="9.0.0" />
With:
1
 <PackageReference Include="Npgsql.EntityFrameworkCore.PostgreSQL" Version="9.0.0" />
This changes the Entity Framework provider from SQL Server to PostgreSQL, matching the database setup in your dev-environment and StarterApp.
-
Open the Notes.Database/Notes.Database.csproj file. Update the ItemGroup at the bottom of the file to look like this:
1
2
3
4
5
6
 <ItemGroup>
     <EmbeddedResource Include="appsettings.json" Condition="Exists('appsettings.json')" />
     <None Update="appsettings.json" Condition="Exists('appsettings.json')">
         <CopyToOutputDirectory>Always</CopyToOutputDirectory>
     </None>
 </ItemGroup>
The change will ensure that there are no errors in the workflow due to the absence of the
appsettings.jsonfile in your remote repository. -
Open the NotesDbContext.cs file. Update the
OnConfiguringmethod to look like this:1 2 3 4 5 6 7 8 9 10 11 12 13 14 15 16 17 18 19 20 21 22 23 24 25 26 27 28
protected override void OnConfiguring(DbContextOptionsBuilder optionsBuilder) { var connectionString = Environment.GetEnvironmentVariable($"ConnectionStrings__{ConnectionName}"); if (string.IsNullOrEmpty(connectionString)) { var assembly = Assembly.GetExecutingAssembly(); using var stream = assembly.GetManifestResourceStream("Notes.Database.appsettings.json"); if (stream != null) { var config = new ConfigurationBuilder() .AddJsonStream(stream) .Build(); connectionString = config.GetConnectionString(ConnectionName); } } if (string.IsNullOrEmpty(connectionString)) { throw new InvalidOperationException("Database connection string is not configured."); } optionsBuilder.UseNpgsql( connectionString, o => o.MigrationsAssembly("Notes.Migrations")); }
This will first try to retrieve the connection string from the environment variable that is added to the project from the workflow, and if that fails, it will fallback to the original method of getting the connection string from the
appsettings.jsonfile. Note that we’ve changed fromUseSqlServer()toUseNpgsql()to match the PostgreSQL database provider.
Checking whether your pipeline works
At this point, your workflow should be set up to successfuly build and test the project.
-
Commit your changes and push them to the remote repository.
Important
Make sure you commit the changes to a new branch, not the main branch. Since the workflow is set up to be triggered on a pull request, this is necessary.
-
Open a pull request to merge your changes to the main branch. If you don’t know how to do this, check this tutorial or ask for help.
-
If your workflow is set up correctly, you should be able to see the newly trigerred workflow on the pull request page after a few seconds. If you click on
Details, it will take you to the summary of the run in the Actions tab.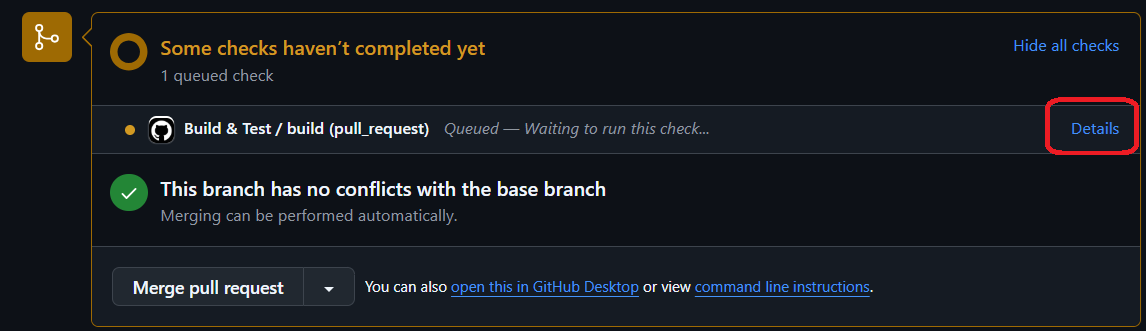
Fig. 18: Action details in pull request -
You should see a screen similar to this:
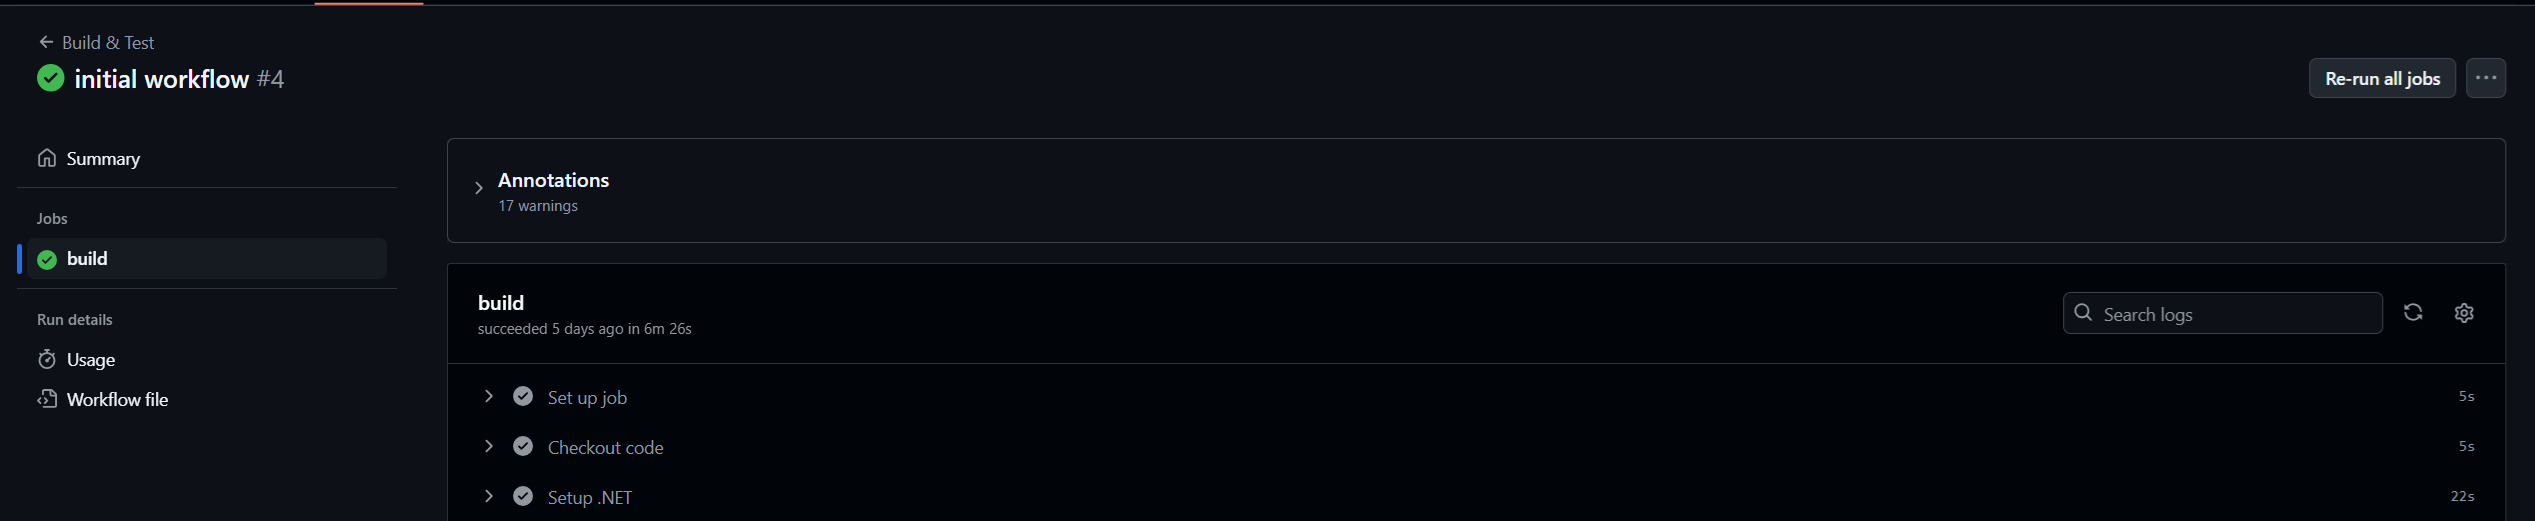
Fig. 19: Action summary In the panel on the left, from the top, you can see:
- the name of the workflow,
- the name of the pull request the run is part of and the status of the entire workflow
- Summary tab
- list of jobs with their statuses
- Run details such as resource usage and the workflow file that was used for the run
If all statuses are green, that means your pipeline ran successfully.
In the bigger panel on the right, you can see a list of steps that were executed in the run. Have a look at it to verify that all steps you expect to see are there. You can expand each step to see what its output was by pressing the
>next to the step’s name.Note
The workflow takes some time to run due to setup steps like restoring workloads and running static analysis. The PostgreSQL service container starts quickly (thanks to health checks), but expect the full workflow to take 5-10 minutes depending on the number of tests and Sonar analysis complexity.
Checkpoint
Please make sure that your workflow completes without any errors before proceeding with the rest of the tutorial. This is the basic workflow that will set up a database, build the project and run any tests.
Why PostgreSQL in CI/CD?
Using PostgreSQL in your CI/CD pipeline mirrors your local development environment and prepares you for real-world deployment scenarios. Understanding the difference between development/testing environments and production deployment is crucial for professional software development.
Development & Testing Workflow (What You’re Doing Now)
In local development and CI/CD testing, you have direct control over the database:
- Local Development:
- Run PostgreSQL in Docker containers locally
- Run database migrations on your local database using Entity Framework
- Test your application against your local database
- You manage the database schema, data, and configuration
- CI/CD Pipeline (This Tutorial):
- GitHub Actions creates a PostgreSQL service container
- The workflow runs database migrations automatically
- Tests execute against the test database
- Each workflow run gets a clean database instance
This approach works because you control the environment and can safely run migrations, reset data, and modify the schema as needed.
Production Deployment (What Happens Later)
In real-world production environments, the architecture is very different:
- Remote Database Access via API:
- Your application connects to a pre-defined API that accesses a centralized PostgreSQL database
- The API runs on a server (e.g., Azure App Service, AWS Elastic Beanstalk)
- The database runs on a managed service (e.g., Azure Database for PostgreSQL, AWS RDS)
- You do NOT run migrations from your application - the API team controls database schema changes
- Your app makes HTTP requests to API endpoints instead of direct database connections
- Why This Separation Matters:
- Security: Client applications cannot access database credentials or connection strings
- Scalability: The API can serve many clients without overwhelming the database
- Versioning: The API provides a stable interface even if the database schema changes
- Control: Database administrators control migrations and schema changes, not every developer
- Reliability: Centralized database management prevents conflicts from multiple apps trying to modify the schema
-
Real-World Example:
Development (Now):
1
2
Your App → Direct Connection → Your Local PostgreSQL Database
(You run migrations, you control schema)
Production (Later in Module):
1
2
Your App → HTTP Requests → University API → Shared PostgreSQL Database
(API team controls migrations, you only read/write data via endpoints)
Summary: Your Workflow in This Module
- ✅ Dev: Run migrations locally → Test directly against PostgreSQL in Docker
- ✅ CI/CD: Run migrations in pipeline → Test against PostgreSQL service container
- ✅ Production: Use pre-defined API → No direct database access, no migrations from your app
This progression mirrors professional software development practices where developers work with full database control locally, automated testing runs in CI/CD pipelines, and production environments use managed services with API layers for security and scalability.
3. Extending your pipeline with external tools
You now know how to create a basic pipeline that builds and tests your code. You can expand the pipeline by adding external tools for static code analysis, database migrations, documentation generation or many other things that will add value to the automatic runs. We will add support for SonarCloud static code analysis and automatic documentation generation using Doxygen.
Static code analysis with SonarQube Cloud
Static code analysis can tell us a lot about the quality of the code written. SonarQube Cloud is a cloud-based version of the SonarQube code analyser. You can find information about the local usage of SonarQube in this tutorial: SonarQube.
Setting up a SonarCloud account, organization and project
-
To use the cloud version of Sonar, you have to create an account on their website. You can find it here: SonarQube Cloud signup. Since we are using GitHub to store the repository, you should sign up using GitHub. If you do that, you will be asked to authorize SonarCloud to gain access to certain details of your GitHub account, which you should accept by pressing the
Authorize SonarCloudbutton.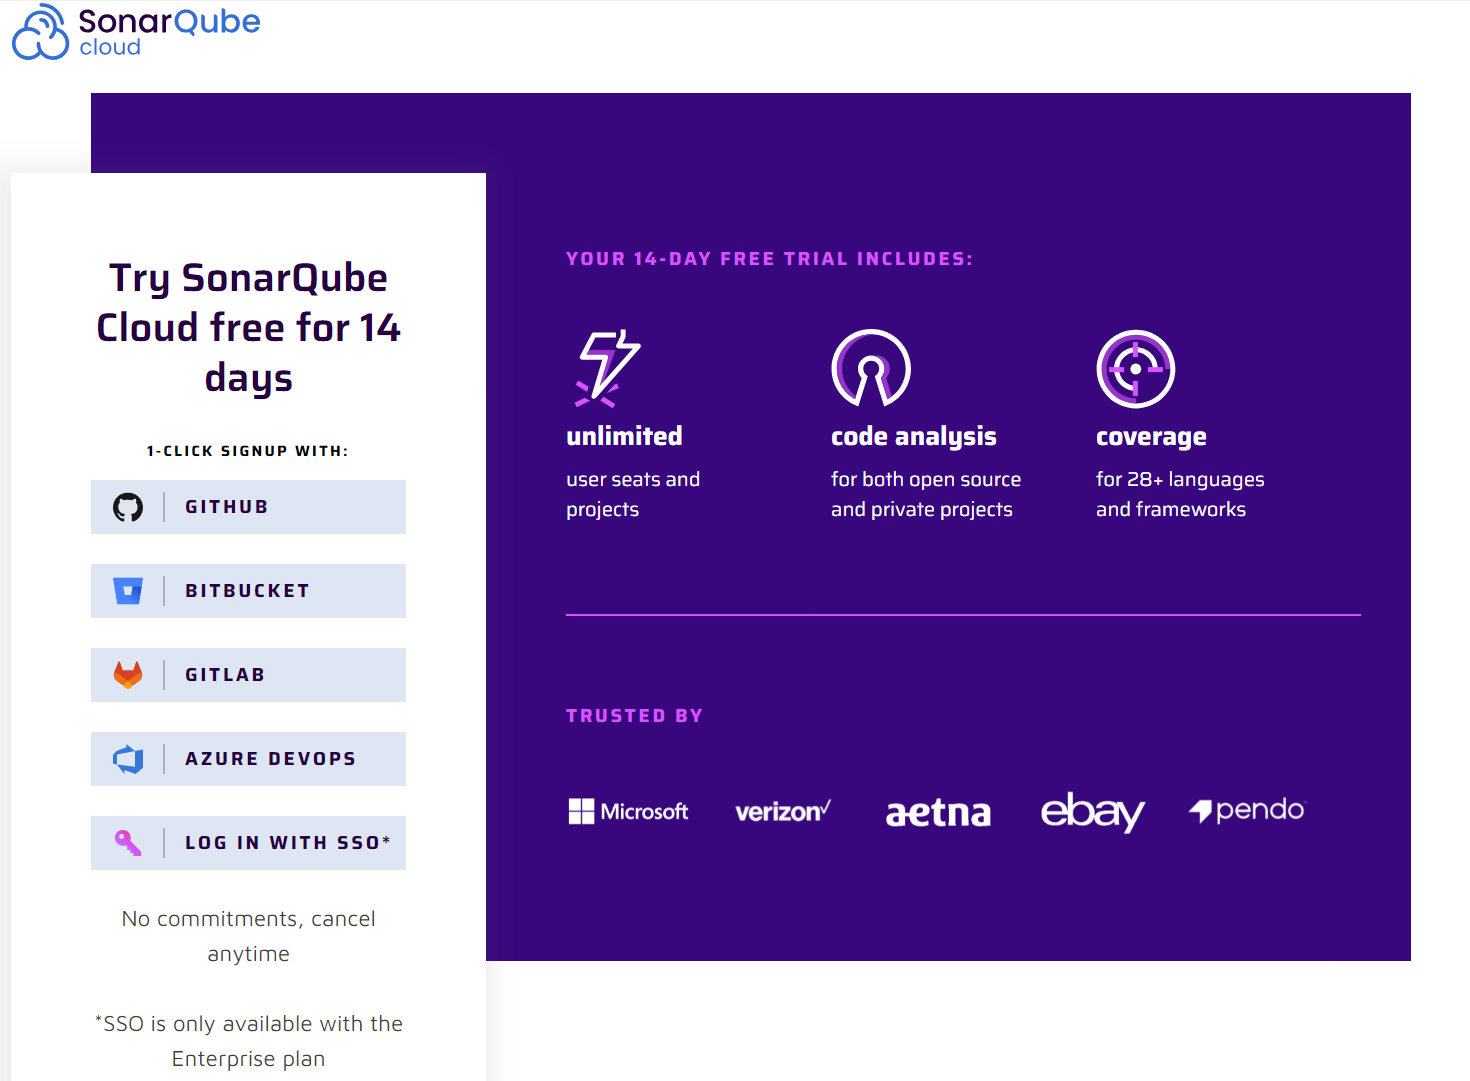
Fig. 20: Sonar Cloud Signup Page -
Once your account is ready, you will be taken to the getting started screen, where you can import the organization that owns your repository from GitHub. You should have created this earlier. We’re going to assume you have an organisation in GitHub so select
Import an organization.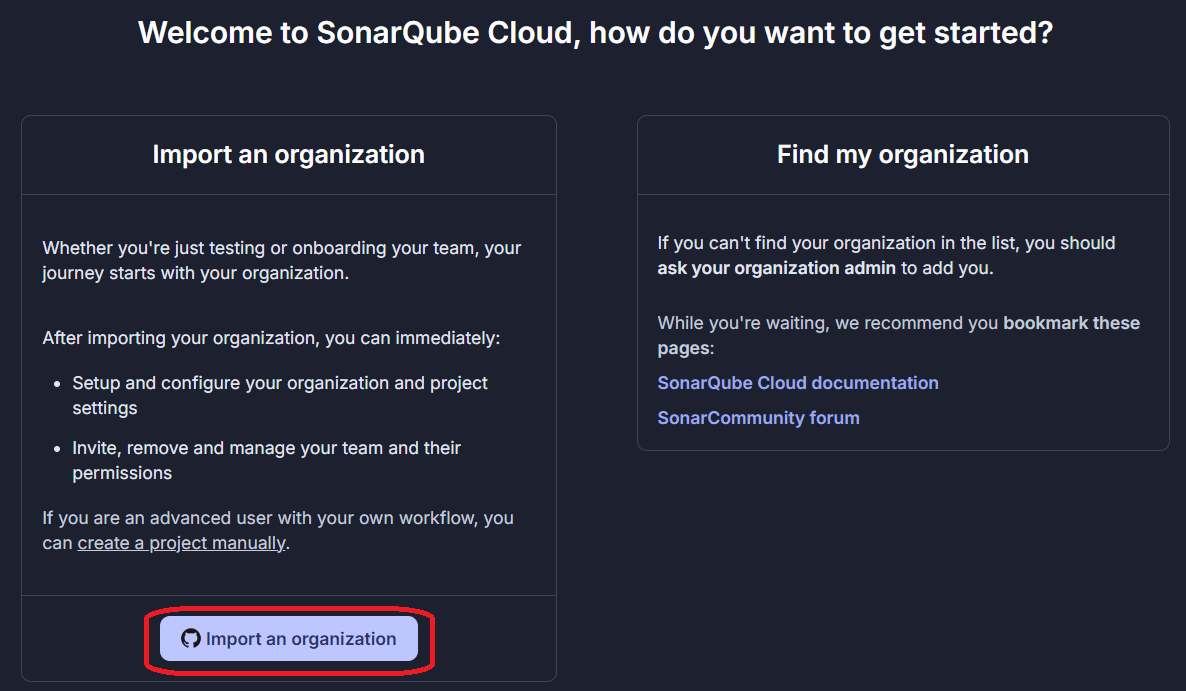
Fig. 21: Import organisation in Sonar -
On the next page, select which organisation you want to use. Then, you will be asked for permission to install Sonar on your organisation. Since we only need the analysis on one repository, choose the
Only select repositoriesoption and select the correct repository, then proceed by pressingInstall.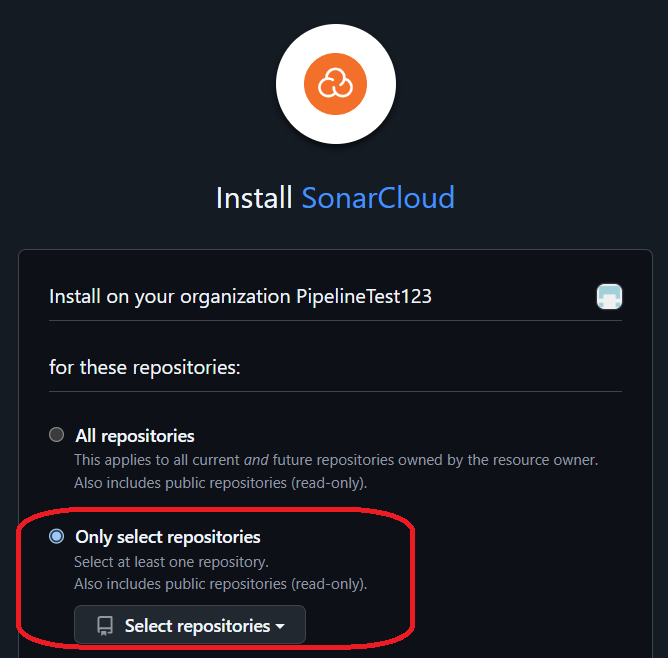
Fig. 22: Selecting a repository -
On the next page, you will be asked for the name and the key of the project - keep them as is. You also need to choose the payment plan so make sure to select the free one to avoid any extra costs. Proceed by pressing
Create organization. -
Now that your Sonar organization is set up, you have to select the repositories that will be included in the Sonar project you are creating. Select the correct one and continue by pressing
Set up.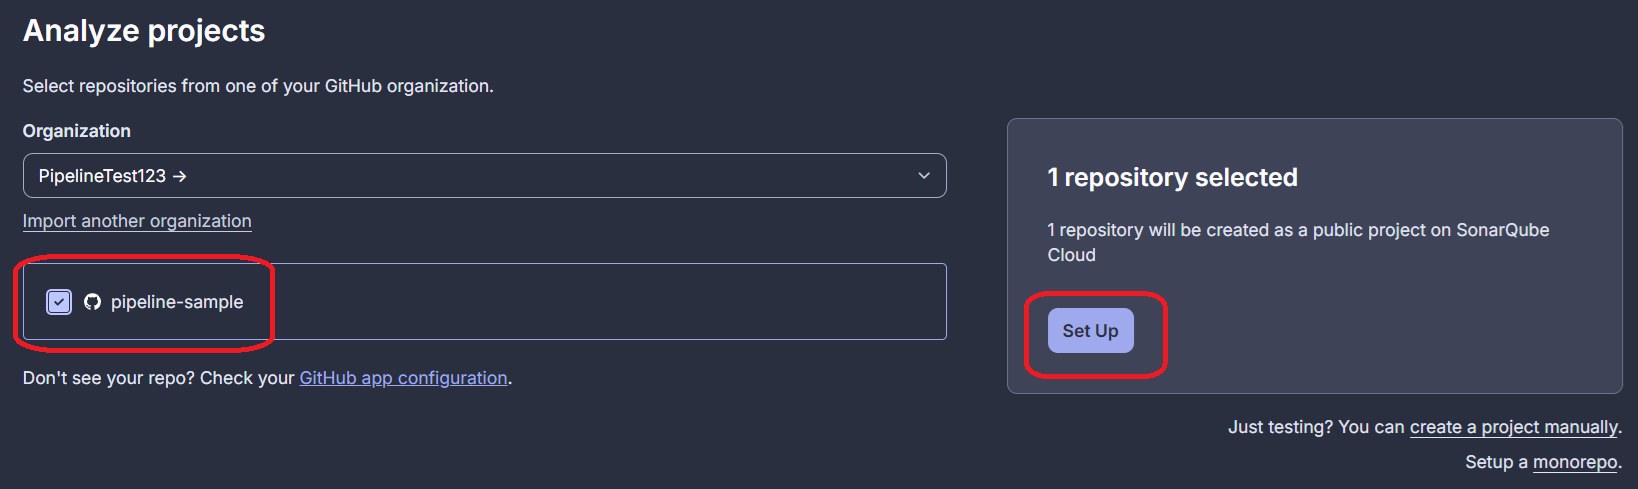
Fig. 23: Choosing the project -
Finally, you need to choose what Sonar considers new code in the repository. You have two choices which are explained in Fig. 24. You should proceed with the
Previous versionone. Then, you can finally create the project.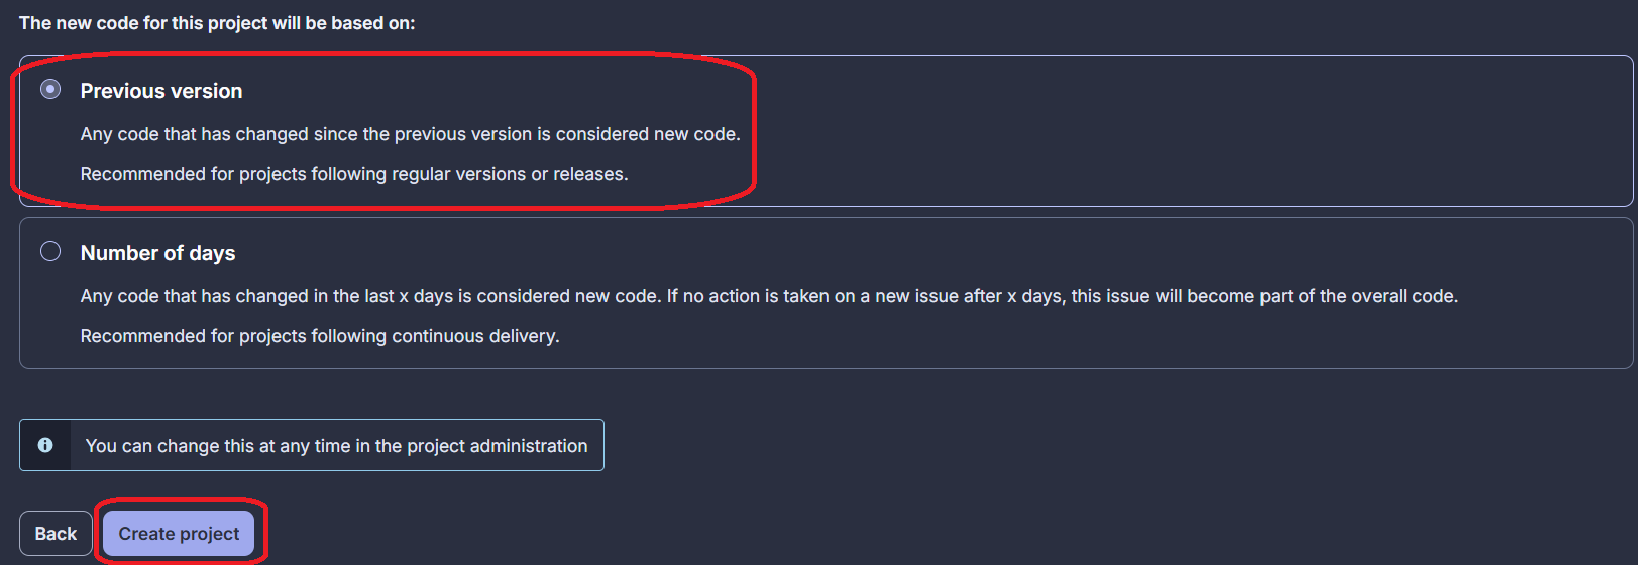
Fig. 24: Selecting what is new code
Adding Sonar Token as a repository secret
SonarCloud can be integrated with your workflow so that anytime the workflow runs, it will trigger a static code analysis by Sonar.
The first step to setting this up is adding a secret in GitHub that contains an access token for Sonar. The token is provided by Sonar and can be found following the steps below:
-
In your main project page in Sonar, go to
Administrationand then selectAnalysis Method.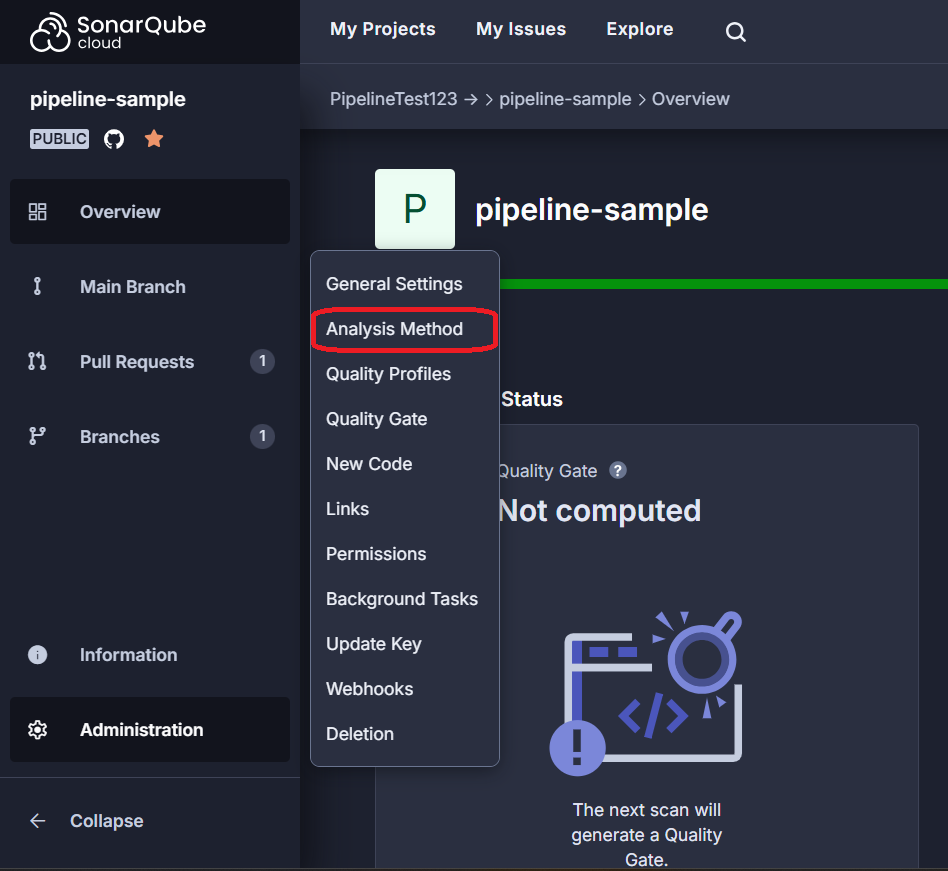
Fig. 25: Analysis method -
At the bottom of the page, select
With GitHub Actions.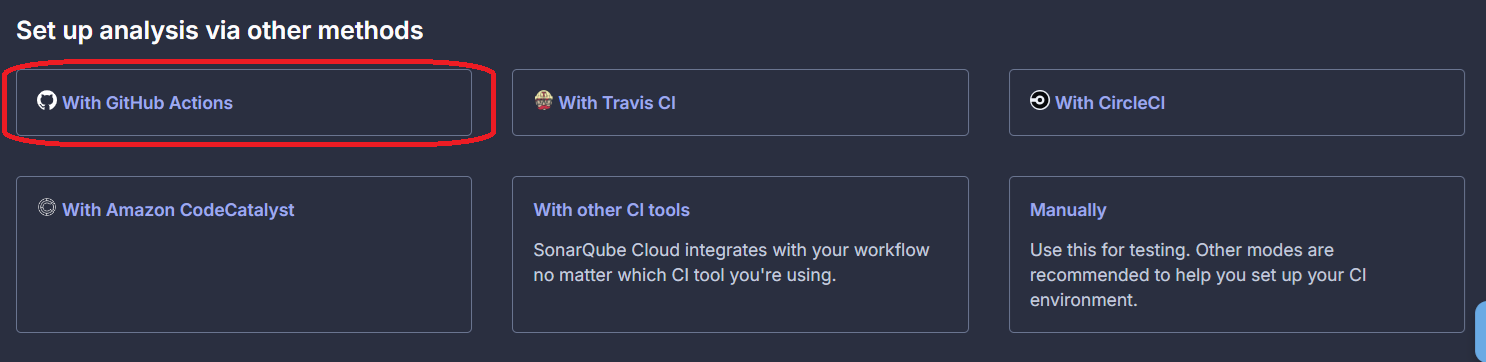
Fig. 26: Setup GitHub in Sonar -
On the final page, make sure you disable automatic analysis and then copy the value of SONAR_TOKEN.
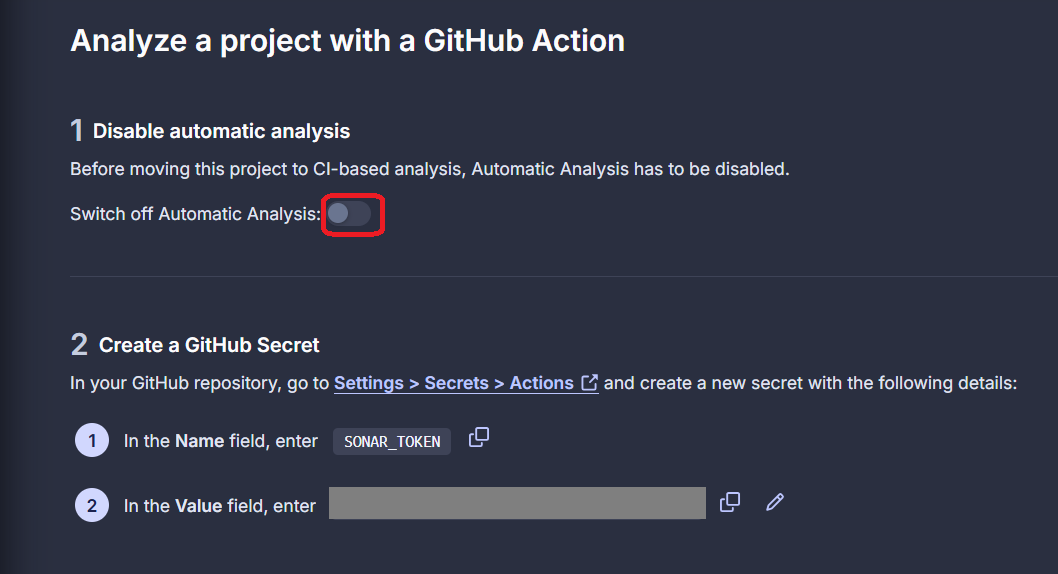
Fig. 27: Secret in Sonar -
You can now add the secret in GitHub Actions, the same way you added the secret for the connection string. Go to the
Actions secrets and variablestab in the repository settings. Make sure you are in theSecretstab and then add a new secret with the nameSONAR_TOKENand the value copied from Sonar. Without this, your workflow will fail as it won’t be able to connect to Sonar properly.
Important
Don’t proceed with adding the steps if you don’t have the token as a repository secret.
Adding Sonar steps to the workflow
Now it’s time to modify the workflow file to include static analysis by SonarCloud. Unfortunately, the setup required before running the scanner is a bit lengthy because Sonar carries its own dependencies and needs to be installed before it can be used. Fortunately, SonarCloud provides all the configuration in their documentation: SonarQube docs
-
Modify your workflow file to insert the Sonar setup steps between the Restore dependencies and the Build steps, like shown below.
1
2
3
4
5
6
7
8
9
10
11
12
13
14
15
16
17
18
19
20
21
22
23
24
25
26
27
28
29
30
31
32
33
34
35
36
37
38
39
40
41
42
43
44
45
46
47
 # ...

 - name: Restore dependencies
   run: dotnet restore <Path to your Notes.csproj>

 # Command-line tools from .NET
 - name: Install Tools
   run: dotnet tool install --global dotnet-coverage

 #Setup a Java JDK
 - name: Set up JDK 17
   uses: actions/setup-java@v4
   with:
     java-version: 17
     distribution: 'zulu'

 # Get the SonarCloud dependencies from cache
 - name: Cache SonarCloud packages
   uses: actions/cache@v4
   with:
     path: ~/sonar/cache
     key: ${{ runner.os }}-sonar
     restore-keys: ${{ runner.os }}-sonar

 # Get the SonarCloud scanner from cache
 - name: Cache SonarCloud scanner
   id: cache-sonar-scanner
   uses: actions/cache@v4
   with:
     path: ./.sonar/scanner
     key: ${{ runner.os }}-sonar-scanner
     restore-keys: ${{ runner.os }}-sonar-scanner

 # Install the SonarCloud Scanner
 - name: Install SonarCloud scanner
   if: steps.cache-sonar-scanner.outputs.cache-hit != 'true'
   run: |
     mkdir -p .sonar/scanner
     dotnet tool update dotnet-sonarscanner --tool-path ./.sonar/scanner
     echo "$PWD/.sonar/scanner" >> $GITHUB_PATH

 - name: Build project
   env:
     ConnectionStrings__TestConnection: ${{ secrets.TestConnection_CONNECTION_STRING }}
   run: dotnet build <Path to your Notes.csproj> --framework net9.0

 ...
What each step does:
-
To properly collect test coverage from the Notes.Test project, Sonar needs the command-line tool from .NET. The first step installs that tool.
-
The SonarCloud Scanner internally requires a Java runtime environment to execute. Without it, the scanner won’t run, even for non-Java projects so the first step in Sonar’s environment setup is setting up the JDK, which is done through a standard action.
-
The next step is to get the cached dependencies. If no dependencies are cached, this step will simply do nothing and all necessary dependencies will need to be installed later. If there are some cached dependencies, they will be restored to speed up the process.
-
In the next two steps, the first one will try to get the SonarCloud scanner from cache but if it’s not found, the second one will install it. Paste the following code below the
Cache SonarCloud packagesstep. Note that you must provide the path to your project folder in the second step.
These are all the steps needed to set up SonarCloud. Now you can move on to setting up the analysis. The way it works is you start the scanner, build and test your project, and then stop the scanner. This means that the build and test steps need to be encapsulated by the sonar start and end steps.
-
Modify your code to include the Start Sonar analysis step before the Build step and End Sonar analysis step after the Test step, as in the code below. Also note that the Test step was updated to make use of the coverage collection required by Sonar.
1
2
3
4
5
6
7
8
9
10
11
12
13
14
15
16
17
18
19
20
21
22
23
24
25
26
27
28
29
30
 #...

  # Install the SonarCloud Scanner
  - name: Install SonarCloud scanner
    if: steps.cache-sonar-scanner.outputs.cache-hit != 'true'
    run: |
      mkdir -p .sonar/scanner
      dotnet tool update dotnet-sonarscanner --tool-path ./.sonar/scanner
      echo "$PWD/.sonar/scanner" >> $GITHUB_PATH

  - name: Start Sonar Analysis
    env:
      SONAR_TOKEN: ${{ secrets.SONAR_TOKEN }}
    run: |
      ./.sonar/scanner/dotnet-sonarscanner begin /k:"<key>" /o:"<organisation>" /d:sonar.token="${{ secrets.SONAR_TOKEN }}" /d:sonar.host.url="https://sonarcloud.io" /d:sonar.scanner.scanAll=false /d:sonar.cs.vscoveragexml.reportsPaths=coverage.xml

  - name: Build project
    env:
      ConnectionStrings__TestConnection: ${{ secrets.TestConnection_CONNECTION_STRING }}
    run: dotnet build <Path to your Notes.csproj file> --framework net9.0

  - name: Test
    env:
      ConnectionStrings__TestConnection: ${{ secrets.TestConnection_CONNECTION_STRING }}
    run: dotnet-coverage collect "dotnet test <Path to you notes.sln file> --framework net9.0" -f xml -o "coverage.xml"

  - name: End Sonar Analysis
    env:
      SONAR_TOKEN: ${{ secrets.SONAR_TOKEN }}
    run: ./.sonar/scanner/dotnet-sonarscanner end /d:sonar.token="${{ secrets.SONAR_TOKEN }}"
-
Make sure that you replace
<organisation>with Sonar organisation key and<key>with your Sonar project key (keep the double quotes around these values). You can find them in the Information tab: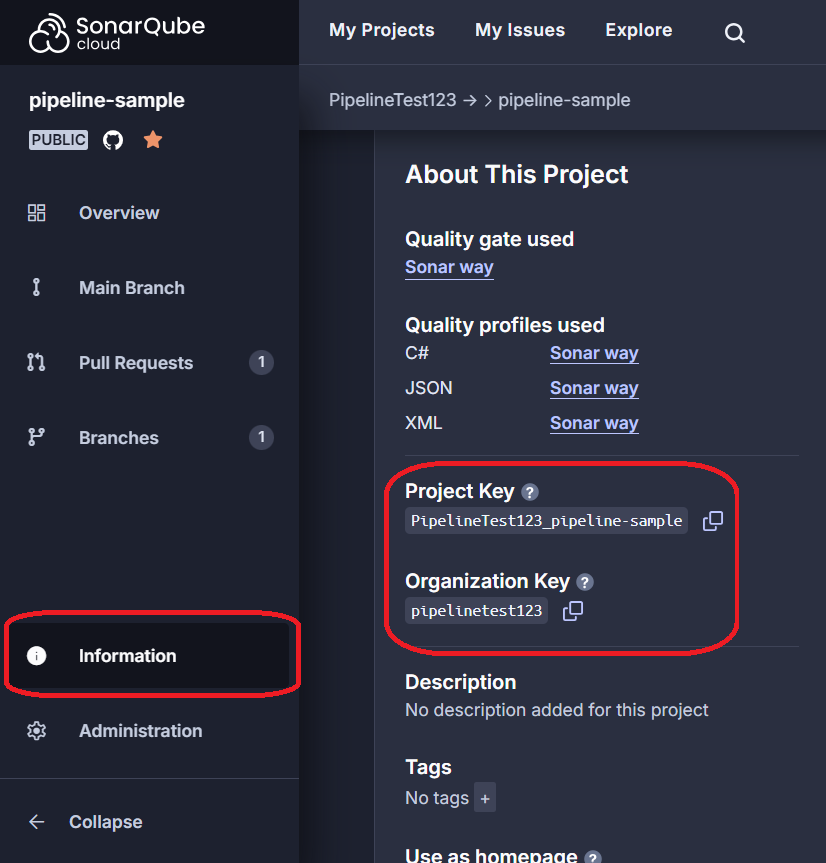
Fig. 28: Organisation and project keys in Sonar
Important
Go through the Sonar steps carefully and double check all paths were replaced with ones that are correct for your project. Also make sure you have correctly replaced the
<organisation>and<key>placeholders.
Checkpoint: Your entire workflow file should look like this now (The paths and placeholders will be different):
1
2
3
4
5
6
7
8
9
10
11
12
13
14
15
16
17
18
19
20
21
22
23
24
25
26
27
28
29
30
31
32
33
34
35
36
37
38
39
40
41
42
43
44
45
46
47
48
49
50
51
52
53
54
55
56
57
58
59
60
61
62
63
64
65
66
67
68
69
70
71
72
73
74
75
76
77
78
79
80
81
82
83
84
85
86
87
88
89
90
91
92
93
name: Build & Test Workflow

on: [pull_request]

jobs:
    build:
        runs-on: ubuntu-latest

        services:
          postgres:
            image: postgres:16
            env:
              POSTGRES_USER: test_user
              POSTGRES_PASSWORD: test_password
              POSTGRES_DB: testdb
            options: >-
              --health-cmd pg_isready
              --health-interval 10s
              --health-timeout 5s
              --health-retries 5
            ports:
              - 5432:5432

        steps:
        - name: Checkout code
          uses: actions/checkout@v4

        - name: Setup .NET
          uses: actions/setup-dotnet@v4
          with:
            dotnet-version: 9.0

        - name: Restore workloads
          run: dotnet workload restore ./Notes/Notes.csproj

        - name: Restore dependencies
          run: dotnet restore ./Notes/Notes.csproj

        - name: Install Tools
          run: dotnet tool install --global dotnet-coverage

        #Setup a Java JDK
        - name: Set up JDK 17
          uses: actions/setup-java@v4
          with:
            java-version: 17
            distribution: 'zulu'

        # Get the SonarCloud dependencies from cache
        - name: Cache SonarCloud packages
          uses: actions/cache@v4
          with:
            path: ~/sonar/cache
            key: ${{ runner.os }}-sonar
            restore-keys: ${{ runner.os }}-sonar

        # Get the SonarCloud scanner from cache
        - name: Cache SonarCloud scanner
          id: cache-sonar-scanner
          uses: actions/cache@v4
          with:
            path: ./.sonar/scanner
            key: ${{ runner.os }}-sonar-scanner
            restore-keys: ${{ runner.os }}-sonar-scanner

        # Install the SonarCloud Scanner
        - name: Install SonarCloud scanner
          if: steps.cache-sonar-scanner.outputs.cache-hit != 'true'
          run: |
            mkdir -p .sonar/scanner
            dotnet tool update dotnet-sonarscanner --tool-path ./.sonar/scanner
            echo "$PWD/.sonar/scanner" >> $GITHUB_PATH

        - name: Start Sonar Analysis
          env:
            SONAR_TOKEN: ${{ secrets.SONAR_TOKEN }}
          run: |
            ./.sonar/scanner/dotnet-sonarscanner begin /k:"PipelineTest123_notes" /o:"pipelinetest123" /d:sonar.token="${{ secrets.SONAR_TOKEN }}" /d:sonar.host.url="https://sonarcloud.io" /d:sonar.scanner.scanAll=false /d:sonar.cs.vscoveragexml.reportsPaths=coverage.xml

        - name: Build project
          env:
            ConnectionStrings__TestConnection: ${{ secrets.TestConnection_CONNECTION_STRING }}
          run: dotnet build ./Notes/Notes.csproj --framework net9.0

        - name: Test
          env:
            ConnectionStrings__TestConnection: ${{ secrets.TestConnection_CONNECTION_STRING }}
          run: dotnet-coverage collect "dotnet test ./notes.sln --framework net9.0" -f xml -o "coverage.xml"

        - name: End Sonar Analysis
          env:
            SONAR_TOKEN: ${{ secrets.SONAR_TOKEN }}
          run: ./.sonar/scanner/dotnet-sonarscanner end /d:sonar.token="${{ secrets.SONAR_TOKEN }}"
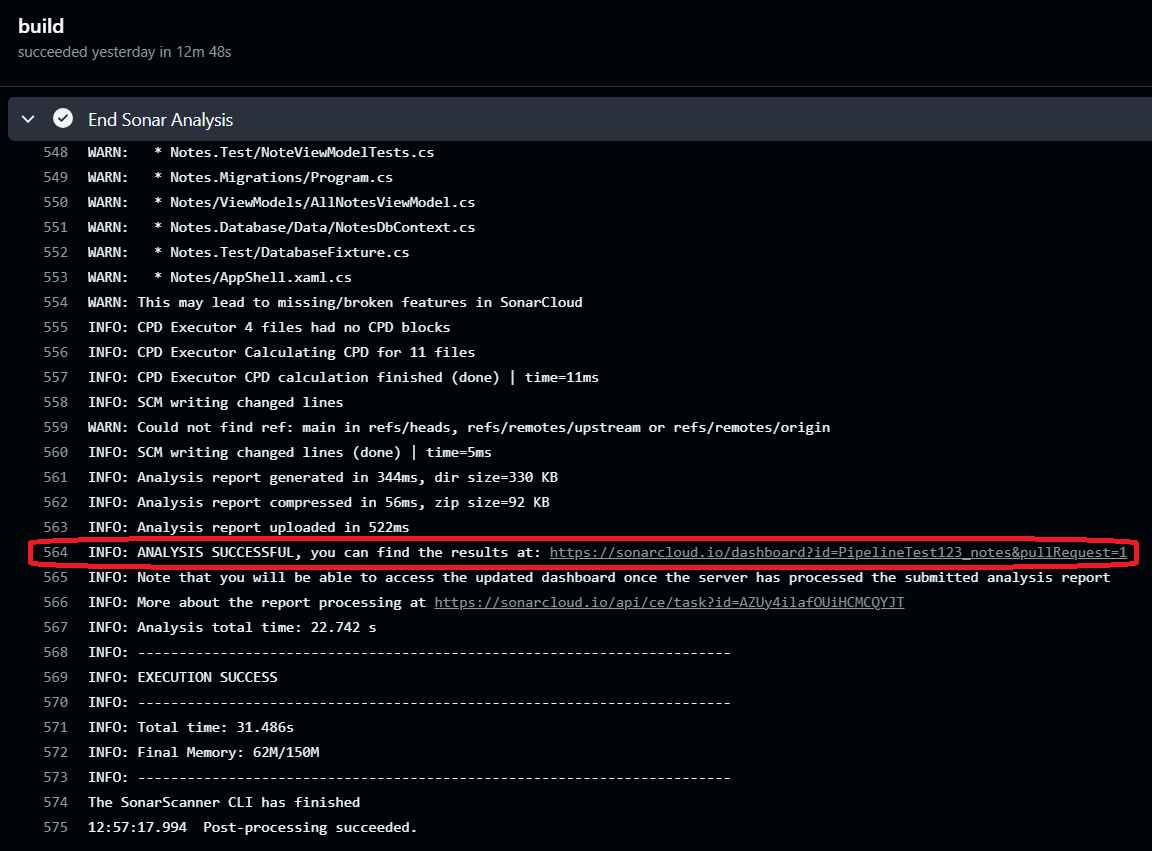
Your workflow should now be set up to automatically run Sonar analysis. Go ahead and commit and push your changes. Then, if you still have a pull request open on the same branch, the workflow will be triggered automatically. If not, you can open a new PR. Make sure to check whether your pipeline ran successfully in the Actions tab in GitHub.
The results of the analysis will be available in the SonarCloud interface. The End Sonar analysis step will generate a link which can take you directly there as in Fig. 29. Alternatively, you can go to the SonarCloud dashboard manually.
Automatic documentation generation with Doxygen
Documentation is important, especially in larger projects with multiple contributors. Doing this manually can be time-consuming but fortunately, it can be sped up by using automatic documentation generators like Doxygen.
Doxygen is a tool that generates a web-based representation of your project’s documentation and takes care of all formatting for you. It takes the comments from your code and produces HTML files with all of the details. You can learn more about Doxygen in this document: Documentation.
Here is an example of documentation generated by Doxygen:
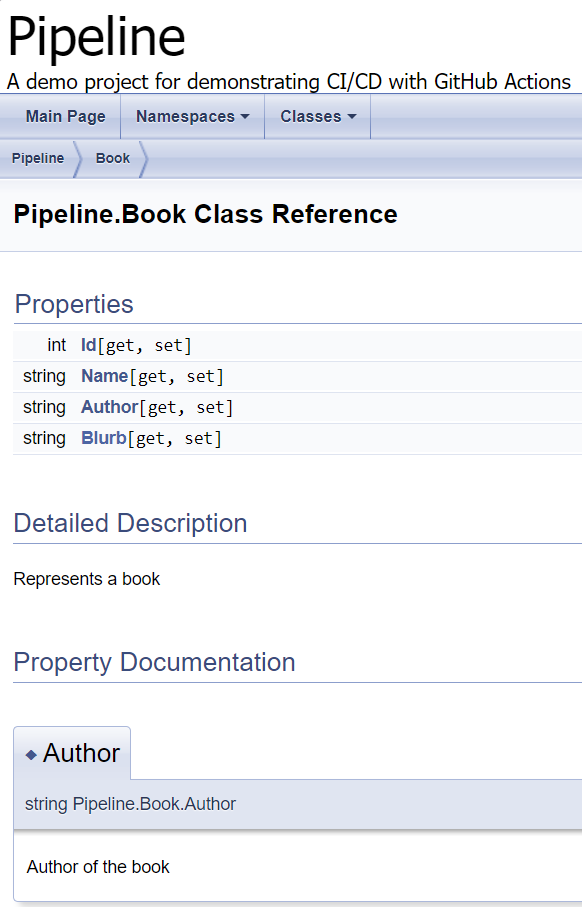
Since documentation should be stable and reflect the stable version of the code, it might be a good idea to include documentation generation in a workflow that runs only when changes are pushed to the master/main branch, which we suggest in this tutorial.
The current workflow runs on any pull requests, so we’ll need to create a new one.
- Create a new file in the
workflowsfolder calleddocumentation.yml. -
Paste the initial code that checks out code from the repository into that file:
1
2
3
4
5
6
7
8
9
10
11
12
13
14
 name: Documentation

 on:
   push:
     branches:
       - master

 jobs:
   generate:
     runs-on: ubuntu-latest

     steps:
     - name: Checkout code
       uses: actions/checkout@v4
-
Doxygen must be installed on the workflow runner so add the following step to the end of your file. Remember about proper indentation:
1
2
 - name: Install Doxygen
   run: sudo apt-get install doxygen -y
-
Doxygen requires the presence of a configuration file called Doxyfile. It defines rules about how the final documentation should be generated, e.g. formatting. This can be generated locally and customised but for this tutorial, the workflow will generate a default one. Add this step to your file:
1
2
 - name: Generate Doxyfile
   run: doxygen -g
-
Now that everything is set up, the documentation can be generated using data included in the Doxyfile. Add this step to the workflow:
1
2
 - name: Generate Doxygen Documentation
   run: doxygen .
Automatic deployment of the documentation
The steps above generate the documentation but it would be better if we could access it from the web. You can use GitHub Pages to do this. The generated artefacts can be uploaded and used to deploy the documentation to GitHub Pages.
-
First add a step to the end of your file which will upload the artifacts generated in the previous step to Github Pages:
1
2
3
4
     - name: Upload static files as artifact
       uses: actions/upload-pages-artifact@v3
       with:
         path: html
-
You will need to grant write permissions to
generatethe job so it can access Github Pages. Modify the beginning of your workflow file to add the permissions:1 2 3 4 5 6 7 8 9 10 11 12 13 14 15 16
name: Documentation on: push: branches: - master # or main depending on your setup jobs: generate: runs-on: ubuntu-latest permissions: pages: write id-token: write ...
Important
Check the name of your branch in GitHub. It might be
masteror it might bemain. Use the correct on in your workflow file.Note
The job also needs permissions to generate an OIDC token (
id-token: write). If you want to learn more about what they are, you can check out this article: ID Token vs Access Token. -
Now we will add a new job that deploys the documentation. Add these lines to the end of your file. Make sure the indentation is correct. The
deployjob should start at the same indentation level as thegeneratejob.1 2 3 4 5 6 7 8 9 10 11 12 13 14 15 16 17 18 19 20 21 22
# ... deploy: needs: generate runs-on: ubuntu-latest permissions: pages: write id-token: write environment: name: github-pages url: ${{ steps.deployment.outputs.page_url }} steps: - name: Deploy to GitHub Pages id: deployment uses: actions/deploy-pages@v4 - name: Output Page URL run: echo "GitHub Pages URL: ${{ steps.deployment.outputs.page_url }}"
Explanation of the code above:
-
We define a new job called
deploy. Again, this is not a keyword and can be called anything else. The job will run on the latest version of Ubuntu. -
The job also needs the write permissions to access GitHub Pages.
-
The environment integrates with GitHub Pages and stores the URL of the deployed site so you can access it easily.
-
The first step deploys the documentation to GitHub Pages
-
The second step displays the URL of the Pages in the Action output so you can access it easily.
Note
The deployment can also be bundled with the generation. That would simplify things and remove the need for the step where you upload the static files as artefacts since the deploy step could see them without it. However, to keep things modular, we decided to separate them into two jobs.
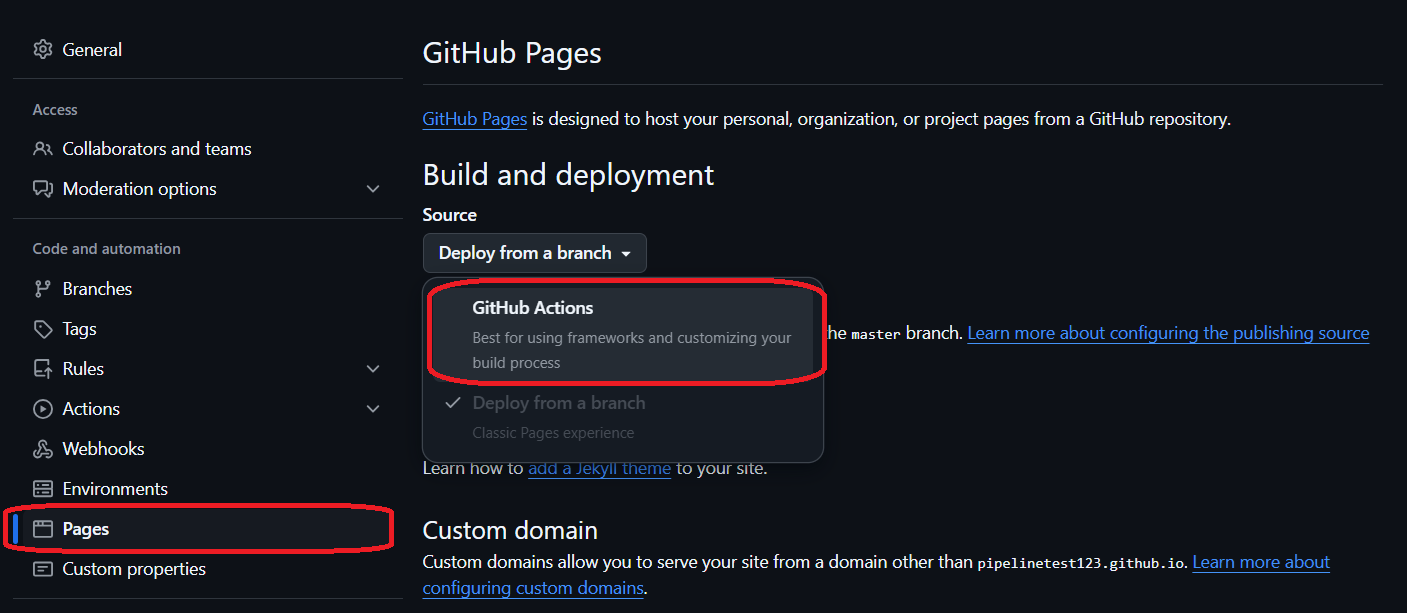
The last step to make sure everything works is enabling GitHub Pages in your repository. Navigate to repository Settings and select Pages in the menu on the left. Then, make sure that GitHub Actions is selected as the source in the dropdown menu.
Go ahead and commit and push the changes now. If you still have that pull request from before open, the basic build workflow will be triggered.
Then, when you decide to merge it into the master branch, the documentation workflow will be triggered and will deploy the docs to GitHub Pages. Try it out yourself and make sure if your workflows ran successfully in the Actions tab. The last step should output the address of your deployed documentation for your convenience.