Adding a database
This tutorial takes you through the process of converting your notes app to use a database instead of storing notes as a series of text files. It makes use of the Microsoft sample MAUI apps provided on GitHub.
You need to have completed the initial notes app tutorial and the follow-on MVVM tutorial. The code that you end up with after the MVVM tutorial provides the starting point for this one.
Here, we will take advantage of the dependency injection framework built into .NET MAUI to manage access to the database.
1. Preparation
Open the solution in Visual Studio Code and check that you have the following viewmodels:
AboutViewModel.csAllNotesViewModel.csNoteViewModel.cs
Note
If you have NotesModel.cs instead of AllNotesViewModel, change its name by following these steps:
- Right-click on the viewmodel in the Solution Explorer and select Rename…
- Type in the new name and press ENTER
- Edit the file and change the name of the class to AllNotesViewModel
- Open the file AllNotesPage.xaml and update the reference to the viewmodel on line 8
Go through each of the viewmodels and make sure that the accessibility level of the main class is
public. Do the same for the Note model.
Run the application to check that it behaves as it should.
Install SQL Server
Follow the instructions here to get SQL Server working on your computer.
Install some new NuGet packages
Add the latest versions of the following NuGet packages as you have done before by right-clicking on the Notes project in the Solution Explorer.
- Microsoft.EntityFrameworkCore
- Microsoft.EntityFrameworkCore.SqlServer
- Microsoft.Extensions.Configuration.Json
Entity Framework (EF) is an object-relational mapper (ORM) that takes care of translating the object-oriented structures in the C# code to relational ones and vice versa.
2. Change the way the binding context is set
Now that the database is ready we can turn our attention to the application code. Currently, the binding context for a content page is set using a xaml element. For reasons that will become clear later, we need to modify the code so that the binding context is set in C# code. We can do that by removing the relevant lines in each of the two xaml files and replacing them with equivalent statements in the related code behind C# files. For more details on setting the binding context, see the Microsoft documentation.
Open All_NotesPage.xaml, find the lines below (around line 8) and remove them.
1
2
3
<ContentPage.BindingContext>
    <viewModels.AllNotesViewModel />
</ContentPage.BindingContext>
Open All_NotesPage.xaml.cs and change the constructor so that it matches the code below.
1
2
3
4
5
public AllNotesPage()
{
    this.BindingContext = new AllNotesViewModel();
    InitializeComponent();
}
You will also need to add the relevant using statement at the top of the file.
Make the equivalent changes in NotePage.xaml and NotePage.xaml.cs. We do not need to change AboutPage because it does not need to access the database.
Run the app to check that it behaves as expected.
3. Create a configuration file
In this step, we create an application configuration file in JSON format using common naming conventions.
Note
Because the configuration file will contain values that are only relevant to the local setup on your computer, it should not be checked into source control. Excluse it by adding it to the .gitignore file. Saving configuration settings may also constitute a security risk - another reason they are not saved to source control.
- Add a new file
appsettings.jsonunder the project directory -
Paste the code below into the new file replacing
IP_ADDRESSwith the IP address of your computer. Please note that127.0.0.1andlocalhostwill not work here. That is because the database runs inside a Docker container rather than directly on your machine.1 2 3 4 5
{ "ConnectionStrings": { "DevelopmentConnection": "Server=IP_ADDRESS;Database=notesdb;User Id=notesapp;Password=N0tesApp$;TrustServerCertificate=True;Encrypt=True;" } }
-
Add the following lines at the end of the Notes.cproj file before the closing
</Project>tag. The file can be accessed from the Solution Explorer by clicking the Notes project node.1 2 3 4 5 6
<ItemGroup> <EmbeddedResource Include="appsettings.json" /> <None Update="appsettings.json"> <CopyToOutputDirectory>Always</CopyToOutputDirectory> </None> </ItemGroup>
-
Add the following lines at the start of the file MauiProgram.cs
1
2
using System.Reflection;
using Microsoft.Extensions.Configuration;
-
Add the following lines into MauiProgram.cs after the creation of the builder object
1
2
3
4
5
6
7
8
var a = Assembly.GetExecutingAssembly();
using var stream = a.GetManifestResourceStream("Notes.appsettings.json");

var config = new ConfigurationBuilder()
    .AddJsonStream(stream)
    .Build();

builder.Configuration.AddConfiguration(config);
Up to this point, your app should still run as it did before. We have made some preparatory changes, but we have not changed the way the notes are stored and retrieved.
4. Create a database context
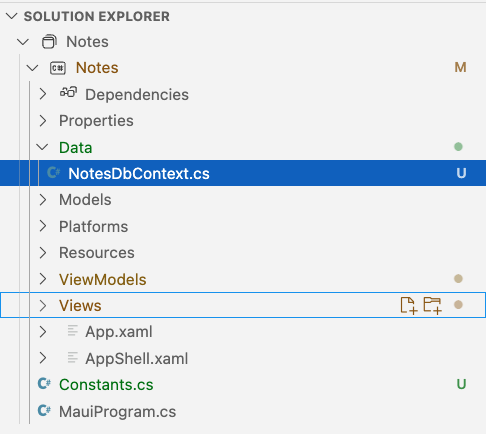
A database wrapper class abstracts the data access layer from the rest of the app. This class centralises query logic and simplifies the management of database initialization, making it easier to refactor or expand data operations as the app grows. Create the wrapper class in a directory called Data under the project as shown in Fig. 7.
Entity Framework uses the DbContext
to handle all interactions with the database.
A derived context represents a session with the database, allowing us to query and save data. We
define a context that derives from System.Data.Entity.DbContext and exposes a typed
DbSet<TEntity> for each class in our model. A
DbSet
is a set of records of a particular type returned from the database.
Paste the code below into NotesDbContext.cs:
1
2
3
4
5
6
7
8
9
10
11
12
13
14
15
using Microsoft.EntityFrameworkCore;
using Notes.Models;

namespace Notes.Data;
public class NotesDbContext : DbContext
{

    public NotesDbContext()
    { }
    public NotesDbContext(DbContextOptions options) : base(options)
    { }

    public DbSet Notes { get; set; }

}
Notice that the class constructor enables us to inject options into the DbContext. This is how we
pass in the details from the appsettings.json file that we created earlier.
We also need to register NotesDbContext as a service in MauiProgram.cs. We will take the
opportunity to register our views and viewmodels at the same time. Add the following code to the
file after thr line that loads the configuration. There are three sections related to the services,
viewmodels and views respectively. Add using statements at the top of the file as needed.
1
2
3
4
5
6
7
8
var connectionString = builder.Configuration.GetConnectionString("DevelopmentConnection");
builder.Services.AddDbContext<NotesDbContext>(options => options.UseSqlServer(connectionString));

builder.Services.AddSingleton<AllNotesViewModel>();
builder.Services.AddTransient<NoteViewModel>();

builder.Services.AddSingleton<AllNotesPage>();
builder.Services.AddTransient<NotePage>();
Microsoft’s dependency injection framework takes care of the majority of service relationships without you having to write any code. Registering the services as shown above makes them available for injection automatically. We will see this in action in the section on viewmodels below.
5. Update the Note model
The Note model needs to be changed to represent a database item rather than a text file. The
existing methods that are used to manipulate notes can all be removed because database operations
will be handled by the NoteService. We will also replace the Filename property with an Id that
will be used as the primary key in the database table.
With EF, we can add more information to our models. EF provides two methods for capturing database information. The first is to use annotations in model files, and the second is to use an explicit API called Fluent in the context file. In most cases, annotations are simpler and have the advantage that the information is in the same place as the model definition itself. Sometimes greater control is needed however, and the Fluent API has to be used.
Replace the content of the Note.cs file with the following:
1
2
3
4
5
6
7
8
9
10
11
12
13
14
15
16
using Microsoft.EntityFrameworkCore;
using System.ComponentModel.DataAnnotations;
using System.ComponentModel.DataAnnotations.Schema;

namespace Notes.Models;

[Table("note")]
[PrimaryKey(nameof(Id))]
public class Note
{
    public int Id { get; set; }
    [Required]
    public string Text { get; set; }
    [Required]
    public DateTime Date { get; set; }
}
Notice the use of annotations to specify the name of the table, the primary key and the required attributes.
The changes to the Note model will create errors in the existing viewmodels. These will need to be fixed before we can run the app again.
6. Update the Note viewmodel
Our goal is to remove references to the old approach of storing notes in a text file and replace
them with references to our new NotesDbContext that will store them in a database instead. Open the
file and look at the errors that are highlighted by VSCode. They either refer to the Filename
property or the data maintenance methods which have just been removed.
As a first step, make sure that the contents of the Data directory are imported by including the following line at the top of the file.
1
using Notes.Data;
Next, replace the definition of the class property Filename with the line below which defines the
Id property as the corresponding property of the _note object;
1
public int Id => _note.Id;
We next need to inject the NotesDbContext dependency. Do this by defining a private class property, adding a parameter to the existing parameterless constructor and setting the internal reference as shown below. Notice the use of the interface to decouple the viewmodel from the implementation of the service.
1
2
3
4
5
6
7
8
9
10
11
12
    private NotesDbContext _context;

    public NoteViewModel(NotesDbContext notesDbContext)
    {
        _context = notesDbContext;
        _note = new Note();
    }
    public NoteViewModel(NotesDbContext notesDbContext, Note note)
    {
        _note = note;
        _context = notesDbContext;
    }
There is a second constructor that takes a new note object as a parameter. You need to make the equivalent changes to that constructor as shown.
We can now resolve the remaining errors by replacing the calls to the deleted methods with calls to the appropriate service methods. This is shown in the code snippet below which can be pasted directly into the file.
1
2
3
4
5
6
7
8
9
10
11
12
13
14
15
16
17
18
19
20
21
22
23
24
25
26
27
28
29
30
31
32
33
34
[RelayCommand]
private async Task Save()
{
    _note.Date = DateTime.Now;
    if (_note.Id == 0)
    {
        _context.Notes.Add(_note);
    }
    _context.SaveChanges();
    await Shell.Current.GoToAsync($"..?saved={_note.Id}");
}

[RelayCommand]
private async Task Delete()
{
    _context.Remove(_note);
    _context.SaveChanges();
    await Shell.Current.GoToAsync($"..?deleted={_note.Id}");
}

void IQueryAttributable.ApplyQueryAttributes(IDictionary<string, object> query)
{
    if (query.ContainsKey("load"))
    {
        _note = _context.Notes.Single(n => n.Id == int.Parse(query["load"].ToString()));
        RefreshProperties();
    }
}

public void Reload()
{
    _context.Entry(_note).Reload();
    RefreshProperties();
}
In Save(), the condition tests whether the note object already exists. If its Id value is zero
then it is a new object; it will be assigned a value by the database engine when it is saved since
the database column is defined as an
identity.
The call to Add() adds the newly created note to the local context so that any further
modifications are tracked along with all other notes that were retrieved from the database.
The call to SaveChanges() adds the new note to the database and saves any other pending changes
as well.
The IQueryAttributable.ApplyQueryAttributes()
method provides a mechanism for passing data between the elements of a Maui application.
Note the use of the Shell.Current.GoToAsync() command to go back to the list page after a save
or delete operation.
Note
The
[RelayCommand]annotations are provided by the CommunityToolkitMvvm NuGet package and trigger the generation of standard code for assigning methods to commands. To use annotations, the class must be declared aspartial. The annotations take the place of the lines shown below which can be removed.
7. Update the AllNotes ViewModel
The AllNotes ViewModel requires similar changes to the Note ViewModel.
-
Add the reference
using Notes.Dataat the top of the file. -
Inject the dependency on NotesDbContext using the following code snippet:
1
2
3
4
5
6
7
8
private NotesDbContext _context;
public AllNotesViewModel(NotesDbContext notesContext)
{
    _context = notesDbContext;
    AllNotes = new ObservableCollection(_context.Notes.ToList().Select(n => new NoteViewModel(_context, n)));
    NewCommand = new AsyncRelayCommand(NewNoteAsync);
    SelectNoteCommand = new AsyncRelayCommand(SelectNoteAsync);
}
-
Ensure that
IQueryAttributable.ApplyQueryAttributesuses the NotesDbContext:1
AllNotes.Insert(0, new NoteViewModel(_context, _context.Notes.Single(n => n.Id == int.Parse(noteId))));
Note that the last two lines of the file could be eliminated by using annotations for the command
methods. This is left as an exercise. If you decide to do this, you must remember that the name of
the command generated is related to the name of the method. NewNoteAsync(), for example, will
generate a command called NewNoteCommand. You will therefore need to update the reference to the
command in AllNotesPage.xaml so that it matches. You will also need to make sure that the class
is declared as partial.
The remaining errors refer to the Identifier property of the note object which was previously set
to the note filename and now replaced by the Id property. To resolve these issues, you need to
replace Identifier with Id. This causes a new error, however, because the new Id property is
an integer whereas the old Identifer (= Filename) was a string. This can be fixed by converting
the value passed in the query to an integer as shown below.
1
NoteViewModel matchedNote = AllNotes.Where((n) => n.Id == int.Parse(noteId)).FirstOrDefault();
Tip
If VSCode continues to report an error when it should not, close the editor and restart it to clear the contextual data.
The changes to the viewmodels will create some new errors in the views that refer to them. These will need to be fixed before the app will run.
8. Updating the views
In an early conversion step, we changed the way the binding context was set for a page by moving the operation from the xaml to the C# code. That created a tight dependency between the view and the viewmodel which we can now delegate to the dependency injection framework. We do this by simply adding the dependency as a parameter to the constructor. Because we registered the appropriate services in MauiProgram.cs, the dependency injection framework will pick them up automatically for us.
Replace the constructor in All_NotesPage.xaml.cs with the following.
1
2
3
4
5
public AllNotesPage(AllNotesViewModel viewModel)
{
    this.BindingContext = viewModel;
    InitializeComponent();
}
Then replace the constructor in NotePage.xaml.cs with the following.
1
2
3
4
5
public NotePage(NoteViewModel viewModel)
{
    this.BindingContext = viewModel;
    InitializeComponent();
}
9. Conclusion
You should now be able to run the app. When it is first started, any notes that you had created will have disappeared because the app is now looking for them in the database. You should be able to create, update and delete notes as before.
The complete code for this app can be found in GitHub.