These instructions take you through the installation of an instance of SQL Server as a
Docker image. This cross-platform approach is preferred because it avoids operating
system-specific complications.
You will need to install two new tools if you do not yet have them:
Docker: A virtualisation tool that allows you to run software
applications in containers rather than install them natively on your computer.
Please follow the instructions provided on the respective websites to install these two tools for
your operating system. An alternative to DataGrip is Microsoft’s
Azure Data Studio.
1. Pull and run the SQL Server Docker image
Using Docker ensures consistency across different platforms. If you are working on Windows or Linux, a
native installation of SQL Server is possible. However, the Docker approach work on MacOS as well.
Note
The format of Docker commands is the same on all platforms; however, on Mac or Linux, commands
should be prefixed with sudo
Pull the SQL Server Express Linux Docker container using the command below at the command line
Still at the command line, execute the following command to run the Docker container.
1
docker run -e"ACCEPT_EULA=Y"-e"MSSQL_SA_PASSWORD=<YourPassw0rd>"-p 1433:1433 --name sql1 --hostname sql1 -d mcr.microsoft.com/mssql/server:2025-latest
Notes
The -e switch sets an environment variable. The first accepts the EULA and the second sets the password for the sa user - replace <YourPassw0rd> with the password that you want to use.
The -p switch maps the default TCP port (1433) to a local port. In this case the same one is used.
The –name and –hostname parameters set the name and hostname of the container.
The -d switch specifies which image file to use.
If you are running on an Apple Silicon Mac, you will need to add the additional parameter --platform=linux/arm64
The return value from a successful container launch is a long hexadecimal string. Examine any error
messages and resolve the issues before continuing. For more information, see the
Microsoft documentation.
2. Set up the database
Connect to the database server
Select the instructions that correspond to the database access tool you are using.
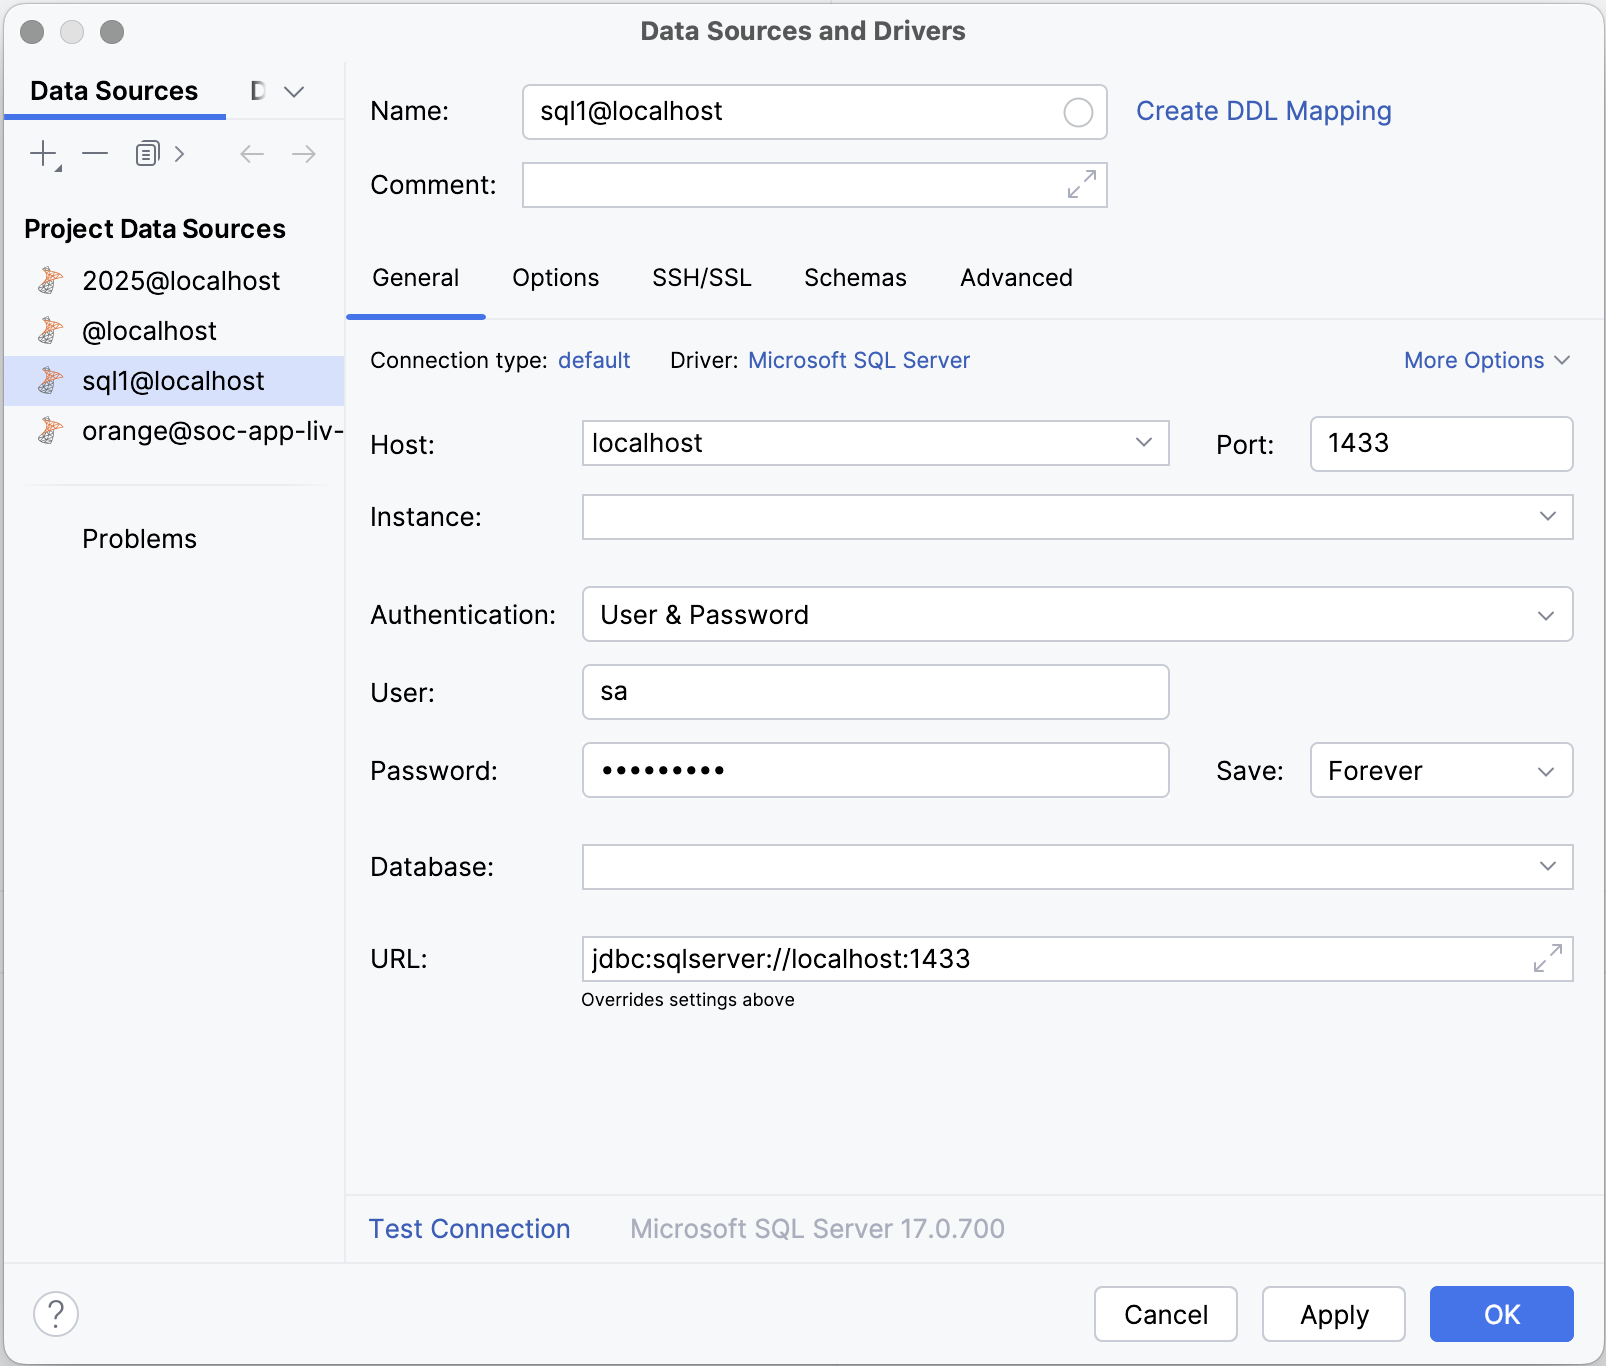
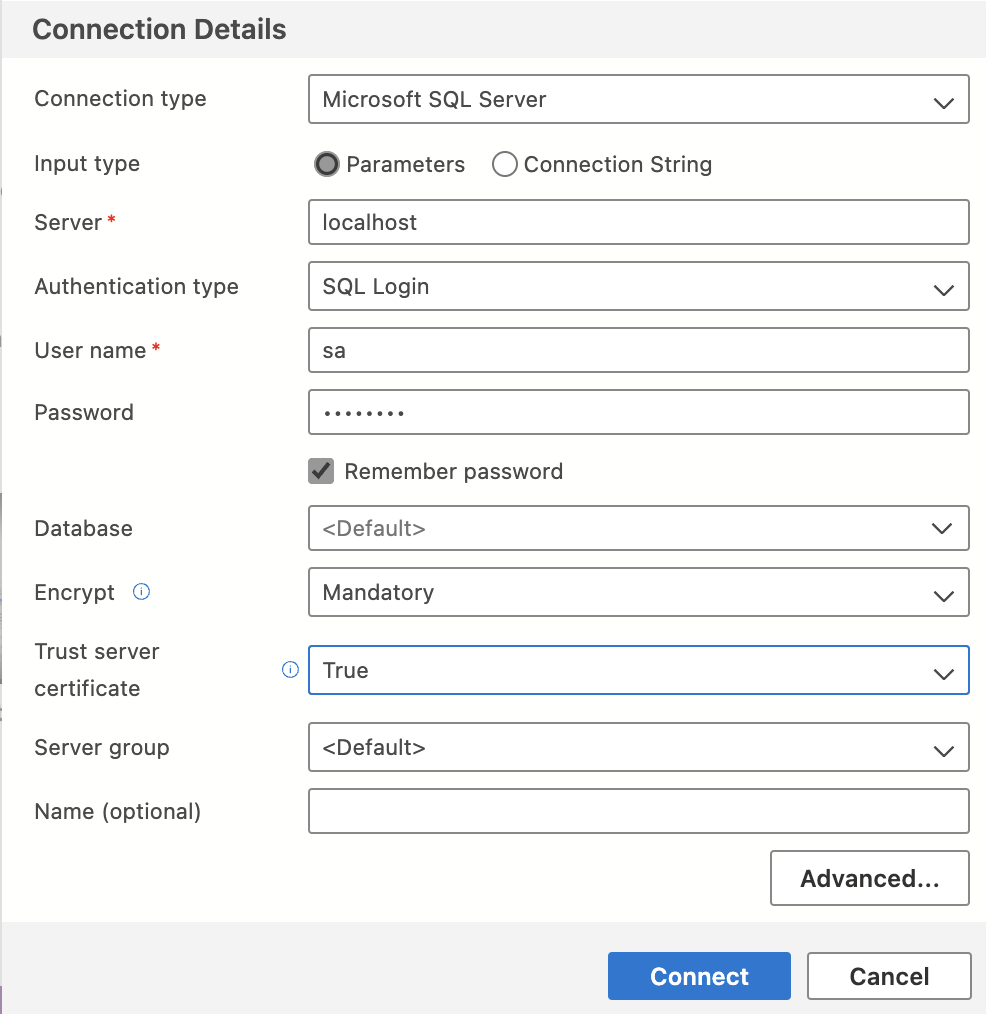
Open DataGrip and create a new connection. You can use the parameter values shown in
Fig. 1. to connect to your SQL Server container. The password is the one you specified when you
started the container.
Fig. 1. Creating a local database connection in dataGrip
SQL Server is a database server. That is, it provides for multiple databases, each of which has its
own purpose and permissions. After connecting, you can see that only system databases currently exist.
These are used to manage the server itself and must not be modified. Note too that you are logged in
as the sa user - this is the default system administration account which should not be used for
routine database tasks.
In the next step, we will set up a user account and database for the Notes app.
Database setup
Access permissions can be enforced at both the server level and the level of an individual database.
For this reason, two steps are required to create a database user account with permission to log into
the server.
Create a new login
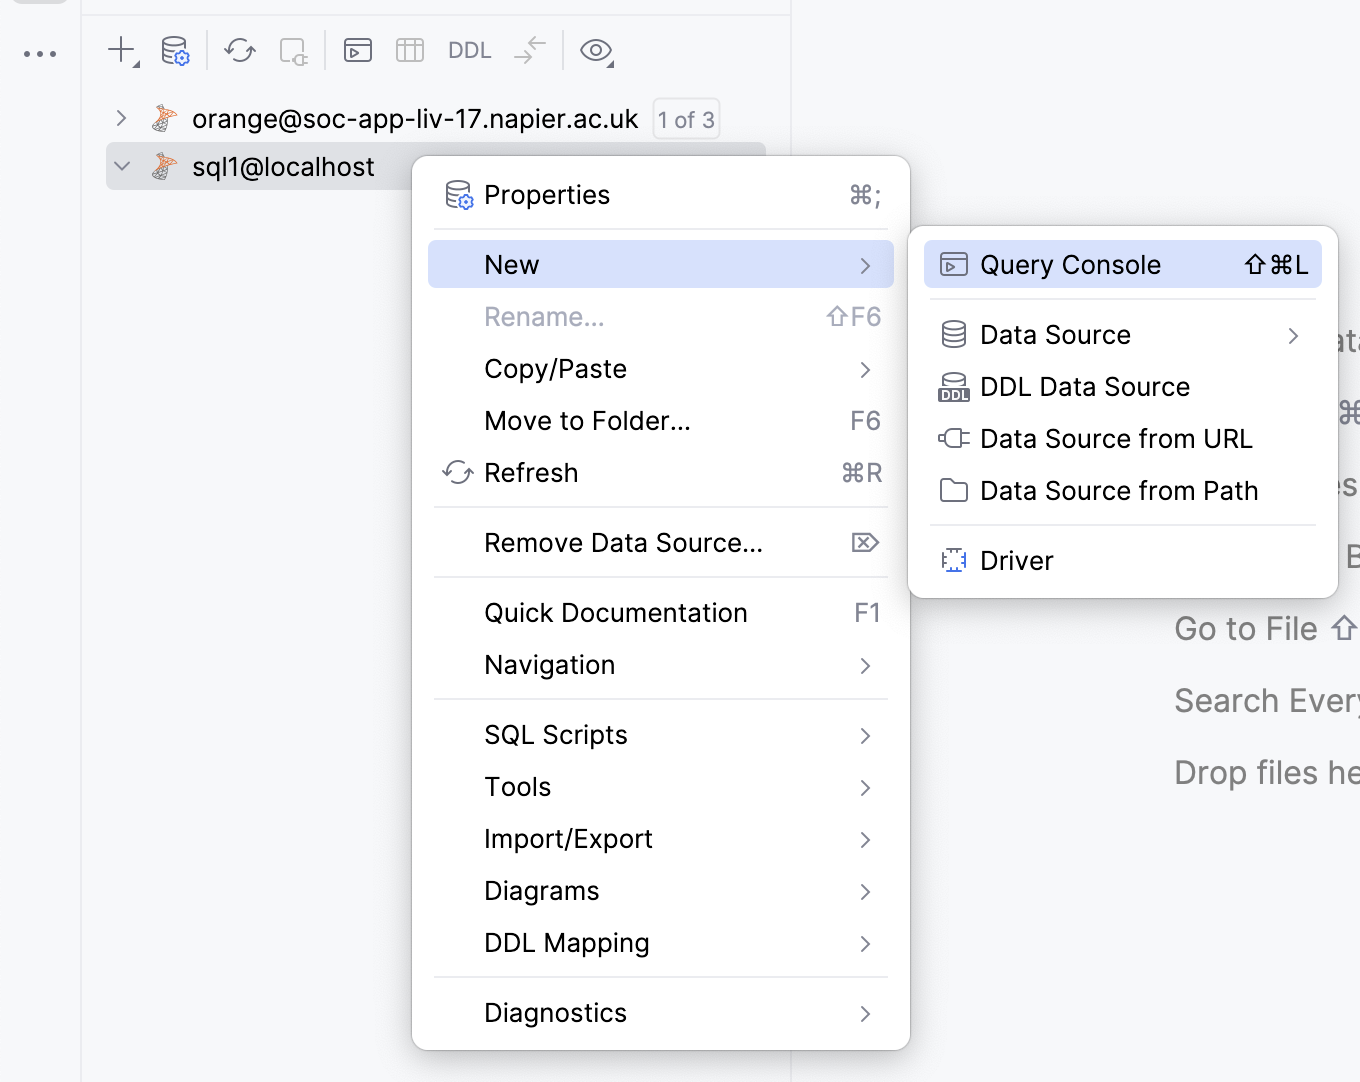
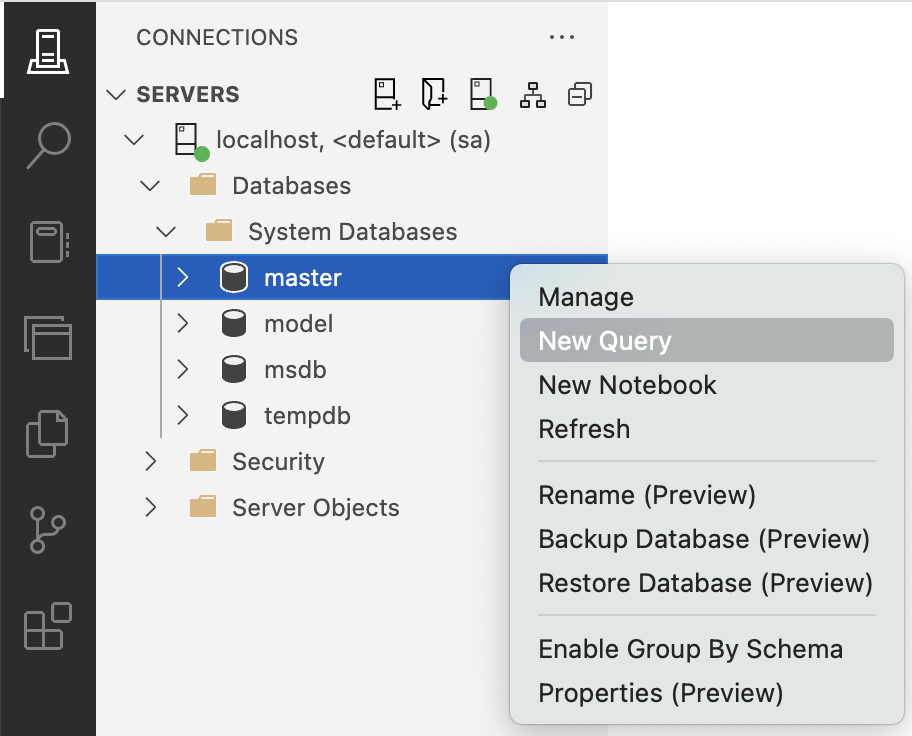
In DataGrip, right-click on the master database as shown in Fig. 2 and select New Query.
Fig. 2. Starting a new query in DataGrip
The next page provides a field where you can type in
Transact-SQL
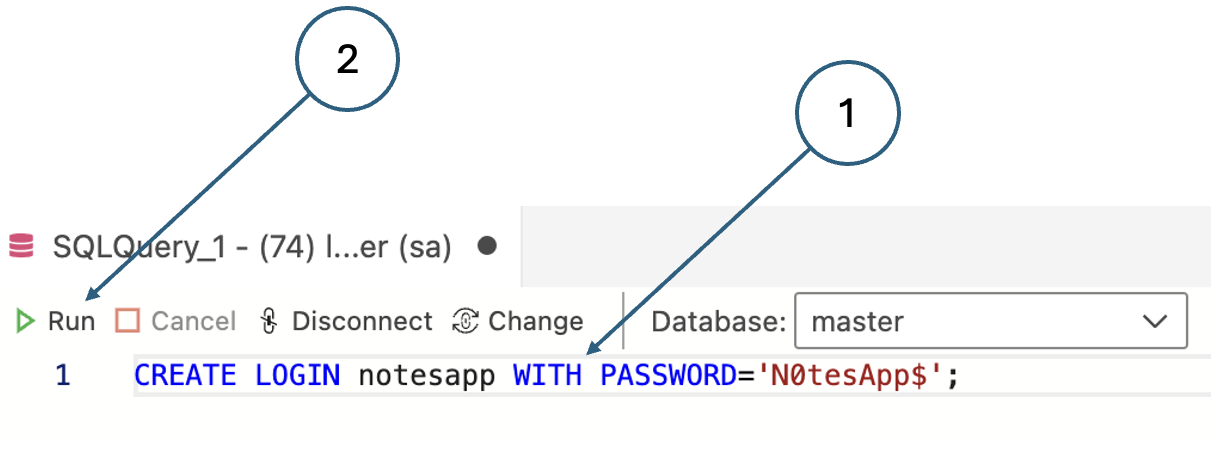
(T-SQL) commands. Enter the following command to create a new server-level login and then click
Run as shown in Fig. 3. Replace <Login name> with the name you want to use (for the
Notes tutorial, this could be notesapp, for example) and replace <Password> with an
appropriate password (e.g N0tesApp$). Note that the password must meet the strength that SQL
Server requires by being at least 8 characters long and containing characters from three of the
following four sets: Uppercase letters, Lowercase letters, Base 10 digits, and Symbols.
1
CREATELOGIN<Loginname>WITHPASSWORD='<Password>';
Fig. 3. Creating a server-level login in DataGrip
Create a new database
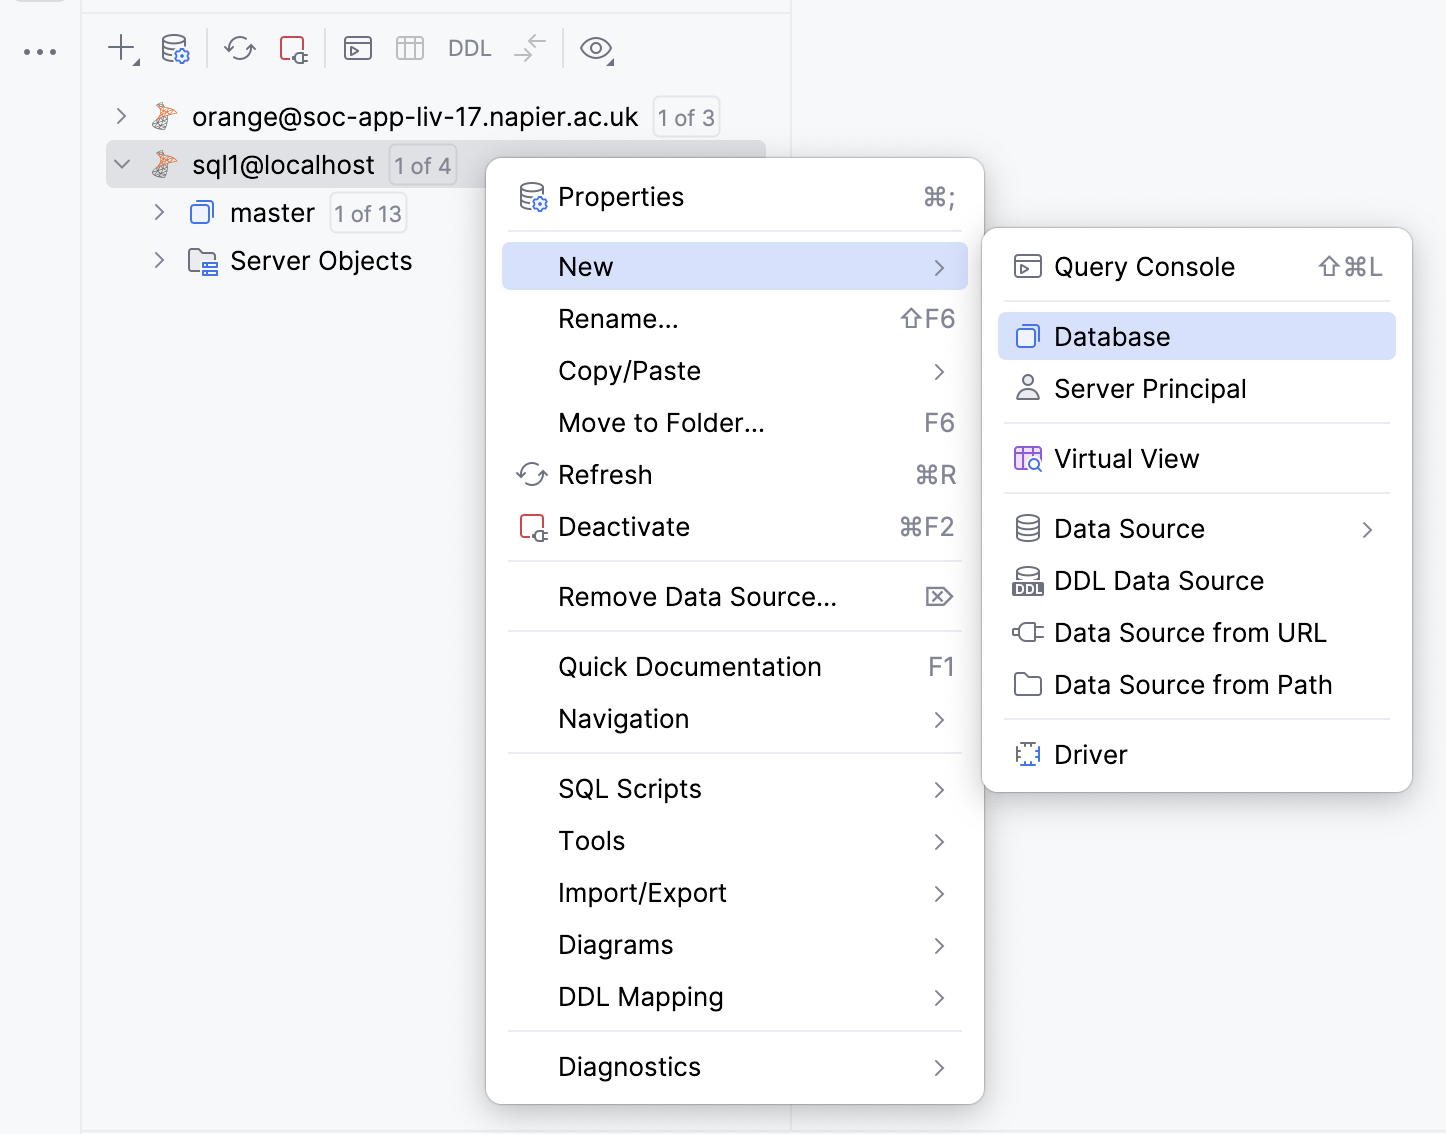
In the explorer sidebar, right-click on the datasource as shown in Fig. 4 and select New > Database.
Fig. 4. Creating a new database in DataGrip
Give the new database and appropriate name (such as notesdb for the Notes tutorial), and leave all
the other options with their default values.
Create a user in the new database
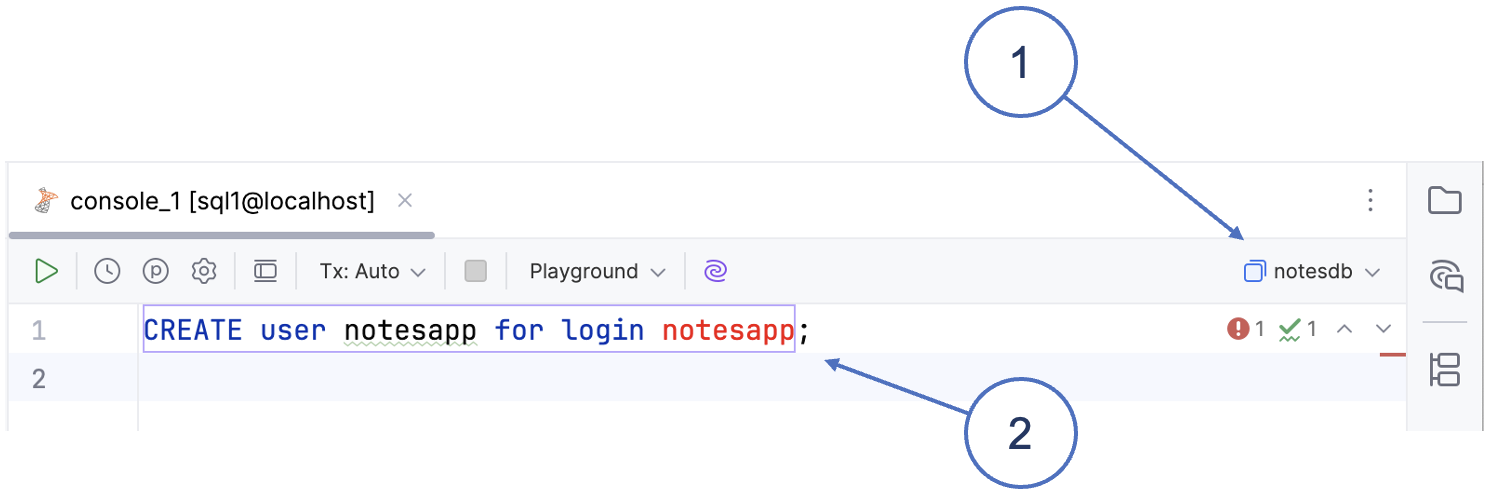
A user is defined at the level of an individual database. The first step is therefore to change
to your new database as shown in Fig. 5. Then execute the following command replacing
<Username> and <Login name> with your values. Note that you can use the same name in
both cases (e.g. notesapp for the Notes tutorial).
1
CREATEuser<Username>forlogin<Loginname>;
Fig. 5. Creating a new user for the login in DataGrip
Grant permissions to the new user
With the new database still active, execute the following T-SQL command to grant all
permission to the user you created. Again, replace <Database name> and <Username>
with your values.
Next, disconnect from SQL Server using the icon in the explorer pane and edit the details of the
connection. Replace sa and the sa password with the name and password of the user you created.
When you reconnect, you are using the new user account that you set up.
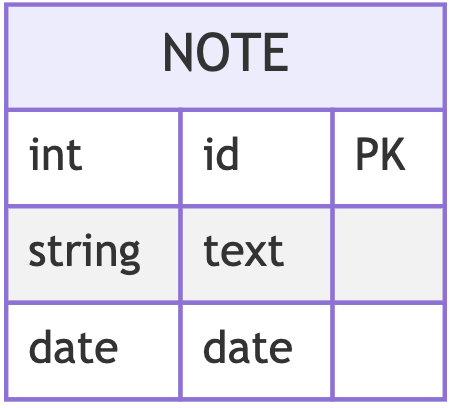
Create a test table
Check that everything is working correctly by creating a table such as the NOTE table shown in
Fig. 6. Use the T-SQL script below to set the table up using DataGrip.
If you are following the Notes tutorial, this table will be useful and you can keep it. If you are
setting up a database for another reason, either create a table that is relevant to your project, or
drop the test table again to leave the database in a clean state.
Open Azure Data Studio (ADS) and create a new connection. You can use the parameter values shown in
Fig. 1. to connect to your SQL Server container. The password is the one you specified when you
started the container.
Fig. 1. Creating a local database connection in Azure Data Studio
SQL Server is a database server. That is, it provides for multiple databases, each of which has its
own purpose and permissions. After connecting, you can see that only system databases currently exist.
These are used to manage the server itself and must not be modified. Note too that you are logged in
as the sa user - this is the default system administration account which should not be used for
routine database tasks.
In the next step, we will set up a user account and database for the Notes app.
Database setup
Access permissions can be enforced at both the server level and the level of an individual database.
For this reason, two steps are required to create a database user account with permission to log into
the server.
Create a new login
In ADS, right-click on the master database as shown in Fig. 2 and select New Query.
Fig. 2. Starting a new query in Azure Data Studio
The next page provides a field where you can type in
Transact-SQL
(T-SQL) commands. Enter the following command to create a new server-level login and then click
Run as shown in Fig. 3. Replace <Login name> with the name you want to use (for the
Notes tutorial, this could be notesapp, for example) and replace <Password> with an
appropriate password (e.g N0tesApp$). Note that the password must meet the strength that SQL
Server requires by being at least 8 characters long and containing characters from three of the
following four sets: Uppercase letters, Lowercase letters, Base 10 digits, and Symbols.
1
CREATELOGIN<Loginname>WITHPASSWORD='<Password>';
Fig. 3. Creating a server-level login in Azure Data Studio
Create a new database
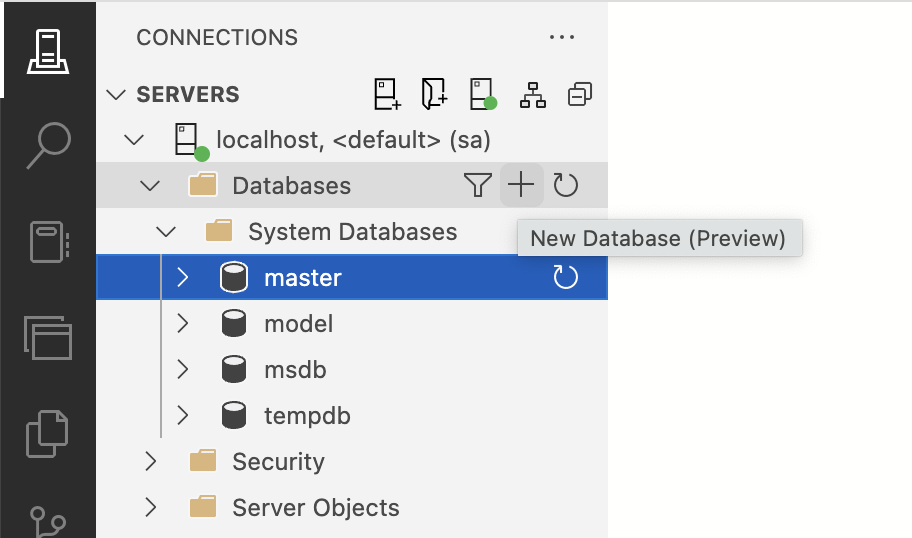
In the explorer sidebar of ADS, click on the plus sign next to Databases as shown in Fig. 4.
Fig. 4. Creating a new database in Azure Data Studio
Call the new database notesdb, and leave all the other options with their default values.
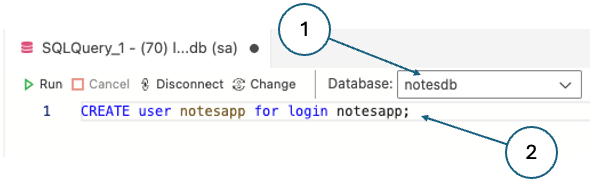
Create a user in the new database
A user is defined at the level of an individual database. The first step is therefore to change
to your new database as shown in Fig. 5. Then execute the following command replacing
<Username> and <Login name> with your values. Note that you can use the same name in
both cases (e.g. notesapp for the Notes tutorial).
1
CREATEuser<Username>forlogin<Loginname>;
Fig. 5. Creating a new user for the notesapp login in Azure Data Studio
Grant permissions to the new user
With the new database still active, execute the following T-SQL command to grant all
permission to the user you created. Again, replace <Database name> and <Username>
with your values.
Next, disconnect from SQL Server using the icon in the explorer pane and edit the details of the
connection. Replace sa and the sa password with the name and password of the user you created.
When you reconnect, you are using the new user account that you set up.
Create a test table
Check that everything is working correctly by creating a table such as the NOTE table shown in
Fig. 6. Use the T-SQL script below to set the table up using ADS.
If you are following the Notes tutorial, this table will be useful and you can keep it. If you are
setting up a database for another reason, either create a table that is relevant to your project, or
drop the test table again to leave the database in a clean state.