Unit tests
Testing a method is essentially a simple concept. You work out what output or behaviour you expect for a given input, feed that input into the method and see what comes out. If it matches your expectations, the test succeeds; if the output does not match expectations, the test fails. Creating unit tests manually can be a laborious and error-prone process, however, requiring developers to write extensive code to cover various scenarios and edge cases. This often leads to inconsistent testing practices, missed cases, and difficulties in maintaining the test suite as the codebase evolves. Using a testing framework, on the other hand, offers significant benefits by providing a structured and systematic approach to testing. Frameworks such as MSTest, NUnit or xUnit offer built-in functionalities like assertions, test runners, and mocking, which streamline the creation, execution, and reporting of tests. They also promote best practices, enhance test readability and reusability, and simplify the detection and debugging of issues, leading to more robust and reliable software development. This discussion comparing the above three frameworks for unit testing C# code shows that not much separates them in their current versions. Here, we will be using xUnit as the most popular option.
Important
This tutorial makes use of concepts from the previous one on database migrations and is built on top of the version of the Notes application from that tutorial. If you have not completed the migrations tutorial, some parts of this one will not work.
1. Theory
Test coverage
In an ideal world, every line of code should be tested to ensure that it behaves as expected. Test coverage is a software quality metric that measures the extent to which the source code of a program is tested by a particular set of tests (the test suite). It is typically expressed as a percentage, indicating how many lines of code, branches, or functions have been executed during testing. High test coverage suggests that a significant portion of the code has been exercised, potentially uncovering more defects and reducing the likelihood of undiscovered bugs. However, while high coverage can indicate thorough testing, it does not guarantee the detection of all issues or the quality of the tests themselves. As a metric, test coverage is used to identify untested parts of the codebase, guide the creation of additional tests, and ensure that modifications or new features do not introduce regressions. These are defects or bugs that arise when a previously functioning feature stops working correctly after changes have been made to the codebase. Detecting and fixing regressions is a critical part of maintaining software quality, often addressed through regression testing which involves re-running existing test cases to ensure that recent changes have not adversely affected previously working functionality.
Cyclomatic complexity
It is reasonable to expect that the more complex a piece of code, the more unit tests are required to ensure it works correctly. Cyclomatic complexity measures the number of linearly independent paths through the code, indicating the minimum number of test cases needed to cover all possible paths. While it is a useful metric for understanding the potential complexity of a codebase, relying on it solely to specify the number of unit tests required has its limitations. For example, this metric does not account for the quality or effectiveness of the tests, only their quantity. High cyclomatic complexity may necessitate more tests, but it does not ensure those tests cover edge cases, validate correct behaviour under various conditions, or catch subtle bugs.
A further limitation of cyclomatic complexity is that it does not consider the interactions between different modules or components which can also affect the testing requirements. It focuses on individual functions or methods, potentially overlooking integration issues that may arise. Additionally, it does not address other important aspects of code quality, such as readability, maintainability, or adherence to design principles.
While cyclomatic complexity can guide the initial estimation of unit tests, it should be used in conjunction with other metrics and testing strategies to ensure comprehensive and effective test coverage. Effective unit testing should also focus on testing different input combinations, boundary conditions, and error-handling scenarios, which may not be fully captured by cyclomatic complexity alone.
Private methods
Does 100% test coverage mean that every method in every class requires its own unit tests? This is a question that has no accepted answer once you get into the details and testing private methods is a classic case which causes considerable debate.
Some people argue that private methods should always be unit tested because they often contain the core logic and algorithms that drive the functionality of a class. They say that ignoring private methods in unit testing can lead to overlooked bugs and insufficient coverage of the code’s functionality. Unit testing private methods ensures that these internal workings are robust, reliable, and behave as expected under various conditions. By testing private methods, developers can also refactor code with greater confidence, knowing that the underlying logic remains intact and functional.
At the other extreme is the argument that private methods should never be unit tested because they are implementation details of a class, intended to be encapsulated and hidden from external access. The primary focus of unit testing should be on the public interface and behaviour of a class, ensuring that it meets its specified requirements and interacts correctly with other components. Testing private methods can lead to brittle tests that break easily with refactoring, even when the public behaviour remains correct. This undermines the agility and maintainability of the code.
Some test frameworks including xUnit make it difficult if not impossible to test methods that are declared with private access. This suggests a bias towards the second position presented above. There is another position, however, that resolves the issue and potentially enhances the quality of the code in other ways by abstracting private methods into a separate class. By doing so, these methods become publicly accessible in their new context which facilitates thorough unit testing without violating encapsulation principles. It also safeguards the Single Responsibility Principle, ensuring each class has a clear, focused purpose. Additionally, this approach enhances code reusability, as the new class can be used by other parts of the application, promoting DRY (Don’t Repeat Yourself) principles.
Although the approach suggested above has a lot of benefits, it may not work in absolutely every situation. However, it is a good rule of thumb which should be adhered to where possible.
Best practices
There is a lot of advice available on the internet on how to do unit testing - the advice from Microsoft on unit testing in .NET is particularly worth a look. Here are a few fairly uncontroversial points to bear in mind.
-
Make sure you are testing all of the relevant scenarios for your method.
For example, calculating the income tax that someone must pay in the UK requires many inputs including
- Gross income
- Country of domicile (Scotland is different to England)
- Age
- Whether the person is in receipt of pension income
- Whether the person is blind or partially sighted
To accurately test a method for calculating the amount owed, the tests would need to cover all combinations of significant parameter values. This would include boundary cases such as age values below, above and equal to a defined threshold.
-
Arrange, Act, Assert
The AAA protocol is widely used for structuring unit tests to give them a consistent appearance and to make them easier to understand and maintain. The three elements are
- Arrange: Perform any setup or initialisation actions to prepare for the test
- Act: Perform the test itself - i.e instantiate the class, provide a known input to the method under test and record the result
- Assert: Verify that the result matches expectations. This is typically dome using an
assertstatement
A common practice is to use comments in the unit test code to indicate where each block starts:
1
2
3
4
5
6
7
8
9
10
11
using Xunit;
using...

// Arrange
        // Setup actions here

// Act
        // Test here

// Assert
        // Verification checks here
-
Do not embed logic in unit tests
If you find that you want to include loops or conditions in your test, you should consider splitting the test up and performing each element separately. This will make the test more readable and it will avoid the temptation to duplicate login in the application code. This is clearly bad since any issues with the application logic would be invisible if the test uses the same logic.
Think about tests as a form of documentation for the development team. The more complex they are, the more difficult they are to understand. A good rule of thumb is to make sure that each test targets only one use case.
-
Unit tests should be deterministic
Deterministic means that tests consistently produce the same result when run multiple times, provided the test code remains unchanged. This consistency ensures that if a function passes a test, it should continue to pass as long as the function is not altered, and vice versa. Deterministic tests build trust among developers by avoiding arbitrary or random results.
To ensure tests are deterministic they must be isolated from
- other test cases
- environmental values (like time or system settings)
- external dependencies (such as file systems or networks)
Essentially, a test should only change its outcome due to changes in the production code it targets, or modifications to the test itself.
2. Configure your solution for unit testing
In this section, we will perform all the preparatory steps to allow you to write and run unit tests for the Notes app.
Add an xUnit project to your solution
- Right-click on the solution in the Solution Explorer and select
New Project... - Select xUnit Test Project from the available options as shown in Fig. 1.
-
Call the new project
Notes.Test.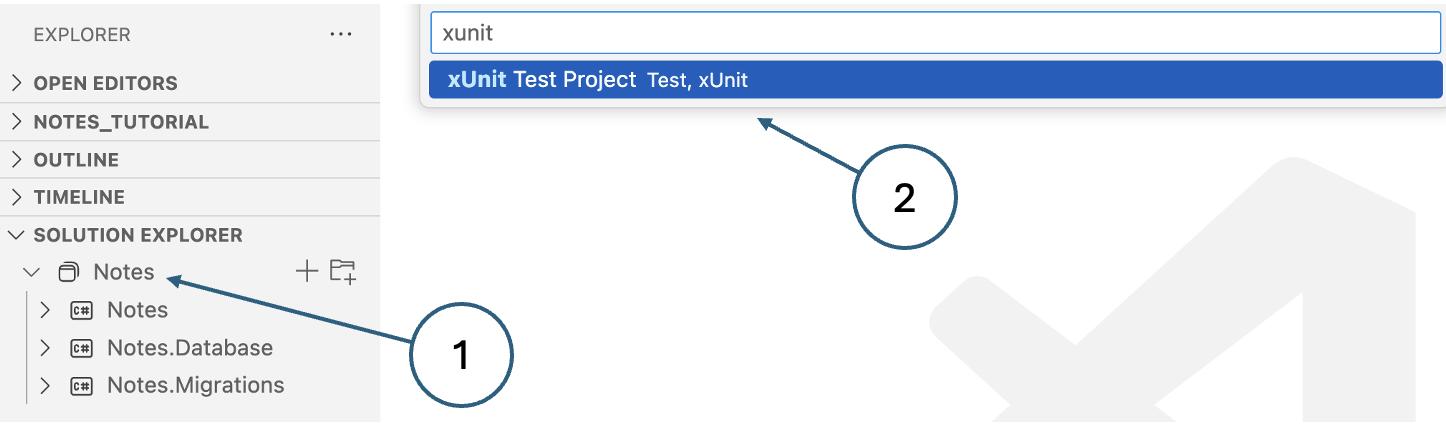
Fig. 1. Adding a test project -
View the project file
Click on the new project in the Solution Explorer. You will see that four packages have been included automatically:
- xunit: Brings in child packages that include the testing framework itself, and Roslyn analyzers that detect common issues with unit tests.
- Microsoft.NET.Test.Sdk: Provides the MSbuild targets and properties for building .NET test projects.
- xunit.runner.visualstudio: Contains the Visual Studio runner for xUnit.net which is also used in VSCode.
- coverlet.collector: Enables the test project to collect code coverage data.
Update the application project file
-
Click on the
Notesproject in the Solution Explorer to open the project file in the editor pane. -
Add
net9.0to theTargetFrameworkselement as shown below.1
<TargetFrameworks>net9.0;net9.0-android;net9.0-maccatalyst</TargetFrameworks>
-
Prevent the build process from attempting to output an executable for the test project.
Update the
OutputTypeitem to add the condition shown below.1
<OutputType Condition="'$(TargetFramework)' != 'net9.0'">Exe</OutputType>
Update the test project file
-
Click on the
Notes.Testproject in the Solution Explorer to open the project file in the editor pane. -
Add the following reference to the
Notesproject before the closing</Project>tag.1 2 3
<ItemGroup> <ProjectReference Include="../Notes/Notes.csproj" /> </ItemGroup>
Exclude generated files from the repository
-
Edit the
.gitignorefile. -
Add the following two lines:
1
2
Notes.Test/obj
Notes.Test/bin
3. Run some dummy tests
The purpose of this step is just to test that the framework is properly configured.
Note
xUnit supports two different types of unit test:
- Facts: Tests that are always true, which test invariant conditions
- Theories: Tests that are only true for a particular set of data
Here, we will only be considering facts.
Run a successful test
-
The
Notes.Testproject already contains a default file called UnitTest1.cs. Edit the file and you will see that it contains no executable test code. Update the contents to add anAssertstatement that will always succeed as shown below.1 2 3 4 5 6 7 8 9 10
namespace Notes.Test; public class UnitTest1 { [Fact] public void Test1() { Assert.True(true); } }
-
Clean and rebuild the entire solution by right-clicking the solution in the Solution Explorer
Once the solution has been built, the .NET MAUI extension (which extends the C# Dev Kit) will identify any tests and generate shortcut controls like the one labelled (1) in Fig. 2.
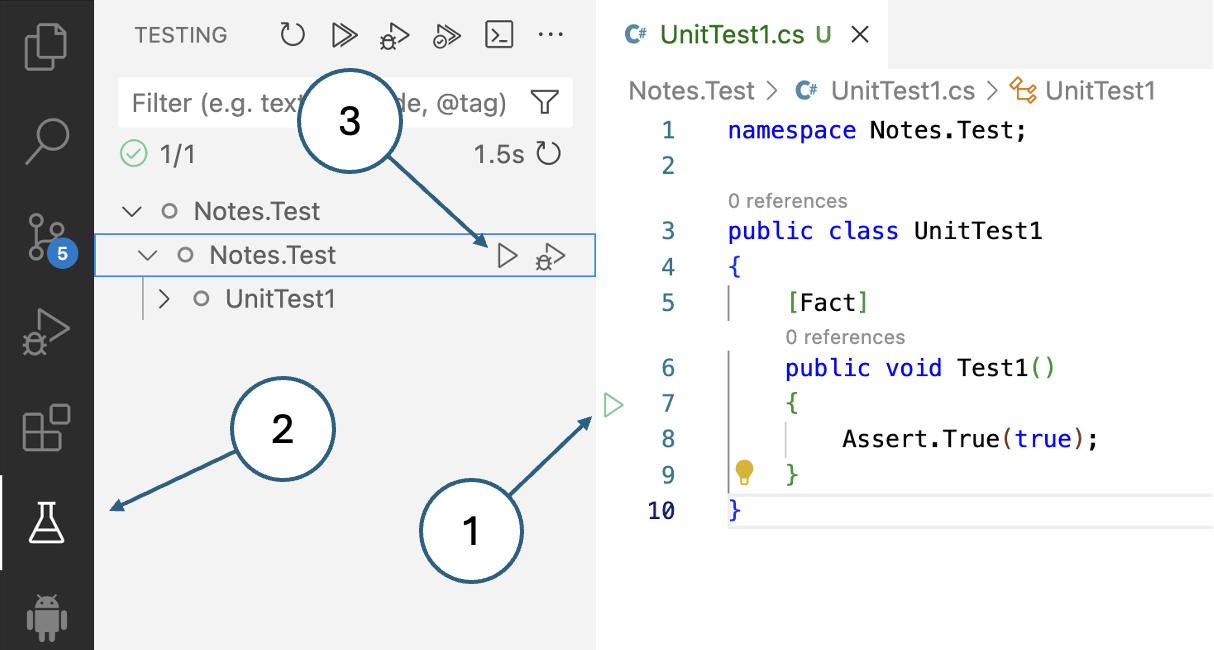
Fig. 2. Test controls in VSCode -
Enable the Test Explorer view by clicking the beaker icon in the left-hand toolbar. This view shows the tests arranged in a tree structure which provides an alternative way to run individual tests - (3) in Fig. 2.
-
Click either of the Run icons to run the dummy test. The results are presented in the Test Explorer and in the editor pane where green ticks are displayed showing that the test was successful. A new pane is also generated in the lower part of the application wind labelled TEST RESULTS. Here you can see the same success or failure information along with any output generated during the test.
Run a failing test
To see what happens when a test fails, change the Assert.True(false) and run the test again.
Note
The
Assertclass provides many options for testing the results of a test. Please refer to the xUnit documentation for details.
4. Prepare a new test
In the example that foillows, we will create a unit test for the method in the `NoteViewModel which saves a new note in the database. The code is shown below.
1
2
3
4
5
6
7
8
9
10
private async Task Save()
{
    _note.Date = DateTime.Now;
    if (_note.Id == 0)
    {
        _context.Notes.Add(_note);
    }
    _context.SaveChanges();
    await Shell.Current.GoToAsync($"..?saved={_note.Id}");
}
The test should check that a new note is indeed created as expected; however, there are a few complications:
- The method is defined with the
privateaccess modifier and xUnit cannot test private methods. - We need some note data to save.
- To verify correct execution, the test needs access to the database.
Set up the test outline
-
Under the
Notes.Testproject, create a new unit test class calledNoteViewModelTests.Tip
This name suggests that all unit tests related to the methods in
NoteViewModelcan be found in this class. This is not the only way to divide tests up, and you should adopt a consistent convention for both the arrangement of tests and the naming of tests and test classes. -
Add a method,
Save_NewNote_ShouldCreateDatabaseRecordto the new class using the AAA structure as shown in the snippet below.1 2 3 4 5 6 7 8 9 10 11 12 13 14 15 16
using Xunit; namespace Notes.Test; public class NoteViewModelTests { [Fact] public void Save_NewNote_ShouldCreateDatabaseRecord() { // Arrange // Act // Assert } }
We will go on to develop the content of the test over the next few steps.
Tip
Note that the name of the test is verbose and descriptive. It includes
- The name of the method being tested
- The scenario under which it’s being tested
- The expected behaviour when the scenario is invoked
This is good practice since it helps with readability and maintainability.
Testing private methods
This is one of the situations where extracting the method into a separate class would be difficult. It would not be impossible to solve the problem using .NET generics which would make the code even more streamlined; however, that is an advanced C# topic that is beyond the scope of the module.
As a workaround to the access issue, we can take advantage of the internal access modifier:
- Change the access modifier on the method from
privatetointernal. -
Add the following
ItemGroupelement to theNotesproject file:1 2 3 4 5
<ItemGroup> <AssemblyAttribute Include="InternalsVisibleToAttribute"> <_Parameter1>Notes.Test</_Parameter1> </AssemblyAttribute> </ItemGroup>
This directive makes methods declared as
internalvisible to the assembly named in_Parameter1.
Creating a test note
Before we can save a note, we need to instantiate it and populate its properties. This is a good
example of something that is done in the Arrange section of the unit test. Add the following
lines into the new test method under the // Arrange comment:
1
2
3
var note = new Note();
note.Date = DateTime.Now;
note.Text = "I am a test note";
Run the test
Although the test does not actually do anything yet, we can still run it. If there are any issues related to setting up the test note, they will show up here.
- Right-click on the
Notes.Testproject and select Rebuild. - Click one of the options for running the test
5. Managing database access
We already have a database set up for the application. However, using it for testing would be a bad idea. What happens for example if we are testing record deletion and something goes wrong? We risk losing any real data that we already have. The solution is to use a parallel database purely for testing. We can set up the test database at the start of a test run and this has the added advantage that it will always have predictable structure and content. At this stage, we need to introduce three new concepts:
A fixture is a fixed state of the test environment used to ensure that tests run with the same conditions every time, providing consistency and reliability in the results.
Setup is the process of creating the required objects, data, or configurations before running tests.
Teardown is the process of cleaning up afterwards to remove the test context thus keeping all tests isolated.
In xUnit, the test database can be set up before each individual test or at higher levels that allow several tests to share the same context. We will be using the class fixture approach which allows us to set up the context once for all the tests in a single class. The Notes application already has code for creating a database connection and database objects. The steps below will take advantage of known concepts and existing code wherever possible. In summary, we need to
- Add a new database connection string
- Add a second database context
- Alter the user’s database permissions to allow them to create and drop databases
- Create a fixture class
- Make the fixture class accessible from our tests
- Make the
Notes.Migrationsproject accessible from theNotes.Testproject - Finish writing the test
Add a new connection string
The connection string contains all the parameters needed for the database connection including the name of the database. We can recycle a lot of the information from the existing connection string by following these steps:
- Edit the file
appsettings.json - Duplicate the existing connection string named
DevelopmentConnection - Change the name of the new string to
TestConnection - Change the database in the new connections string to
testdb - Add a comma between the two connection string items
The file should look similar to the following snippet:
1
2
3
4
5
6
{
    "ConnectionStrings": {
        "DevelopmentConnection": "Host=localhost;Database=notesdb;Username=student_user;Password=password123;",
        "TestConnection": "Host=localhost;Database=testdb;Username=student_user;Password=password123;"
    }
}
Add a second database context
Note
This tutorial assumes you have already installed the
Npgsql.EntityFrameworkCore.PostgreSQLNuGet package in yourNotes.Databaseproject from previous tutorials. If not, add it now:
The simplest way to create a second DbContext would be to copy the existing one and update the
relevant names. However, that would be a violation of the DRY principle. Instead, we will convert
the existing code into an abstract class that we can subclass for the two contexts that we need.
- Edit the file
NotesDbContext.csin theNotes.Databaseproject. - Add the
abstractmodifier to the class definition. - Change the class name to
GenericDbContextand update the constructors to match. - Add an abstract property
connectionStringto hold the name of the connection string. - In the call to
optionsBuilder.UseNpgsql(), change the hard-coded connection string name toconnectionString
At this stage, the code should look like this:
1
2
3
4
5
6
7
8
9
10
11
12
13
14
15
16
17
18
19
20
21
22
23
24
25
26
27
public abstract class GenericDbContext : DbContext
{
    internal abstract String connectionName {get; set;}
    public GenericDbContext()
    { }
    public GenericDbContext(DbContextOptions options) : base(options)
    { }

    protected override void OnConfiguring(DbContextOptionsBuilder optionsBuilder)
    {
        var a = Assembly.GetExecutingAssembly();
        var resources = a.GetManifestResourceNames();
        using var stream = a.GetManifestResourceStream("Notes.Database.appsettings.json");

        var config = new ConfigurationBuilder()
            .AddJsonStream(stream)
            .Build();

        optionsBuilder.UseNpgsql(
            config.GetConnectionString(connectionName),
            m => m.MigrationsAssembly("Notes.Migrations")
            );
    }

    public DbSet Notes { get; set; }
    public DbSet Projects { get; set; }
}
We can now create two subclasses that inherit from GenericDbContext, overriding the
connectinString property in each case:
1
2
3
4
5
6
7
8
9
public class NotesDbContext : GenericDbContext
{
    internal override String connectionName {get; set;} = "DevelopmentConnection";
}

public class TestDbContext : GenericDbContext
{
    internal override String connectionName {get; set;} = "TestConnection";
}
At this point, you can check that the original connection is still working by rebuilding the
Notes.Database project and attempting a migration. In a terminal window, make sure that you
are in the Notes.Migrations project directory and execute the following commands:
1
2
dotnet ef dbcontext info
dotnet ef database update
You should see the connection details and a message to say that the database is already up to date.
Verify PostgreSQL user permissions
Our strategy is to create the testdb database when needed. If you followed the
dev-environment tutorial, the student_user already has the necessary
CREATEDB privilege to create databases.
Note
The
student_userwas created with CREATEDB privilege in the dev-environment tutorial, which allows it to create and drop databases as needed for testing.
To verify that the permissions are correct, you can test creating a database:
- Connect to PostgreSQL using your preferred database tool (e.g., pgAdmin, DBeaver, or psql)
- Connect as
student_userwith passwordpassword123 -
Execute the following command:
1
CREATE DATABASE testdb;
-
Verify the database was created by listing all databases:
1
SELECT datname FROM pg_database WHERE datname = 'testdb';
-
Remove the test database:
1
DROP DATABASE testdb;
If you can successfully create and drop the database, the permissions are configured correctly and you can proceed with the tutorial.
Create a fixture class
Add a new class called DatabaseFixture to the Notes.Test project and paste in the code below.
1
2
3
4
5
6
7
8
9
10
11
12
13
14
15
16
17
18
19
using Microsoft.EntityFrameworkCore;
using Notes.Database.Data;

namespace Notes.Test;

public class DatabaseFixture
{
    internal TestDbContext? _testDbContext { get; private set; }

    public DatabaseFixture()
    {
        _testDbContext = new TestDbContext();

        _testDbContext.Database.EnsureDeleted();
        _testDbContext.Database.EnsureCreated();
        _testDbContext.Database.OpenConnection();
        _testDbContext.Database.Migrate();
    }
}
The code is fairly self-explanatory. The main features are:
EnsureDeleted(): If the database already exists, drop it. This ensures a clean start every time.EnsureCreated(): Creates the database.OpenConnection(): Opens the connection.Migrate(): Runs all database migrations - i.e. creates all database objects.
As well as creating the database tables, we need some data in them. Add the Seed() method shown
below to the DatabaseFixture class and call it after the migrations. You will need to add the
line using Notes.Database.Models at the top of the file.
1
2
3
4
5
6
7
8
9
10
11
12
13
14
15
16
17
18
19
internal void Seed() {
    var project = new Database.Models.Project();
    project.Name = "Seed project";
    project.Description = "Just testing";
    project.StartDate = new DateTime(2025, 1, 10, 9, 00, 00);
    project.EndDate = new DateTime(2025, 10, 31, 17, 00, 00);

    _testDbContext.Add(project);
    _testDbContext.SaveChanges();

    var note = new Note();
    note.Date = DateTime.Now;
    note.Text = "Seed note";
    note.Project = project;

    _testDbContext.Add(note);
    _testDbContext.SaveChanges();

}
The method creates a single project with one associated note.
Make the Notes.Migrations project accessible from the Notes.Test project
To ensure that the test project has access to the migration files, we need to add a reference in
the Notes.Test project file.
-
Click on the
Notes.Testproject to open the project file in the editor pane. -
Find the
<ItemGroup>element that contains a reference to theNotesproject. -
Add a similar reference to the
Notes.Migrationsproject as shown below.1 2 3 4
<ItemGroup> <ProjectReference Include="../Notes/Notes.csproj" /> <ProjectReference Include="../Notes.Migrations/Notes.Migrations.csproj" /> </ItemGroup>
Make the fixture class accessible from our tests
Although the fixture is defined, we need to add a reference to the IClassFixture interface into the test class to trigger the fixture as intended.
-
Edit the file
NoteViewModelTests.cs -
Update the class declaration and constructor as shown below.
1
2
3
4
5
6
7
public class NoteViewModelTests : IClassFixture<DatabaseFixture>
{
    DatabaseFixture _fixture;
    public NoteViewModelTests(DatabaseFixture fixture) {
        _fixture = fixture;
        _fixture.Seed();
    }
Note that the fixture is injected into the class where it is used to instantiate an internal property.
Run the test
Although there is still no content to the test itself, running the test will trigger the fixture so that we can see that it works correctly. Assuming the test completes successfully, use Azure Data Studio to check that the database, the tables and the data have been created correctly. Resolve any issues before continuing.
Information
The xUnit documentation recommends that the test class implements the
IDisposableinterface so that the database can be dropped once the tests are complete. That would be a good way to implement the teardown process. As our test is currently written however, the database is dropped at the start if it already exists. This has the advantage that the test data is available for manual checking after the tests have been run which can often be useful when debugging.
6. Finish writing the test
We now have all the supporting infrastructure in place to complete the
Save_NewNote_ShouldCreateDatabaseRecord test. We have already set up the test note in the
Arrange section, so the steps below target the Act and sections.
Update the test
-
Edit the
NoteViewModelTests.csfile. -
Add the following two lines to the Act section.
1
2
_fixture._testDbContext.Add(note);
_fixture._testDbContext.SaveChanges();
-
Add the following line into the Assert section.
1
Assert.NotEqual(note.Id, 0);
If the note is successfully inserted into the database, the engine will create a new value for the
Idproperty since it is defined as an identity column. Entity Framework will ensure that the localnoteobject is updated with the new value. We therefore do not need to make an explicit call to the database; we just need to check whether theIdvalue has been populated.
Run the test
We have finally reached the point where we can actually test whether a note is correctly inserted
into the table by the Save() method.
Run the test in the usual way.
If you have been following the instructions exactly as written, you should see the message in Fig. 4:

What has gone wrong?
If you anticipated this error and corrected it as you went along - well done. The error of course arises because we changed the database structure so that a note must now be associated with a project. The error message is telling us that we have tried to perform a database insert that violates a foreign key constraint which is exactly what it should do.
The immediate solution is simply to ensure that the ProjectId property of the test note is
populated, and we can do that by hard-coding the value 1 which is the id of the seed project
created by the fixture. Add the following line to the Arrange section of the test and run it
again. This time it should succeed and you can check it manually through ADS.
1
note.ProjectId = 1;
We should not start to think about how to ensure that the ProjectId property is set correctly by
the application. Remember that we have not made any allowance yet for listing or maintaining
projects; we have only changed the database structure. This might lead us to start thinking that
the simple fix we just made to the test might have to change to something more sophisticated.
That would be a mistake, however, because the purpose of the test is to make sure that the
Save() method works and nothing else. The way in which the properties of the new note are
populated in the application is out of scope. We might test the setup with other tests, but this
one is fine as it is.
7. Summary
In this tutorial, we have barely scratched the surface of what is possible with unit tests in the .NET environment. We have, however, done several important things:
- Covered the basic structure of a unit test.
- Added the elements required to run unit tests to our .NET MAUI solution.
- Enabled database access to our tests.
- Defined and used a fixture that creates a repeatable environment for our tests.
As you can see from section 6 above, writing a single test is relatively simple. Now that the supporting machinery is in place, you should have no trouble adding more of them as required.