Database migrations
Working with databases is difficult for several reasons. One of them is that the standard language for performing database operations is SQL which has a completely different syntax from all common programming languages. A simple approach is to prepare SQL statements as text strings and then to execute those commands against the database. This is not only cumbersome but also carries the security risk of SQL injection which must be prevented explicitly. In the last tutorial, we saw that an ORM can help by providing an object-oriented interface to the database which integrates much more fluently into the programming environment. Up to this point however, we have still been using SQL to create tables and to perform other DDL operations. In this tutorial, we will implement the migrations feature of Entity Framework Core which puts DDL under programmatic control. Once initialised, migrations allow a developer to define changes to the data model in code and then implement those changes to the database using standard utility functions provided by EF Core.
1. How migrations work
During development, the main steps to implement a database change are
- Update the data structure in a model file
- Create a migration using EF Core
- Apply the migration to the database using EF Core
- Commit and push the migration to the code repo
Once the migration is part of the repo, it is available to apply to any other instance of the database. This includes copies used by other developers as well as server-based instances used either for testing or production. The process above is simple but requires some supporting infrastructure to make it work. To generate a migration, for example, EF Core needs to be able to compare the data schema as defined in the model files with the implemented schema in the database. That in itself is not too difficult, but the process also needs to take the sequence of changes into account. To illustrate the issue, consider two separate schema changes where the first creates a new table and the second renames one of the columns in that table. It is important that they are executed in sequence because the second change depends on the first. To ensure that changes are sequenced correctly, every migration is assigned a level identifier. Migration scripts specify their starting level and the target level, and a table in the database records the current migration level. Thus a script that migrates the schema from level 10 to level 11, say, cannot be run unless the database is currently at level 10.
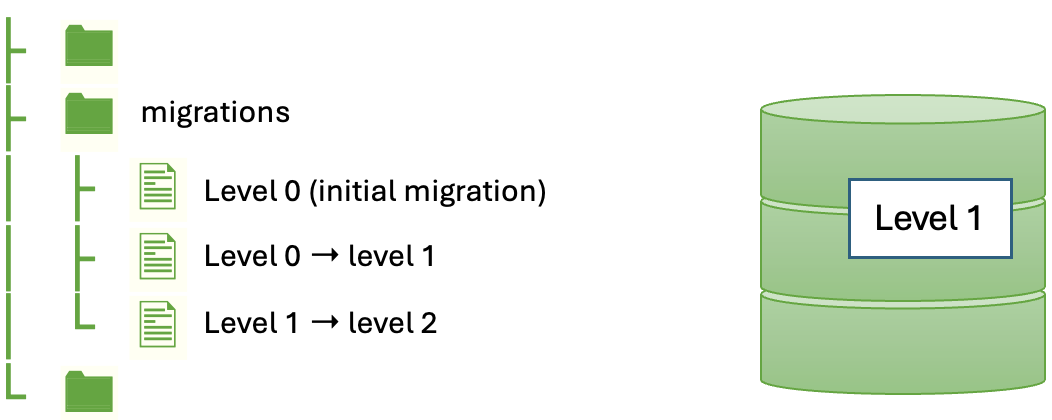
The infrastructure supporting migrations is shown in Fig. 1. Migration scripts are generated and stored in a standard directory. The migration process is bootstrapped from an initial migration which creates a migration level table in the database along with any tables defined in the model files. Subsequent migrations update this initial configuration. In the figure, we can see that the first two migrations have already been run since the migration level table records that the database is currently at level 1. EF Core would therefore prevent the first two migrations from being run again, and only the third migration would be permitted. Once it is applied, the third migration would update the migration level of the database to 2.
A big advantage of this infrastructure is that most migration scripts allow the database to be downgraded from its existing level to the previous one. Some changes, such as dropping a table may not be completely reversible since any data the table contained would be lost.
2. Refactor the code
Although the concept of migrations is straightforward, there is some work to be done on the
structure of the application before they can actually be implemented. This is mainly due to
incompatibilities between Microsoft technologies. For example, .NET MAUI uses a new Microsoft
feature called Native Ahead-Of-Time (Native AOT) compilation. This feature minimises the size
and startup time of the executables created for different platforms and eliminates the need for
a .NET runtime. Unfortunately, this feature will not be fully supported by EF Core until the next
release. A workaround is to create a
dummy project
for the migrations. However, this requires the current project to be refactored so that the
database-related elements (models and DbContext) are contained in a third project that can be
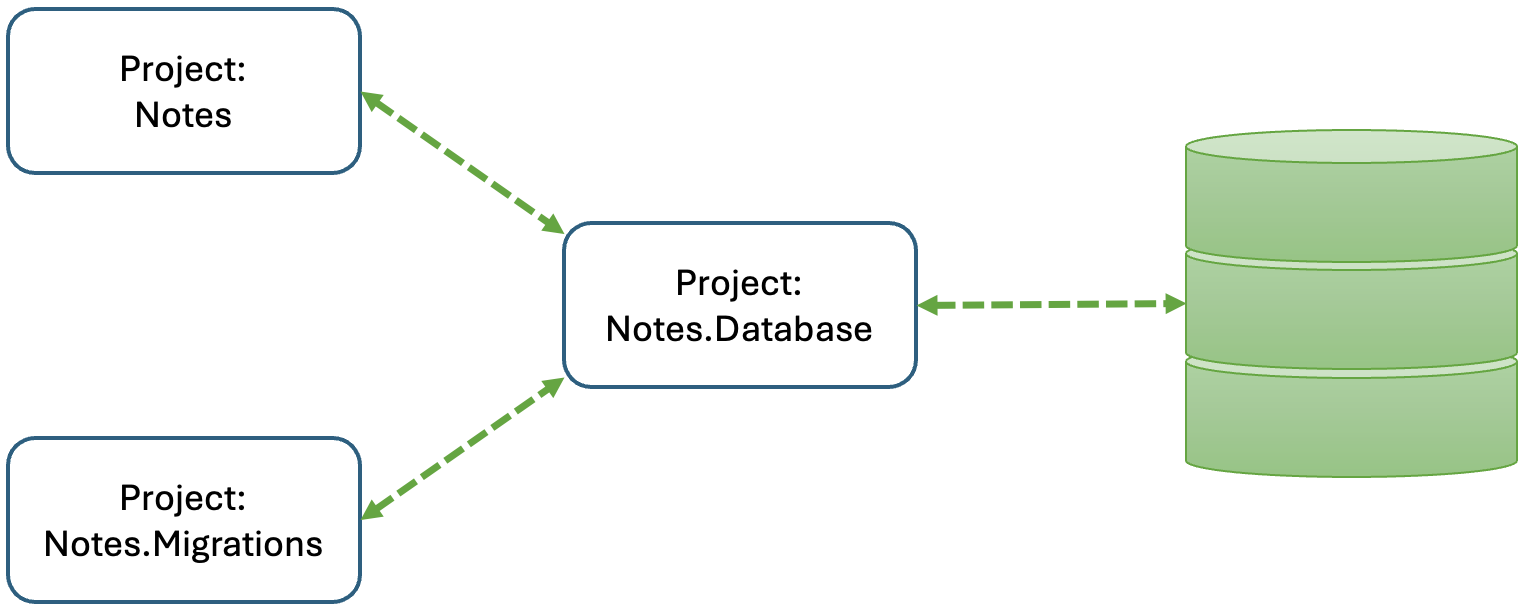
shared by the application and the migrations. This setup is illustrated in Fig. 2 where the
Notes.Database project is a shared library used by both Notes and Notes.Migrations. The
shared library looks after all the interactions with the database.
The steps below explain how to separate the database-related elements from the rest of the application.
Create a new project in the same solution
This step creates a project to contain the new shared library.
- Right-click on the solution in the Solution Explorer and choose New Project…
- Select Class Library from the available options.
-
Name the new project Notes.Database.
The new project should appear as shown in Fig. 3.
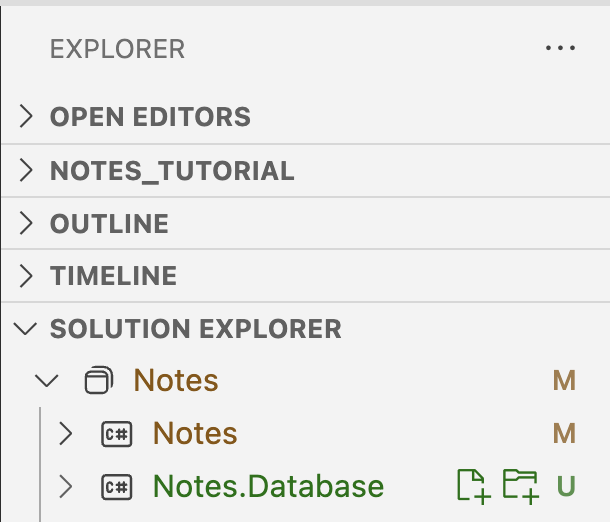
Fig. 3. New database project
Update the project content
First, remove the default file Class1.cs.
Next, we will move the database-related elements from Notes into the new library project.
Moving the items from one project to another is most easily done using a file manager (e.g.
File Explorer on Windows or Finder on Mac). We will also take the opportunity to update the
namespace in the relocated files and to correct any invalid references.
- Move the
Datafolder fromNotestoNotes.Database - Move the
Modelsfolder fromNotestoNotes.Database - Move
appsettings.jsonfromNotestoNotes.Database -
Edit the file
Data/NotesDbContext.csUpdate the first three lines of the file to match the snippet below
1
2
3
4
using Microsoft.EntityFrameworkCore;
using Notes.Database.Models;

namespace Notes.Database.Data;
-
Edit the file
Models/Note.csUpdate the namespace to
Notes.Database.Models
Update the NuGet packages in the Notes project
Now that we will be dealing with three related projects each with different package requirements, a graphical management tool will be useful. Using the extensions tool on the left-hand side menu, find and install the NuGet Package Manager GUI by aliasadidev. Once installed, you can invoke the interface using the VSCode command palette (SHIFT+CTRL+P on Windows; SHIFT+CMD+P on Mac). You will be presented with a display like the one in Fig. 4.
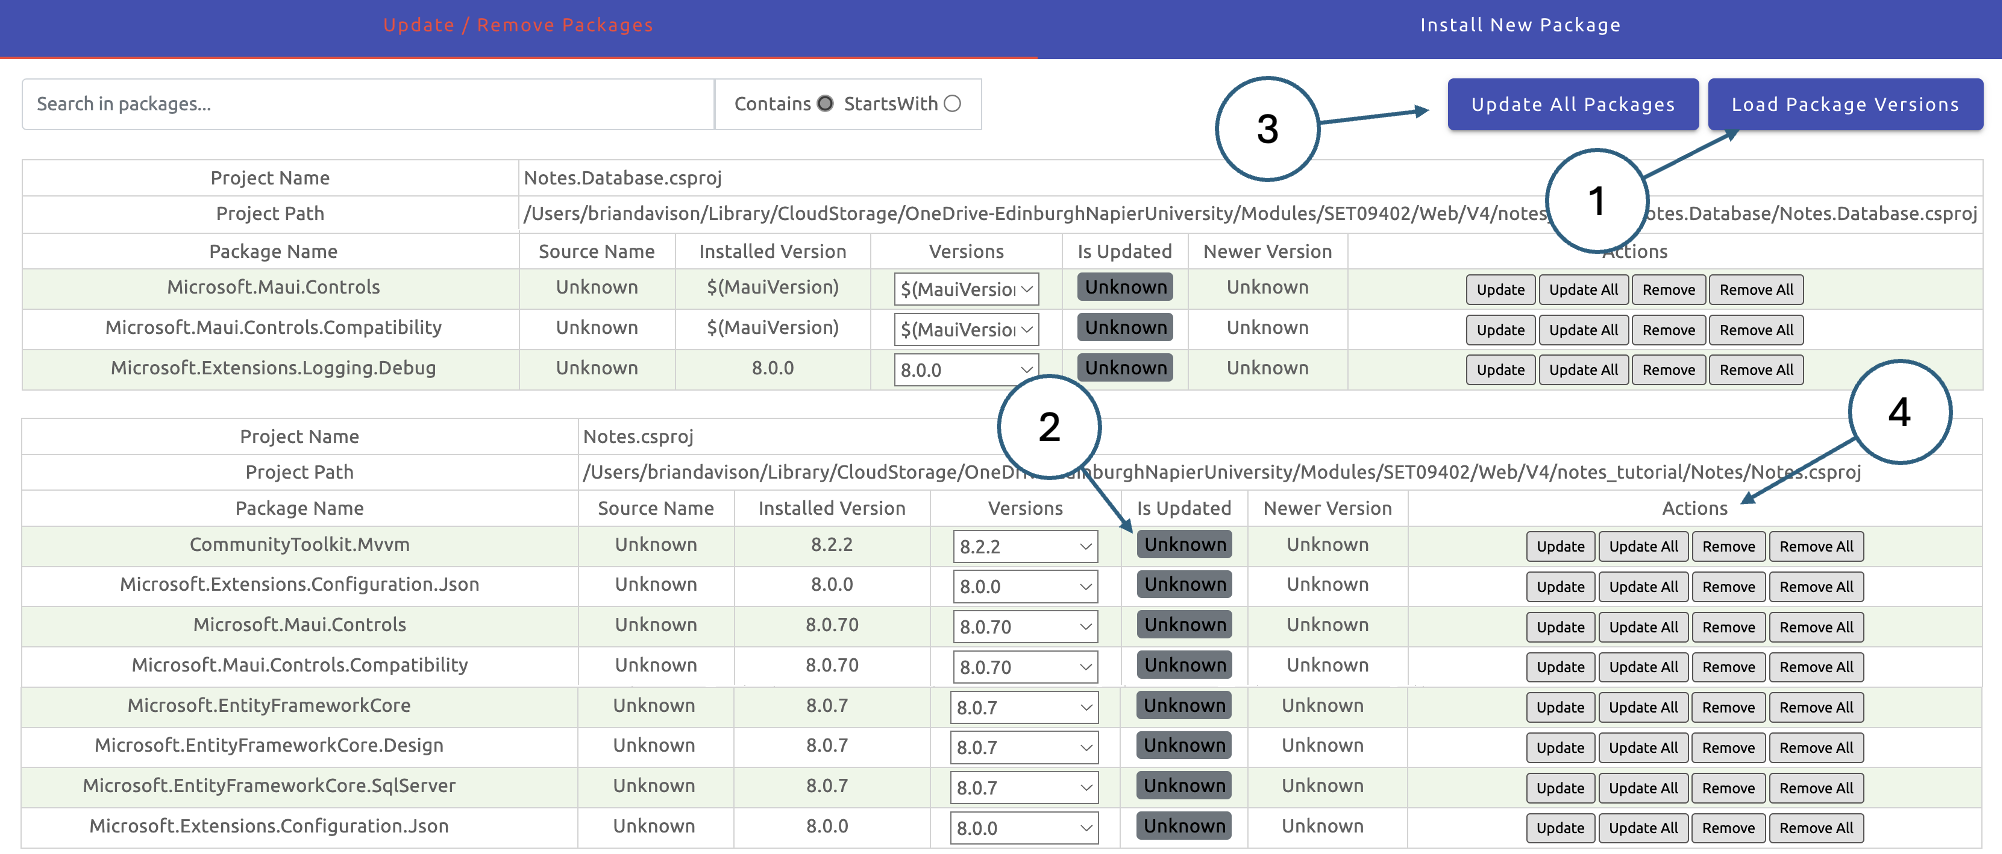
The display shows the packages that are installed for each project. Clicking the Load Package Versions button (1) will query the NuGet repositories to find out whether there are any updates available. If the installed packages are up to date, the Is Updated flashes (2) will turn green. They will turn red if there is a newer version of the package available. You can upgrade all packages using the button at the top (3), or individually using the buttons to the right (4). Here, you will also find a button to delete a package.
We need to remove the references to Entity Framework Core from the Notes project and install
the same packages in Notes.Database. Remove the following packages using the action buttons (4):
- Microsoft.EntityFrameworkCore
- Microsoft.EntityFrameworkCore.Design
- Microsoft.EntityFrameworkCore.SqlServer
- Microsoft.Extensions.Configuration.Json
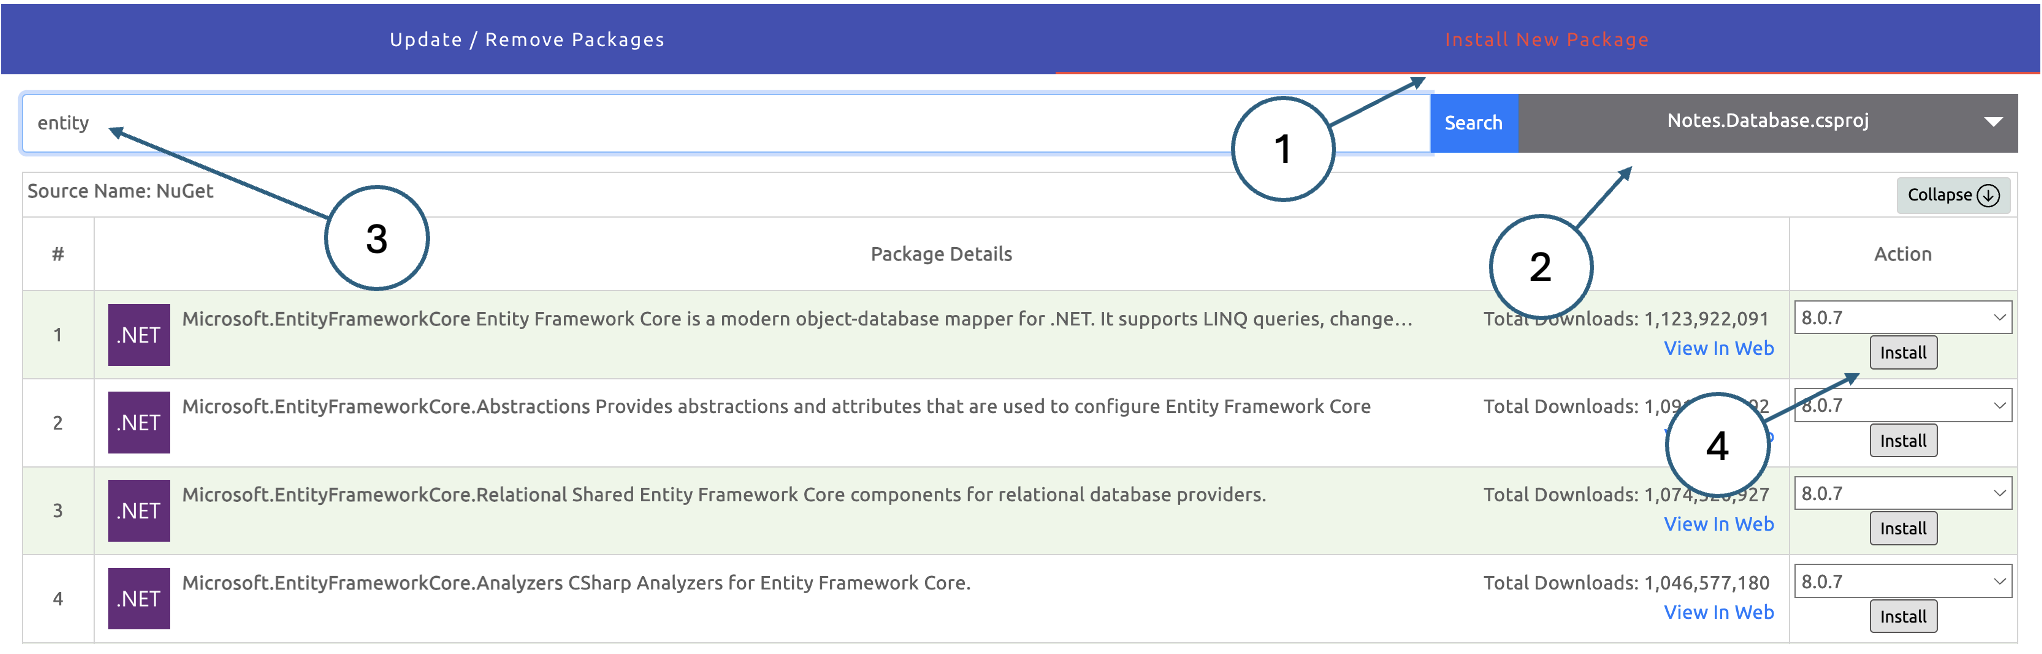
Next we need to add the same packages to the Notes.Database project. On the Install New Package
tab as shown in Fig. 5, set the target project using the dropdown list (2), search for the package
you want (3) and install it by clicking the button on the right (4).
Modify Notes.csproj
Here, we remove the references to the relocated elements and add a directive to include the new shared project.
- Click on the
Notesproject to open the project file in the editor pane. -
Check that the
<ItemGroup>that shows the installed packages matches the snippet below.1 2 3 4 5 6
<ItemGroup> <PackageReference Include="CommunityToolkit.Mvvm" Version="8.2.2" /> <PackageReference Include="Microsoft.Maui.Controls" Version="8.0.70" /> <PackageReference Include="Microsoft.Maui.Controls.Compatibility" Version="8.0.70" /> <PackageReference Include="Microsoft.Extensions.Logging.Debug" Version="8.0.0" /> </ItemGroup>
- Remove the
<ItemGroup>that includes theappsetting.jsonfile -
Add the new
<ItemGroup>shown below to include theNotes.Databaseproject.1 2 3
<ItemGroup> <ProjectReference Include="../Notes.Database/Notes.Database.csproj" /> </ItemGroup>
Modify Notes.Database.csproj
The next task is to update the new Notes.Database project file to ensure that it contains all
the necessary elements. Follow the steps below.
-
Click on the
Notes.Databaseproject to open the project file in the editor pane. -
Check that the
<ItemGroup>that shows the installed packages matches the snippet below.1 2 3 4 5 6
<ItemGroup> <PackageReference Include="Microsoft.EntityFrameworkCore" Version="8.0.7" /> <PackageReference Include="Microsoft.EntityFrameworkCore.Design" Version="8.0.7" /> <PackageReference Include="Microsoft.EntityFrameworkCore.SqlServer" Version="8.0.7" /> <PackageReference Include="Microsoft.Extensions.Configuration.Json" Version="8.0.0" /> </ItemGroup>
-
Add the new
<ItemGroup>shown below to include theappsettings.jsonfile.1 2 3 4 5
<ItemGroup> <EmbeddedResource Include="appsettings.json"> <CopyToOutputDirectory>Always</CopyToOutputDirectory> </EmbeddedResource> </ItemGroup>
-
Edit the file
Data/NotesDbContext.csand add theOnConfiguring()method after the constructors:1 2 3 4 5 6 7 8 9 10 11 12 13 14
protected override void OnConfiguring(DbContextOptionsBuilder optionsBuilder) { var a = Assembly.GetExecutingAssembly(); var resources = a.GetManifestResourceNames(); using var stream = a.GetManifestResourceStream("Notes.Database.appsettings.json"); var config = new ConfigurationBuilder() .AddJsonStream(stream) .Build(); optionsBuilder.UseSqlServer( config.GetConnectionString("DevelopmentConnection") ); }
Update other files
Now that the database-related elements have been moved, we need to remove references to them in
the Notes project. Follow the steps below to make the necessary changes.
- Edit the
MauiProgram.csfile. -
Remove the following three
usingstatements from the start of the file:1 2 3
using System.Reflection; using Microsoft.EntityFrameworkCore; using Microsoft.Extensions.Configuration;
-
Remove the following lines which read the
appsettings.jsonfile.:1 2 3 4 5 6 7 8 9 10
var a = Assembly.GetExecutingAssembly(); using var stream = a.GetManifestResourceStream("Notes.appsettings.json"); var config = new ConfigurationBuilder() .AddJsonStream(stream) .Build(); builder.Configuration.AddConfiguration(config); var connectionString = builder.Configuration.GetConnectionString("LocalConnection");
-
Update the line that creates the
DbContextto remove the reference to the connection string. This is now handled inNotes.Database:1
builder.Services.AddDbContext<NotesDbContext>();
-
Edit the
NoteViewModel.csfile. -
Update the
usingstatements to reflect the new namespace forModelsandData:1 2
using Notes.Database.Models; using Notes.Database.Data;
-
Edit the
AllNotesViewModel.csfile. -
Update the
usingstatement to reflect the new namespace forData:1
using Notes.Database.Data;
Update the .gitignore file
Now that we have added a new project, object and binary files will be generated which should not
be stored in the repo. We have also moved the appsettings.json file and we need to prevent the
new version from being committed. Update the contents of your .gitignore file to match the
snippet below.
1
2
3
4
5
6
Notes/bin/
Notes/obj/
Notes.Database/obj/
Notes.Database/bin/
Notes.Database/appsettings.json
.vscode
Test the application
At this stage, the app should still function as before. Run it in the emulator to check and fix any issues before continuing.
Add the migrations project
To add the final element in the new architecture, follow the steps below.
-
Right-click on the solution in the Solution Explorer and select Console App from the available options.
-
Call the new project Notes.Migrations.
-
Edit the project file by clicking the new project in the Solution Explorer.
-
Add the new
<ItemGroup>shown below to include theNotes.Databaseproject.1 2 3
<ItemGroup> <ProjectReference Include="../Notes.Database/Notes.Database.csproj" /> </ItemGroup>
Update the .gitignore file
We need to prevent object and binary files from being stored in the repo as we did before. Update
the contents of your .gitignore file to match the snippet below.
1
2
3
4
5
6
7
8
Notes/bin/
Notes/obj/
Notes.Database/obj/
Notes.Database/bin/
Notes.Database/appsettings.json
Notes.Migrations/obj/
Notes.Migrations/bin/
.vscode
3. Initialise migrations
Installing the tools
To use migrations in VSCode we need to install the .NET Core CLI tools and the EF Design package. This can be done by executing the commands below at the terminal prompt in VSCode. Make sure that you are in the Notes.Migrations project directory.
1
2
dotnet tool install --global dotnet-ef
dotnet add package Microsoft.EntityFrameworkCore.Design
You can check that the installation is successful with the command
1
dotnet ef
If all is well, you will see the output below along with some additional version information.
1
2
3
4
5
6
7
8
                 _/\__
           ---==/    \\
     ___  ___   |.    \|\
    | __|| __|  |  )   \\\
    | _| | _|   \_/ |  //|\\
    |___||_|       /   \\\/\\

Entity Framework Core .NET Command-line Tools 9.0.6
Create the initial migration
In the long term, we want to store database migrations in the Notes.Migrations project; however, there is a bootstrapping problem. EF Core makes the following distinction between projects used for migrations:
- The target project is the one where the migration files will be generated.
- The startup project is the one that will be built and run in order to perform the migrations.
You might think that since Notes.Database is included in Notes.Migrations, we could use
Notes.Migrations for both the target and startup projects. However, if no migrations exist -
as is the case with the initial migration - the command to add a new migration is unable to find
the DbContext. The simplest way around the dilemma is to create the initial migration in the
Notes.Database project and then move it to Notes.Migrations. Follow the steps below to do this.
-
In a terminal window, make sure that you are in the solution root directory - i.e. the one that contains all of the project directories.
-
Create the initial migration by executing the command below:
1
dotnet ef migrations add InitialCreate --project Notes.Database
The steps above create a new directory Migrations in the Notes.Database project which contains
two files. They are
- NotesDbContextModelSnapshot.cs: This file records the current state of the data model for reference.
- 20240713135445_InitialCreate.cs: This is the migration script - note that the number at the start of the filename is a timestamp and so your file will be named slightly differently.
Note
The name InitialCreate is commonly used, but is not mandatory. In general, you should give migrations a descriptive name like commit comments so that it is clear what changes are being made.
Because this is the initial migration, EF Core assumes that the database is currently empty and the migration file contains the code to create the database objects defined in the model files. It is good practice to check migration files before applying them to make sure they are going to make the changes you expect. This would be a good moment to take a look at the content of the new example.
If we tried to apply this migration it would fail because we already have a NOTE table in the database. Although it is possible to work around that, the simplest approach is simply to drop the table from the database using your chosen database management tool (DataGrip or ADS). The steps below take you through the process of applying the initial migration.
- Use your database management tool to drop the NOTE table.
- In a terminal window, make sure that you are in the solution root directory.
-
Execute the command below.
1
dotnet ef database update --project Notes.Database
After the migration operation completes, check the contents of the database in your database management
tool (you may need to refresh the view). You should see two new tables, the NOTE table and another
called _EFMigrationsHistory_. You can examine the contents of the migrations history by executing the
following query:
1
select * from __EFMigrationsHistory;
The function of the history table is to ensure that we do not try to apply migrations more than
once. You can check out what happens by executing the database update command a second time.
You should see a message that says the database is already up to date.
Move the Migrations directory
Now that the supporting infrastructure for migrations exists, EF Core will be able to access the
DbContext from the Notes.Migrations project. Two steps are required to make the change:
- Use a file manager to move the Migrations directory from
Notes.DatabasetoNotes.Migrations. -
Update the
NotesDbContext.csfile to add a reference to theNotes.Migrationsproject in theoptionsBuilder:1 2 3 4
optionsBuilder.UseSqlServer( config.GetConnectionString("LocalConnection"), m => m.MigrationsAssembly("Notes.Migrations") );
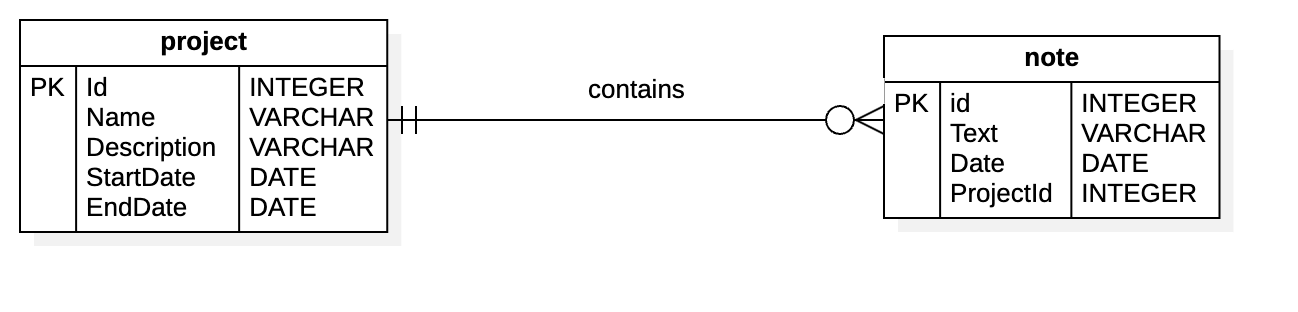
4. Create a new table
Let us assume that as part of the further development of the Notes application, we want to be able to group notes according to the project they are related to. The ER diagram for this is shown in Fig. 6.
Follow the steps below to add the new model to the application, create a migration and apply it to the database.
-
Create a new file
Project.csin the Models directory and paste in the following code:1 2 3 4 5 6 7 8 9 10 11 12 13 14 15 16 17 18 19 20
using Microsoft.EntityFrameworkCore; using System.ComponentModel.DataAnnotations; using System.ComponentModel.DataAnnotations.Schema; namespace Notes.Database.Models; [Table("project")] [PrimaryKey(nameof(Id))] public class Project { public int Id { get; set; } [Required] public string Name { get; set; } [Required] public string Description { get; set; } public DateTime StartDate { get; set; } public DateTime EndDate { get; set; } public List Notes { get; set; } = new List(); }
Notice the use of annotations, and also the last line which defines a relationship between a project and a list of notes.
-
Update the
Note.csfile with the corresponding foreign key information by adding the following two lines to the existing list of columns:1 2
public int ProjectId { get; set; } public Project Project { get; set; }
Note
As currently defined, the new properties will generate non-nullable columns in the database table. That means that a note must be associated with a project. If there are existing notes in the database, an automatically generated migration will fail because it will attempt to add a non-nullable column without any data. This would be a case where manually adjusting the migration script to adjust the data would be necessary. In this case, the NOTE table is probably empty and there will be no problem. Alternatively, we could define the new properties to be nullable which would allow notes with no associated project.
-
Add the following line to the
DbContext.csfile:1
public DbSet Projects { get; set; }
-
In a terminal window, make sure that you are in the
Notes.Migrationsroot folder - not the solution root folder. -
Execute the following command to generate the new migration:
1
2
dotnet ef migrations add AddProjectTable
dotnet ef database update
Once both commands have completed, check the results in your database management tool.
You now have sufficient information to get started with database migrations. However, it is important to note that there are many options available and many problems that can arise. For more information, please see the Microsoft documentation.