This tutorial guides you through setting up a containerised development environment using Docker,
Visual Studio Code, .NET MAUI, and PostgreSQL. By the end, you will have a reproducible development
environment that includes everything needed for mobile app development with database support.
Architecture Overview
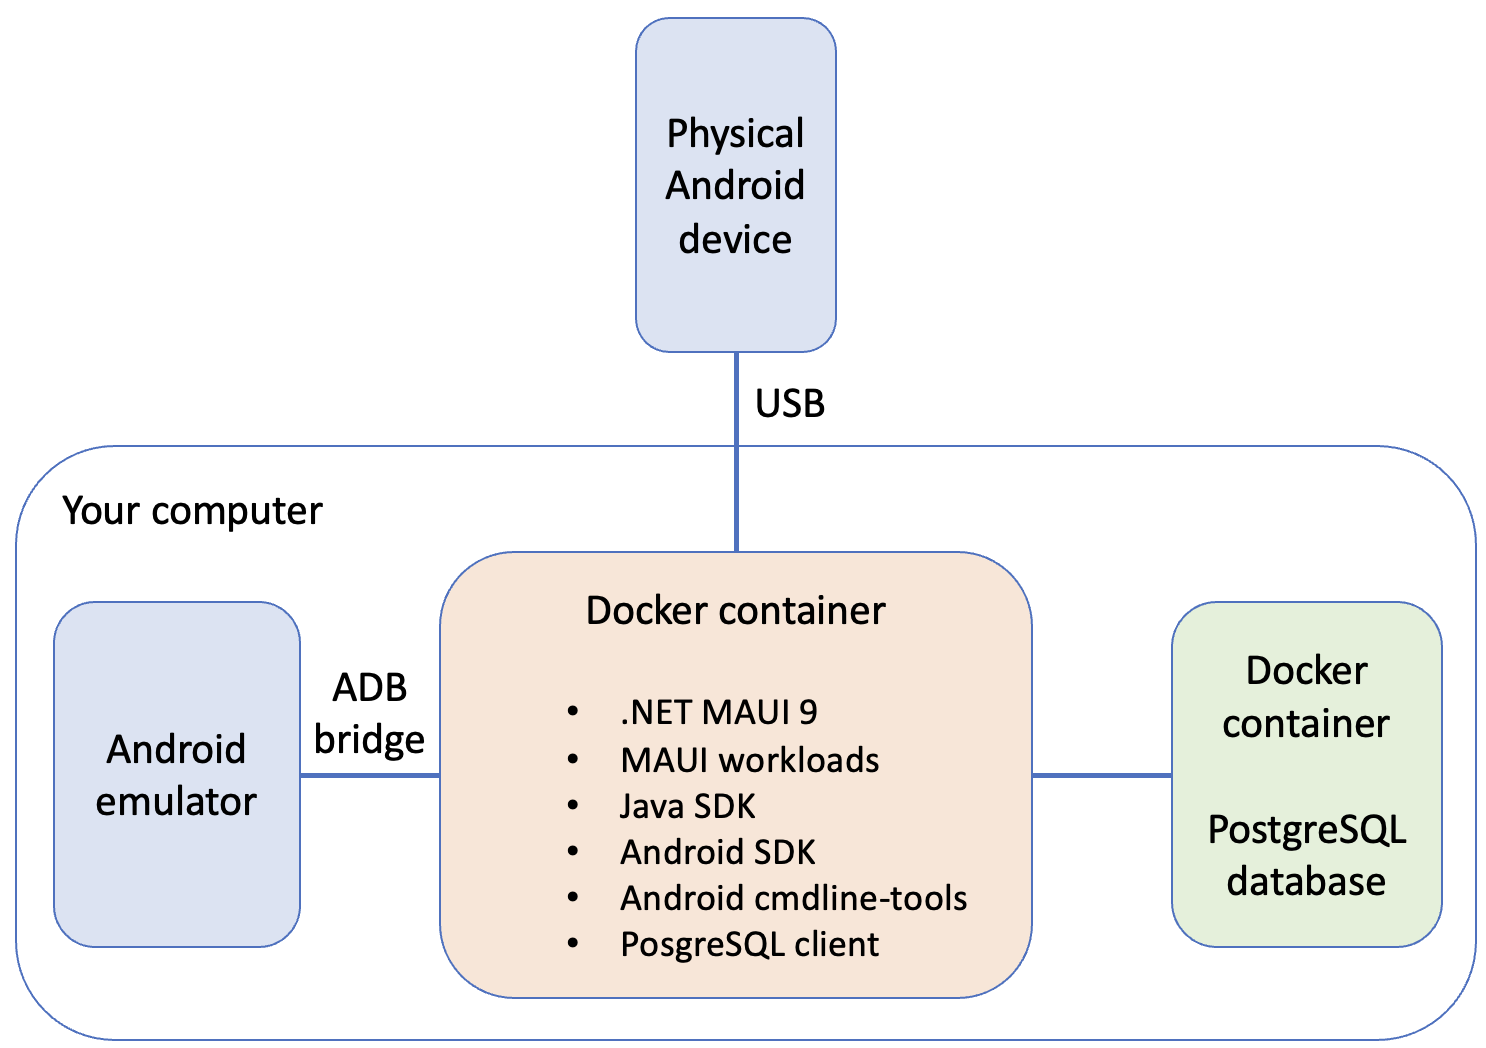
The development environment uses Docker to provide a consistent build environment across all
platforms. The Android emulator runs on your host machine (for performance and GPU access),
while the container handles building and deploying your app.
Fig. 1. Architecture overview
1. Install Docker Desktop
Docker Desktop provides a graphical interface for managing containers and includes everything
needed to run containerised applications on your computer.
Download Docker Desktop from the Docker website
and run the installer.
Warning
Docker Desktop on Windows requires WSL 2 (Windows Subsystem for Linux). If you don’t have it
installed, the Docker installer will prompt you to enable it. You may need to restart your
computer during this process.
After installation, Docker Desktop should start automatically. You can verify it’s running by
looking for the Docker whale icon in your system tray.
Make sure you download the correct version for your Mac:
Apple Silicon (M1, M2, M3, M4 chips): Download the “Apple Silicon” version
Intel: Download the “Intel chip” version
You can check your chip type by clicking the Apple menu and selecting “About This Mac”.
Open the downloaded .dmg file and drag the Docker icon to your Applications folder.
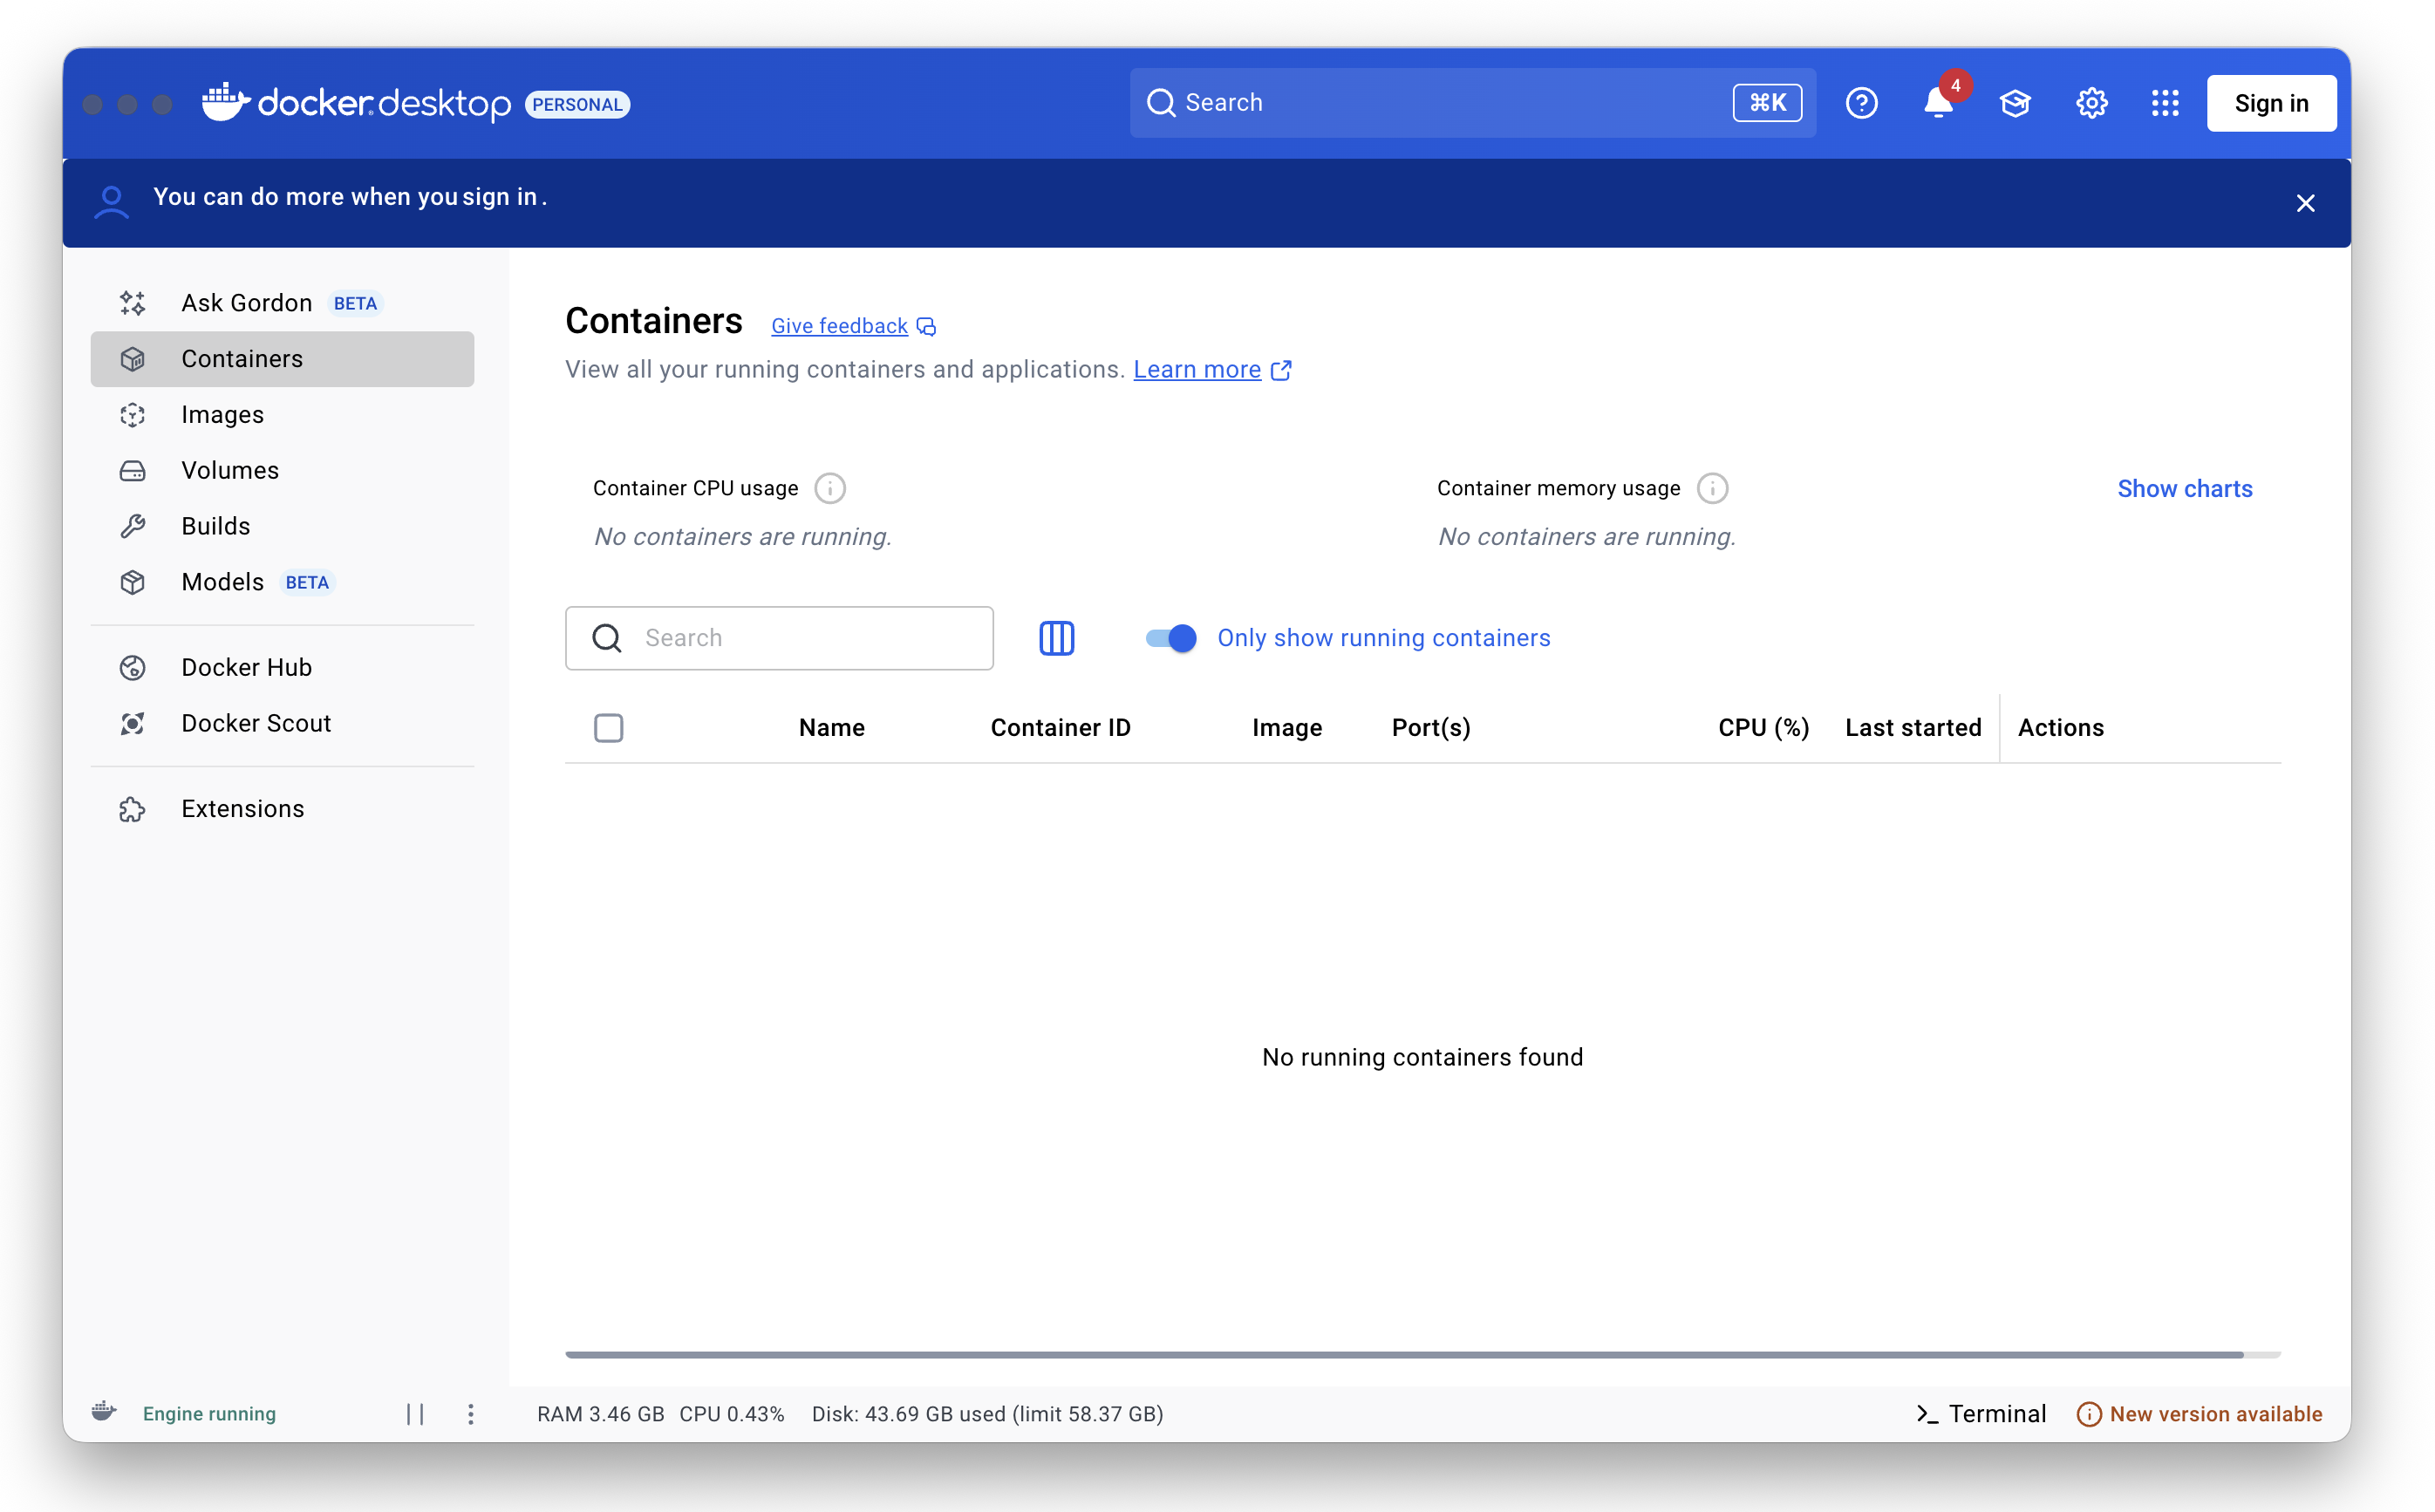
Launch Docker from your Applications folder.
Fig. 3. Docker Desktop running on Mac
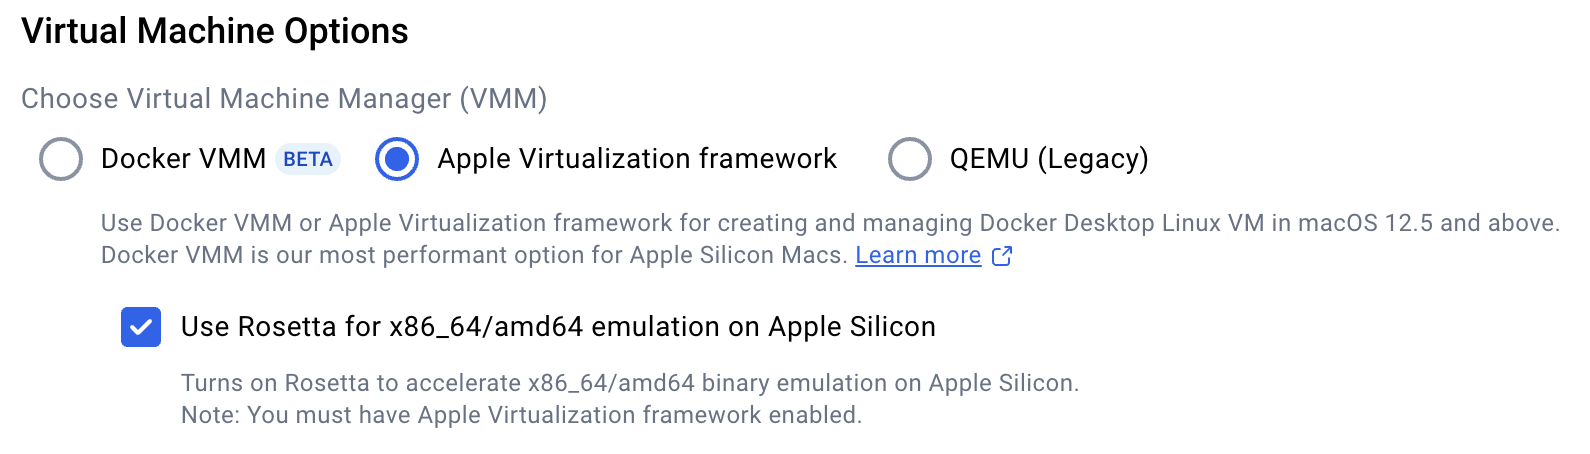
If you are using an Apple Silicon Mac, make sure that Docker is configured to use
Rosetta for x86_64 emulation. Open the Settings and check the box as shown in Fig. 4.
Fig. 4. Enabling Rosetta
On most Linux distributions, you can install Docker Engine using your package manager.
For Ubuntu/Debian:
Log out and back in for the group change to take effect. Alternatively, you can install
Docker Desktop for Linux
if you prefer a graphical interface.
Verify Docker is installed correctly by opening a terminal and running:
1
docker --version
You should see output similar to Docker version 24.0.0 or higher.
2. Install Visual Studio Code and Extensions
Follow the installation instructions for your operating system on the
VSCode website.
Permissions: VS Code needs to install extensions and may run into directory permissions issues.
To get around these, always run VSCode as an administrator.
Once VSCode is installed, you need to add the following extensions:
Extension
Extension ID
Purpose
Dev Containers
ms-vscode-remote.remote-containers
Develop inside Docker containers
Docker
ms-azuretools.vscode-docker
Manage Docker containers and images
Database Client
cweijan.vscode-postgresql-client2
Connect to and query PostgreSQL databases
.NET MAUI
dotnettools.dotnet-maui
.NET MAUI development support
AVD Manager
toroxx.vscode-avdmanager
Manage Android Virtual Devices
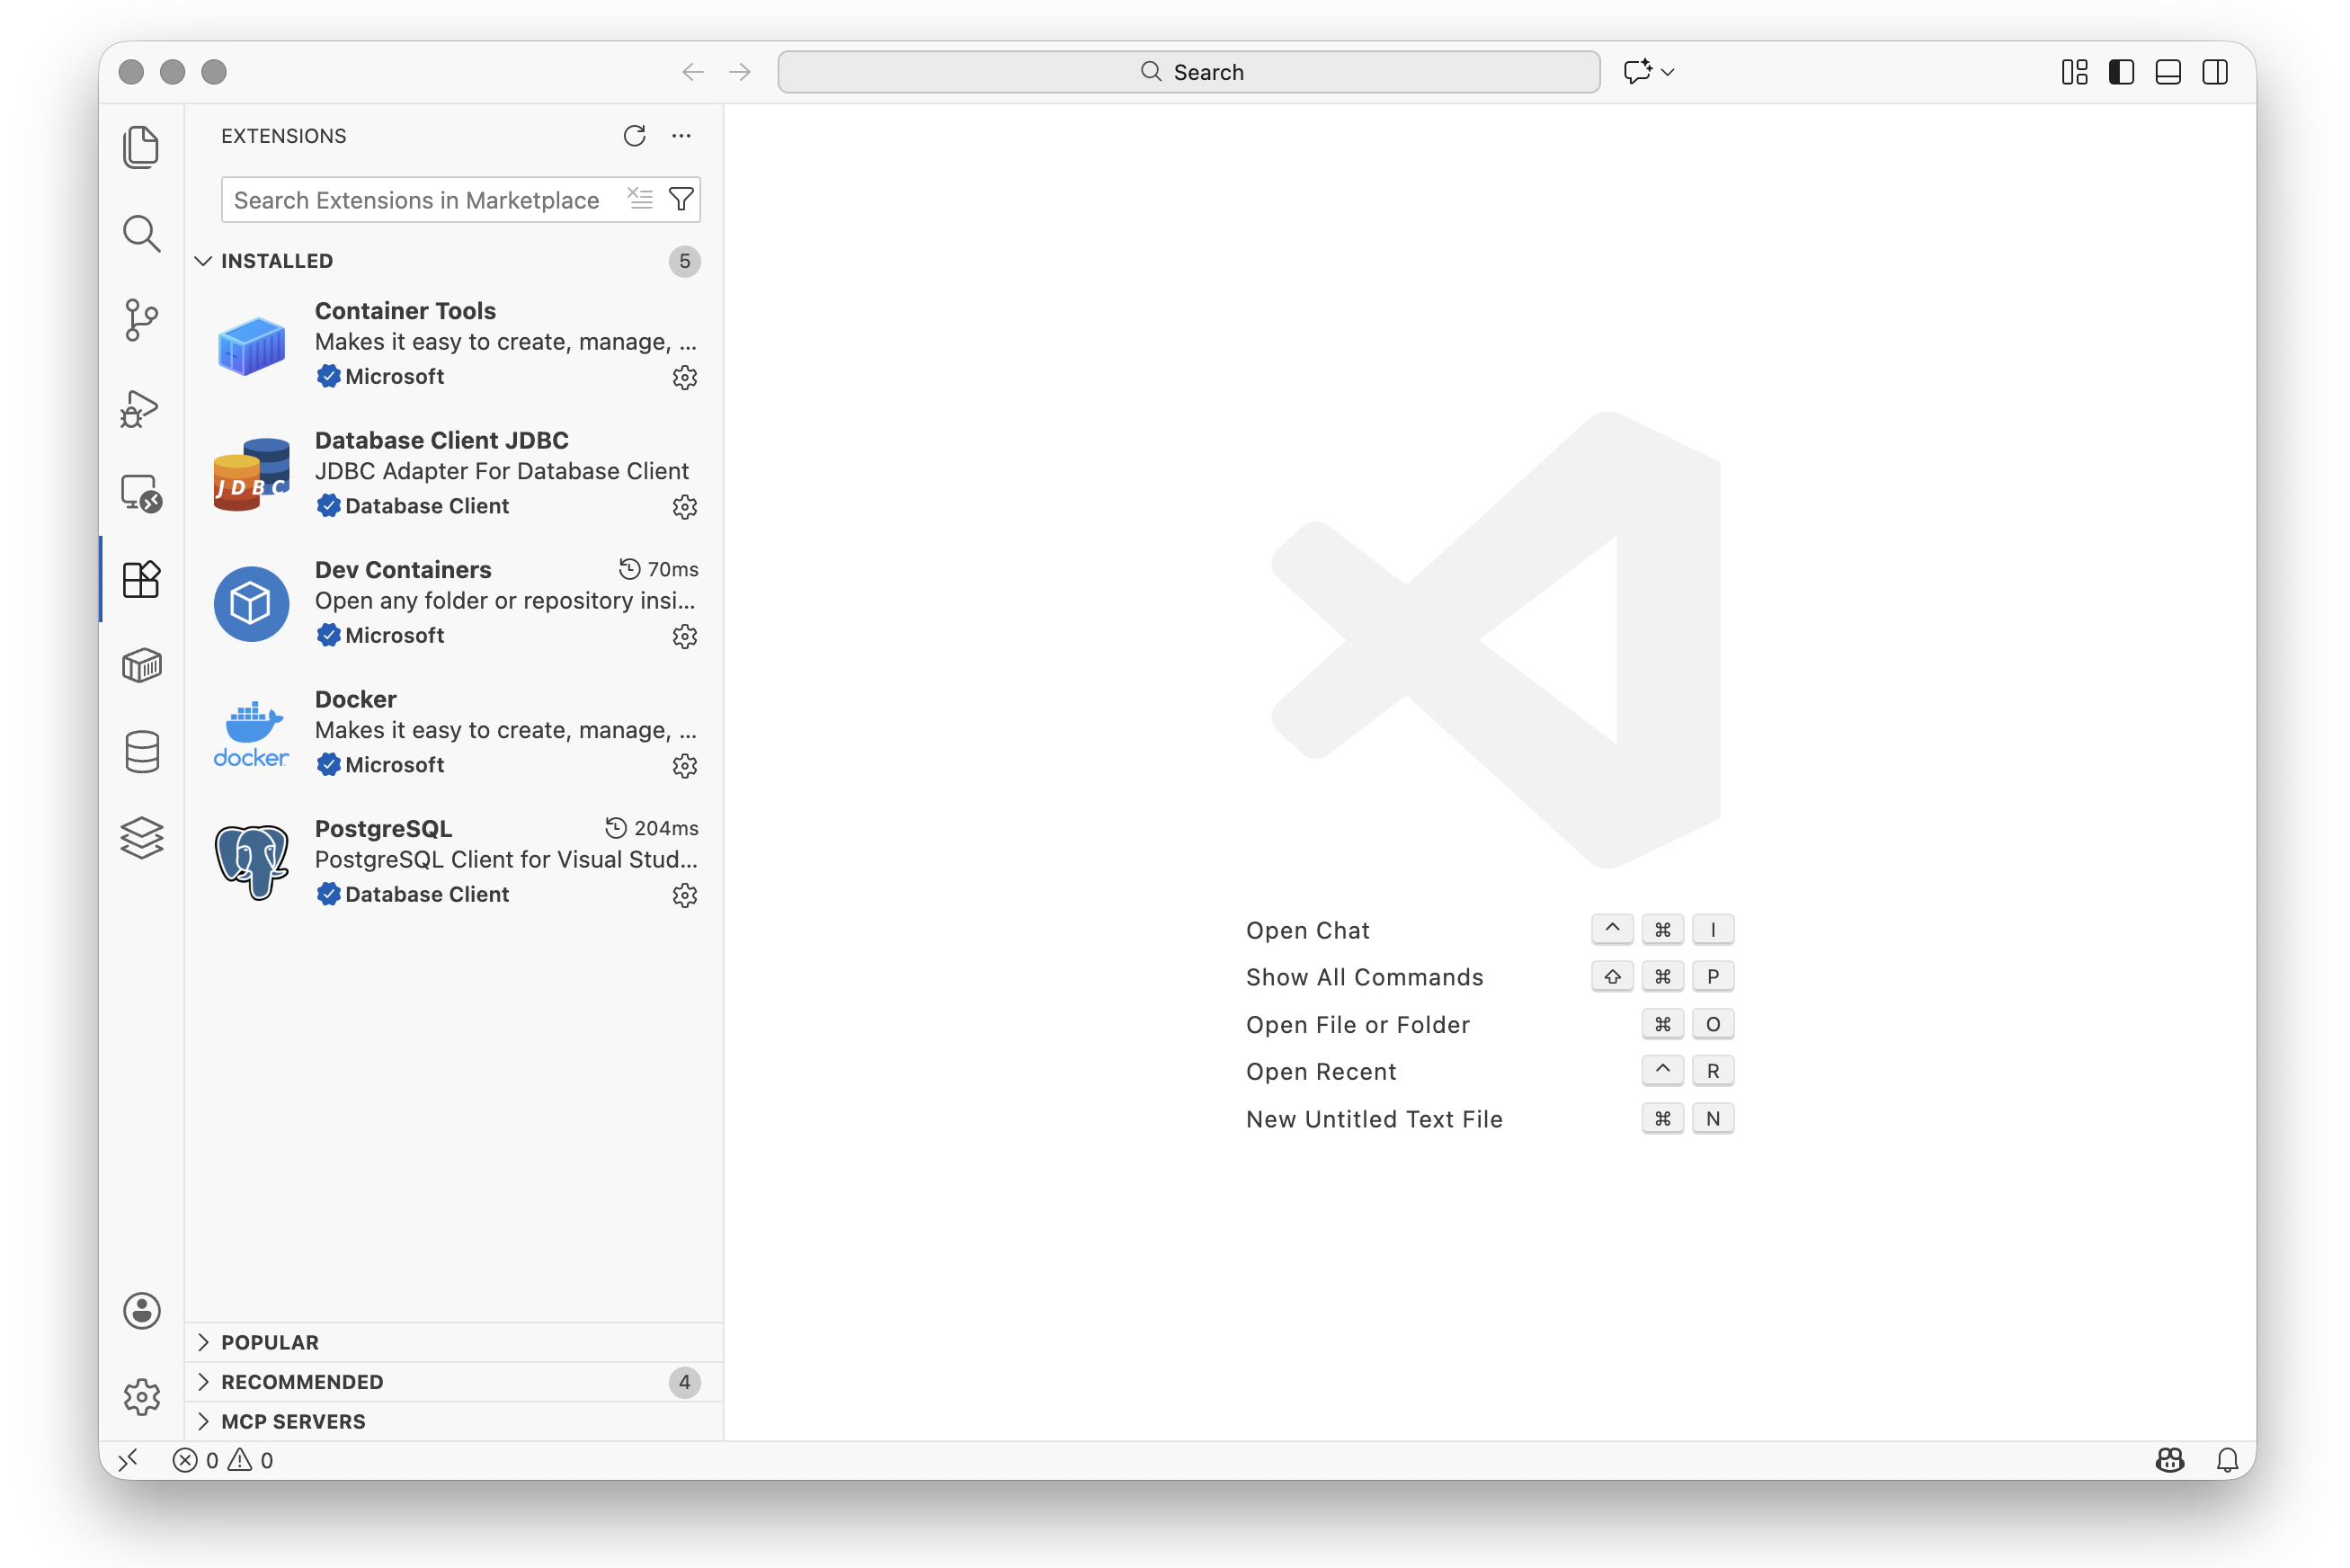
To install an extension, open VSCode and press Ctrl+Shift+X (Windows/Linux) or Cmd+Shift+X (Mac)
to open the Extensions panel. Search for each extension by name and click Install.
Fig. 5. Required VSCode extensions installed
3. Create the Project Structure
Create a new project folder with the required subdirectory for the dev container configuration.
mkdir MauiDevProject
cd MauiDevProject
mkdir .devcontainer
Open a terminal and run:
1
2
mkdir-p MauiDevProject/.devcontainer
cd MauiDevProject
Open the MauiDevProject folder in VSCode using File > Open Folder… or by running
code . from the terminal while in the project directory.
Your project structure should look like this:
1
2
MauiDevProject/
└── .devcontainer/
4. Create the Dockerfile
The Dockerfile defines the development container with all the tools needed for .NET MAUI
development, including the .NET SDK, MAUI workloads, Java JDK, and Android SDK.
Create a file called Dockerfile in the project root directory with the following content:
FROM mcr.microsoft.com/devcontainers/base:ubuntu# Install .NET SDK 9RUN wget https://dot.net/v1/dotnet-install.sh -O dotnet-install.sh \
&&chmod +x dotnet-install.sh \
&& ./dotnet-install.sh --channel 9.0 --install-dir /usr/share/dotnet \
&&ln-s /usr/share/dotnet/dotnet /usr/bin/dotnet \
&&rm dotnet-install.sh
# Install Java JDK (required for Android SDK) and unzip# Create a fixed symlink so JAVA_HOME works on both amd64 and arm64RUN apt-get update && apt-get install-y openjdk-17-jdk unzip \
&&ln-sfn"$(dirname$(dirname$(readlink-f$(which javac))))" /usr/lib/jvm/java-17
# Install MAUI workloads (maui-android only — iOS/macOS targets cannot install on Linux)RUN dotnet workload install maui-android
# Install Android SDK command-line toolsENV ANDROID_HOME=/opt/android-sdkENV JAVA_HOME=/usr/lib/jvm/java-17RUN mkdir-p${ANDROID_HOME}/cmdline-tools \
&& wget https://dl.google.com/android/repository/commandlinetools-linux-11076708_latest.zip \
&& unzip commandlinetools-linux-*.zip -d${ANDROID_HOME}/cmdline-tools \
&&mv${ANDROID_HOME}/cmdline-tools/cmdline-tools ${ANDROID_HOME}/cmdline-tools/latest \
&&rm commandlinetools-linux-*.zip
# Accept licenses and install platform toolsRUN yes | ${ANDROID_HOME}/cmdline-tools/latest/bin/sdkmanager --licenses&&\
${ANDROID_HOME}/cmdline-tools/latest/bin/sdkmanager \
"platform-tools"\
"platforms;android-35"\
"build-tools;35.0.0"ENV PATH="${PATH}:${ANDROID_HOME}/cmdline-tools/latest/bin:${ANDROID_HOME}/platform-tools"
Note
Understanding the Dockerfile:
.NET SDK 9 - The latest .NET SDK for building MAUI applications
MAUI Android workload - Only the maui-android workload is installed. The full maui
workload includes iOS, macOS, and Windows targets that cannot be installed on a Linux
container, so installing it would fail.
Java JDK 17 - Required by the Android SDK tools. A symlink is created at a fixed path
so that JAVA_HOME resolves correctly on both x86_64 (Windows/Intel) and ARM64
(Apple Silicon) architectures.
Android SDK - Command-line tools for building and deploying Android apps
Platform tools - ADB and other utilities for communicating with Android devices
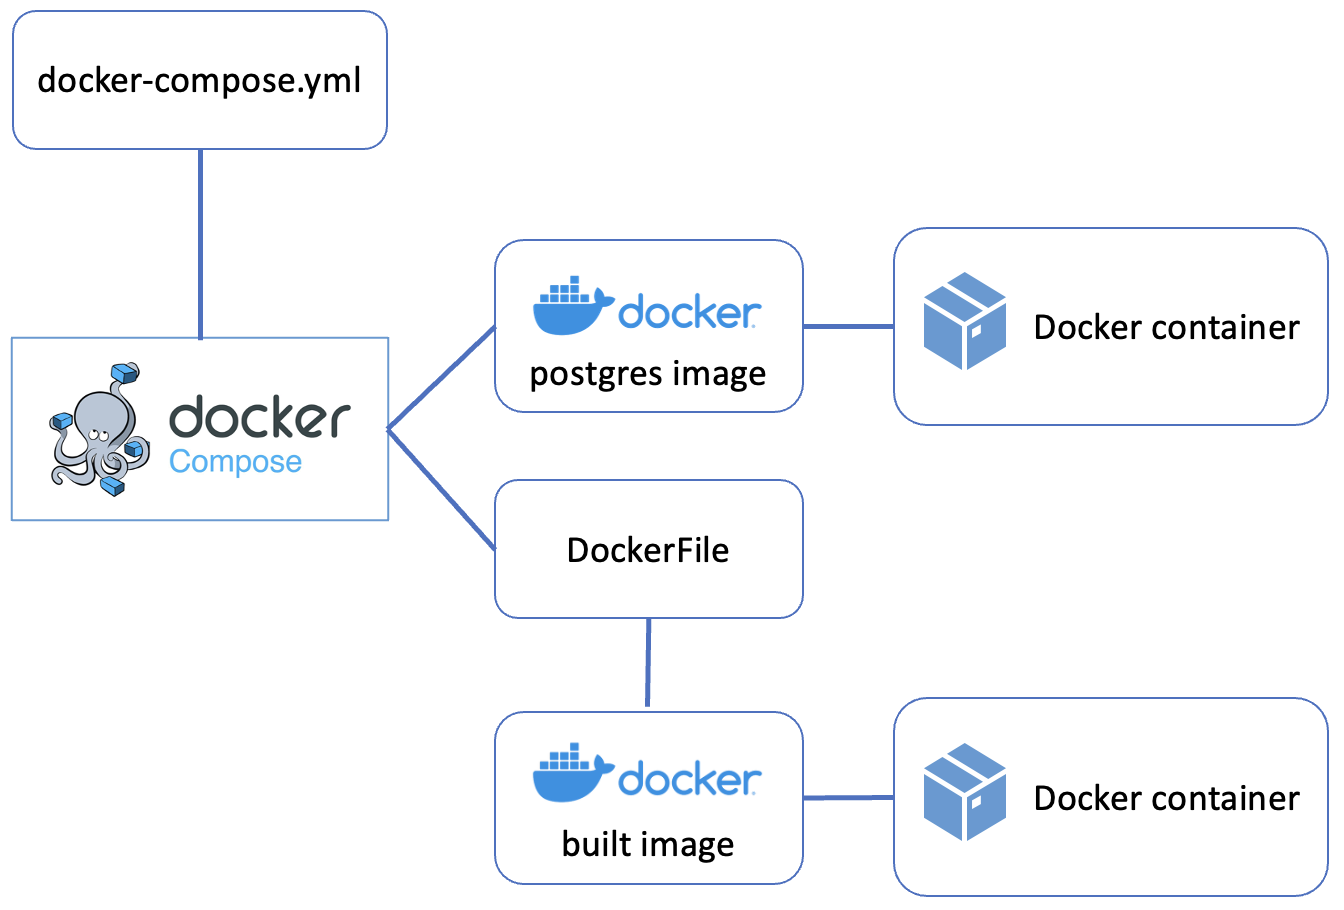
5. Configure Docker Compose
Docker Compose allows you to define and run multi-container applications. We will create a
configuration with two services: an application container for development and a PostgreSQL
database container.
Create a file called docker-compose.yml in the project root directory with the following content.
If you are running on an Apple Silicon Mac, uncomment the platform: linux/amd64 line.
build - Builds the container using our custom Dockerfile instead of a base image
network_mode: service:db - The app container shares the database container’s network
namespace entirely. This means you can connect to PostgreSQL using localhost:5432 from
within the app container. It also means extra_hosts cannot be used on the app service,
as these two options conflict.
depends_on: condition: service_healthy - Ensures the app container does not start until
PostgreSQL is genuinely ready to accept connections, not merely running.
healthcheck - Runs pg_isready every 5 seconds so Docker Compose knows when the
database is ready. This is what service_healthy above waits for.
ports: "5432:5432" - Exposes the database on the host machine. The Android emulator
(which runs on the host, not inside the container) connects to PostgreSQL using
10.0.2.2:5432, where 10.0.2.2 is the special address that the Android emulator uses
to reach the host machine.
volumes: postgres_data - A named volume that persists your database data even when
containers are stopped or removed.
command: sleep infinity - Keeps the app container running so VSCode can connect to it.
Fig. 6. Docker Compose architecture diagram
6. Configure the Dev Container
The dev container configuration tells VSCode how to use the Docker Compose setup for development.
Create a file called devcontainer.json inside the .devcontainer directory with the following content:
{"name":"MAUI Dev Environment","dockerComposeFile":["../docker-compose.yml"],"service":"app","workspaceFolder":"/workspace","customizations":{"vscode":{"extensions":["cweijan.vscode-postgresql-client2","ms-dotnettools.dotnet-maui","toroxx.vscode-avdmanager"]}},"remoteUser":"root","portsAttributes":{"5037":{"onAutoForward":"ignore"},"5554":{"onAutoForward":"silent"},"5555":{"onAutoForward":"silent"}}}
Note
Understanding the configuration:
dockerComposeFile - Points to your Docker Compose configuration
service - Specifies which container VSCode should connect to
workspaceFolder - The folder inside the container where your project files appear
customizations.vscode.extensions - Extensions to install automatically inside the container,
including the PostgreSQL client, .NET MAUI tools, and AVD Manager
portsAttributes - Controls how VSCode handles port forwarding for specific ports detected
inside the container. Port 5037 (the ADB server) is set to ignore so VSCode does not
attempt to forward it — the container already reaches the host ADB server via the
ADB_SERVER_SOCKET environment variable rather than a forwarded port. Ports 5554 and
5555 (the Android emulator’s console and ADB ports) are set to silent so that if VSCode
detects them it forwards them without showing a notification pop-up.
Never commit database credentials or .env files containing passwords to version control.
The credentials in this tutorial are for local development only.
Create a .gitattributes File
Create a file called .gitattributes in the project root directory:
1
2
3
4
* text=auto eol=lf
*.sh text eol=lf
Dockerfile text eol=lf
docker-compose.yml text eol=lf
Note
Windows uses CRLF line endings by default, while Linux and macOS use LF. If a Windows
user edits the Dockerfile or shell scripts and saves them with CRLF endings, the Docker
build will fail with confusing errors because the extra \r character corrupts the shell
commands inside RUN instructions.
The .gitattributes file instructs Git to normalise line endings to LF on checkout
regardless of the operating system or editor settings. This ensures the project builds
correctly for all students.
8. Open the Project in the Container
Now you can open the project inside the development container.
Press Ctrl+Shift+P (Windows/Linux) or Cmd+Shift+P (Mac) to open the command palette.
Type “Reopen in Container” and select Dev Containers: Reopen in Container.
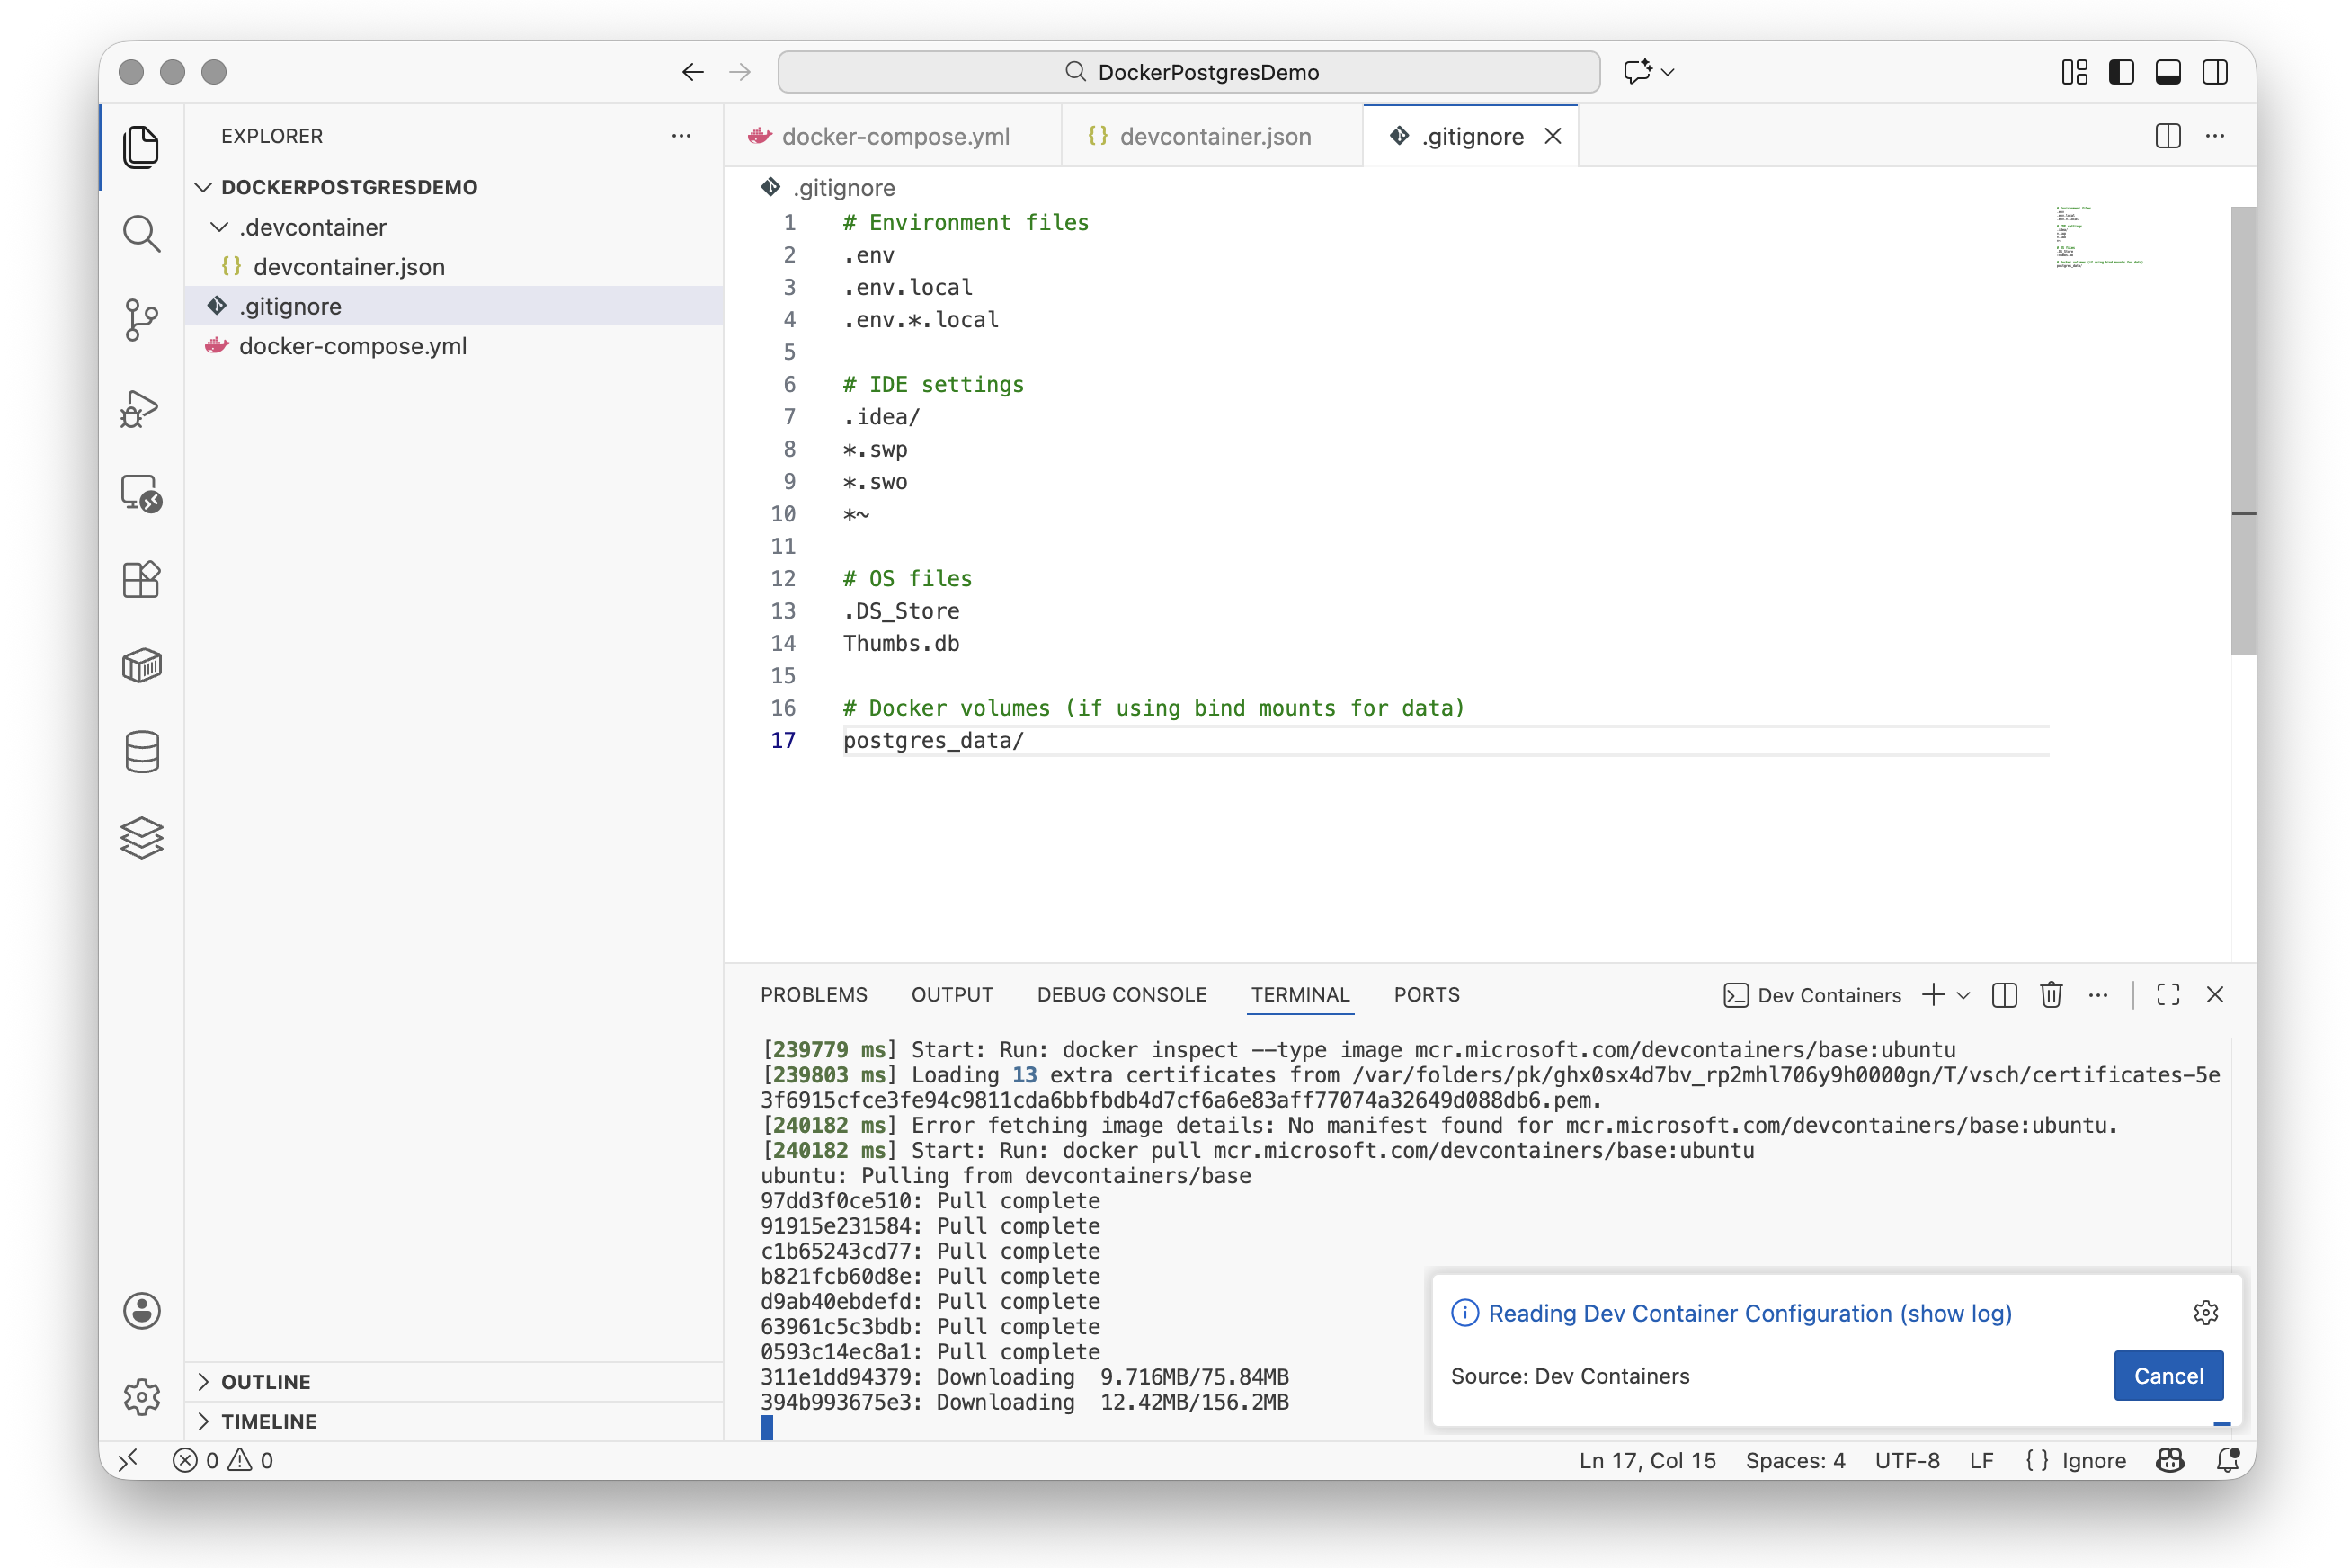
Fig. 7. Building the container
Warning
The first time you do this, Docker will build the custom image and download the required
components (.NET SDK, MAUI workloads, Java JDK, Android SDK). This may take 10-15 minutes
depending on your internet connection. Subsequent starts will be much faster as the image
is cached locally.
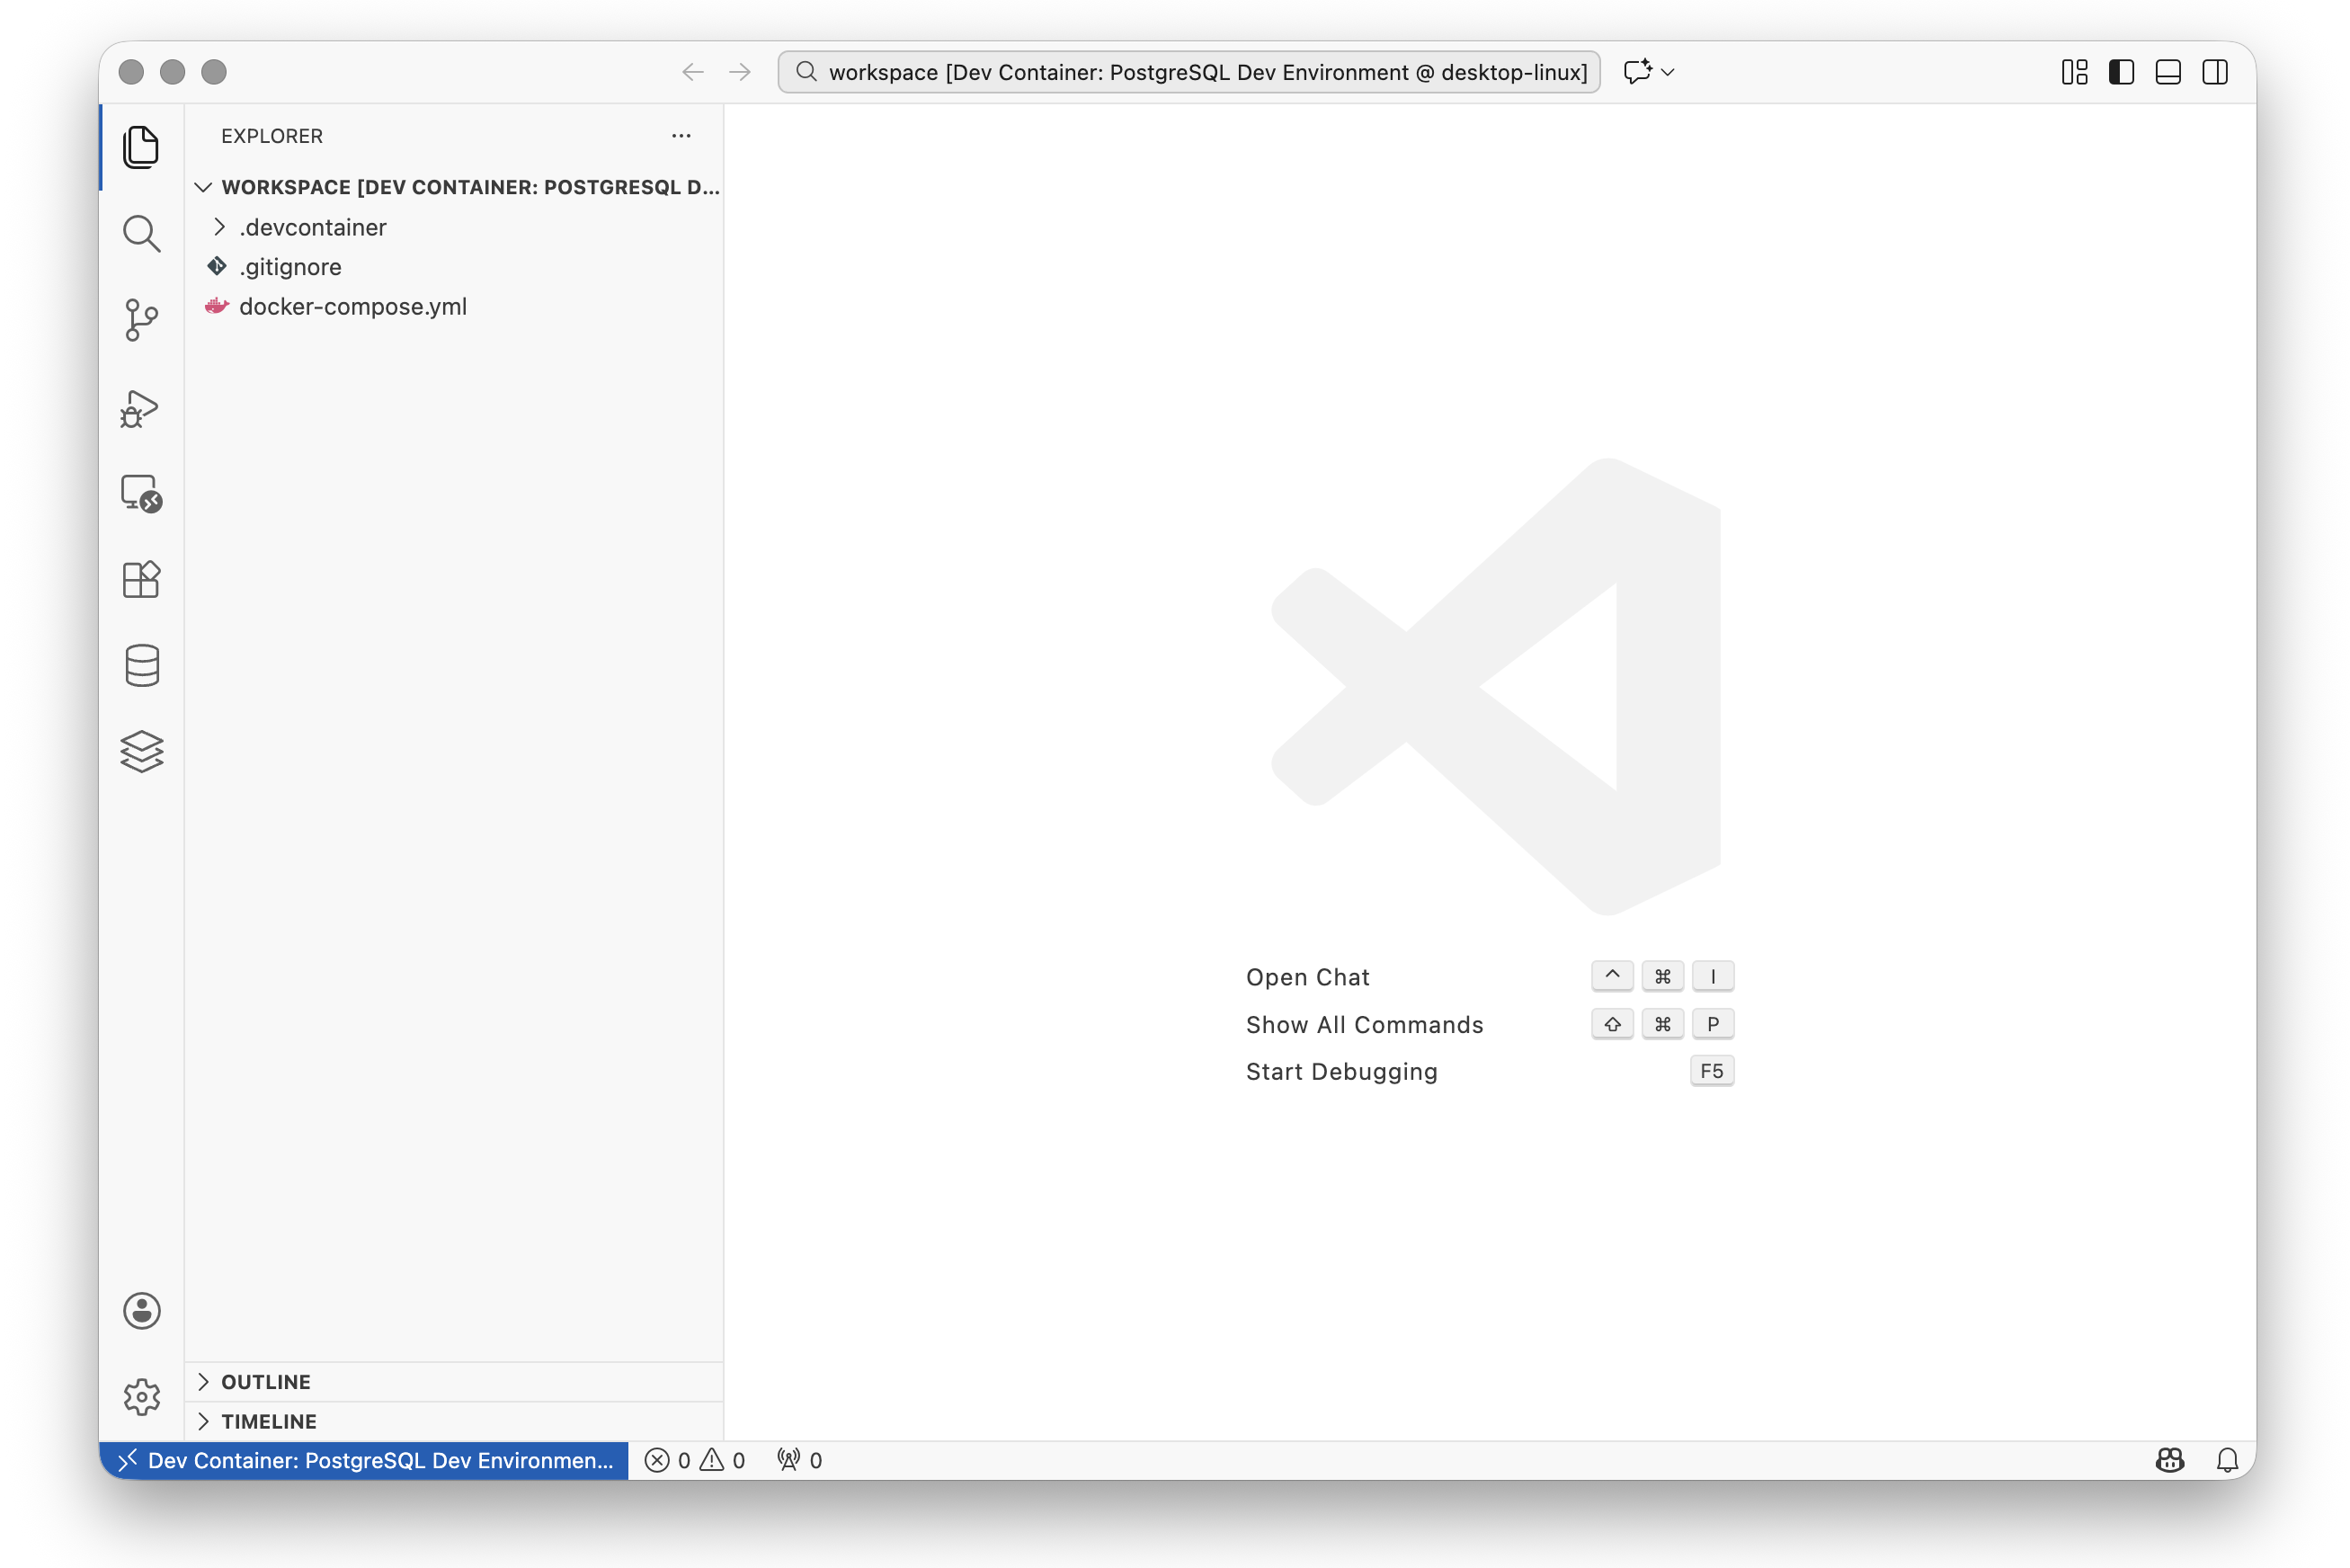
Once the container is ready, you will see the project files in the Explorer panel, and the
bottom-left corner of VSCode will show “Dev Container: MAUI Dev Environment”.
Fig. 8. VSCode running inside the container
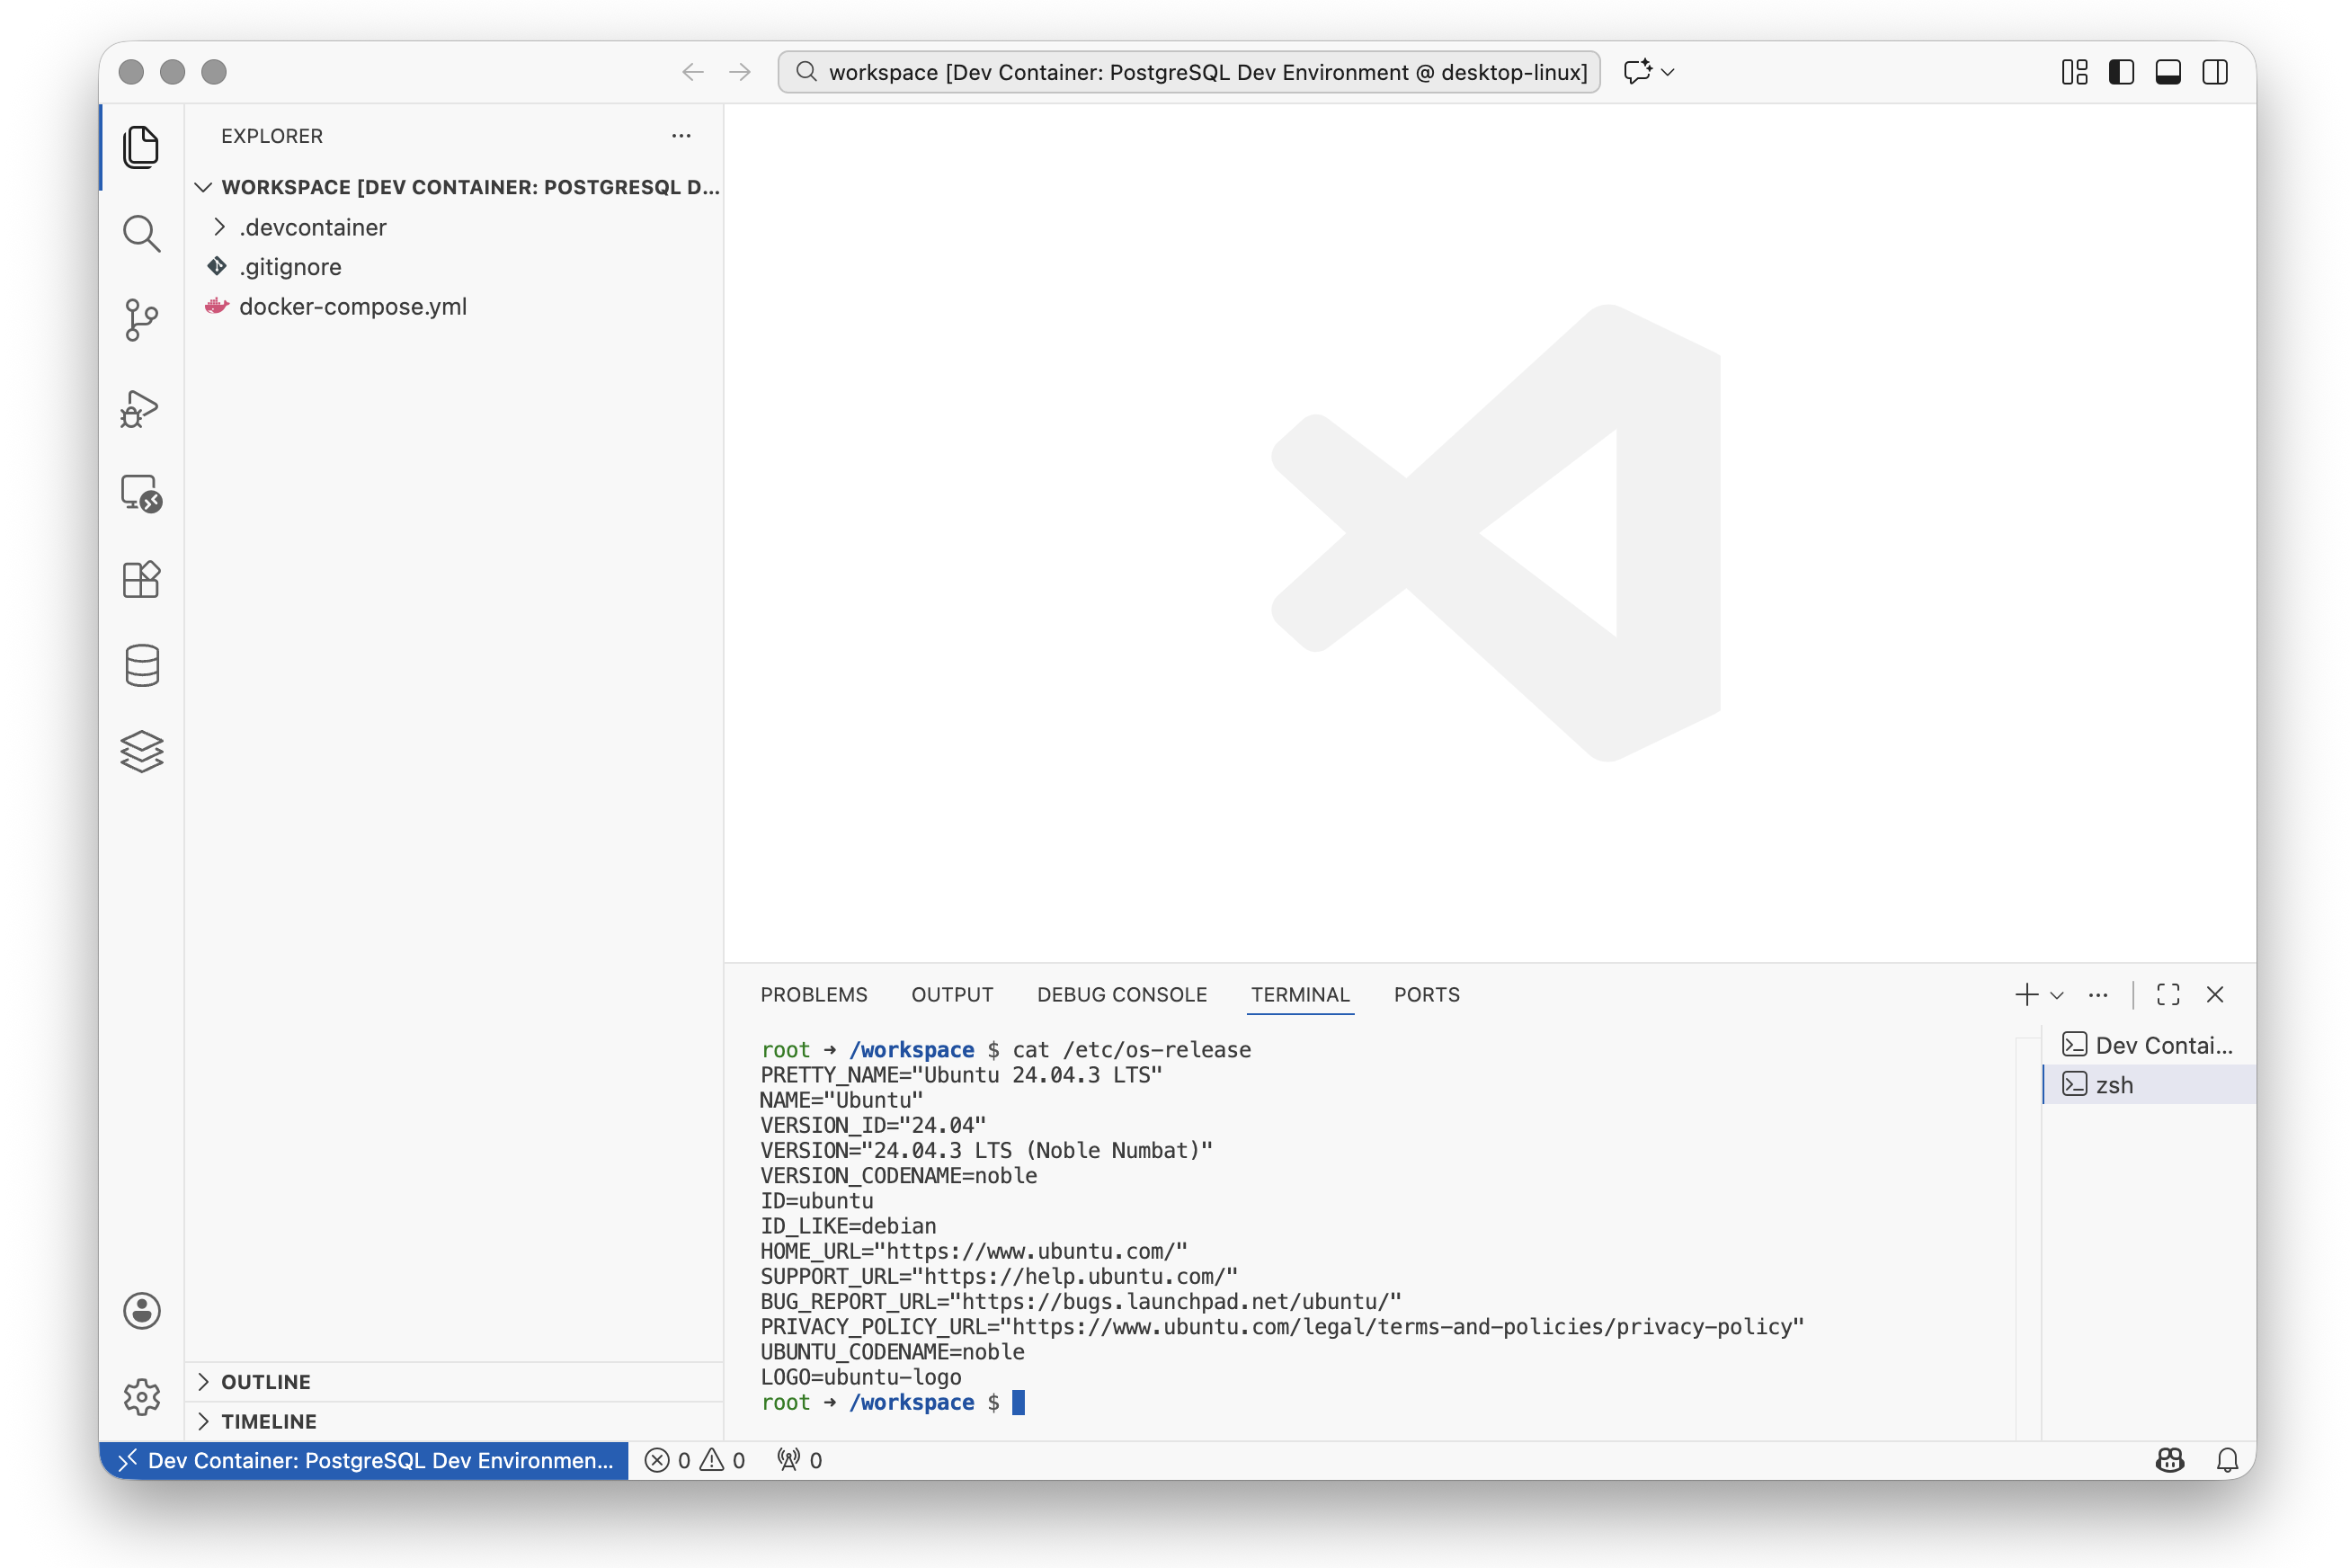
Verify the Development Tools
Open a terminal (Ctrl+ ` or Cmd+ ` ) and verify the development tools are installed:
1
2
3
4
5
6
7
8
# Check .NET version
dotnet --version# Check MAUI workloads
dotnet workload list
# Check Android SDK
sdkmanager --version
You should see .NET 9.x, the MAUI workloads listed, and the Android SDK manager version.
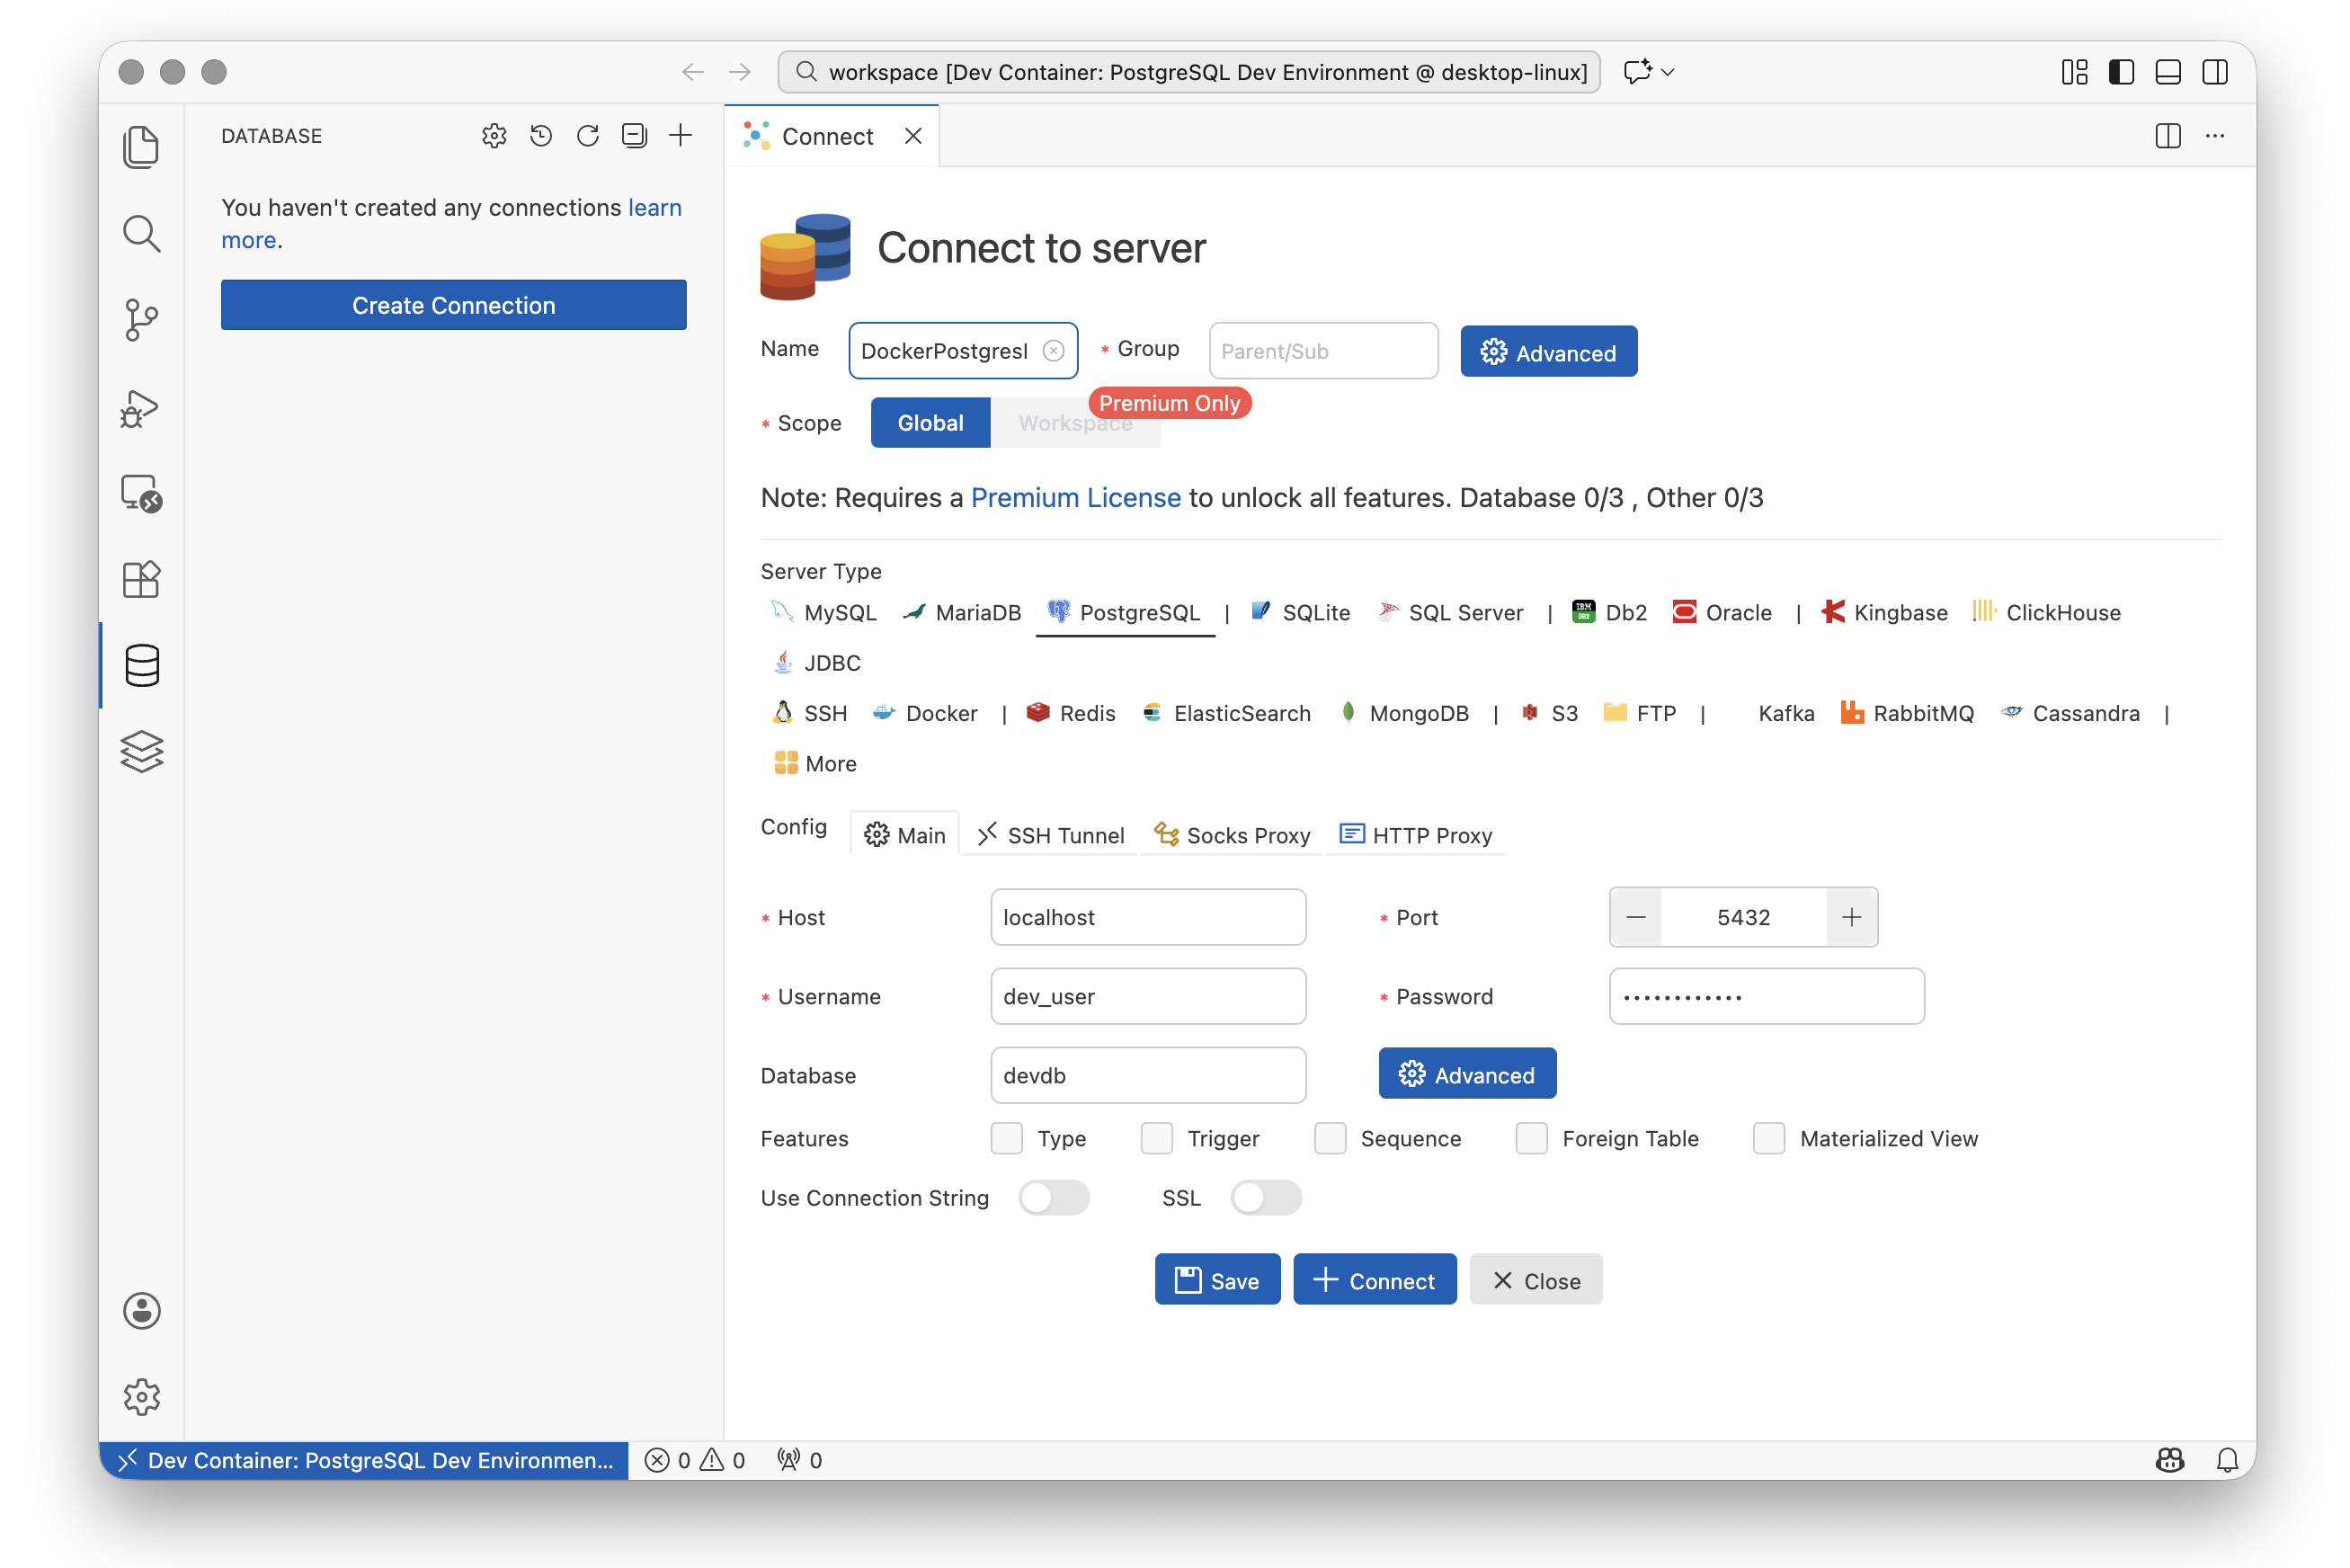
The Database Client extension allows you to browse and query your database directly from VSCode.
Click on the Database icon in the Activity Bar on the left side of VSCode.
Click the + button to create a new connection and select PostgreSQL.
Enter the following connection details:
Parameter
Value
Connection Name
MauiDevProject
Group
(leave blank)
Hostname
localhost
Port
5432
Username
dev_user
Password
dev_password
Database
devdb
Use SSL
No
Fig. 10. PostgreSQL connection configuration
Note
Because the app container uses network_mode: service:db, it shares the network namespace
with the database container. This means PostgreSQL is accessible at localhost:5432 from
within the app container.
Once connected, you can expand the connection in the sidebar to see databases, schemas, and tables.
10. Verify the Database Setup
Let’s verify the database connection is working by creating a simple table and querying it.
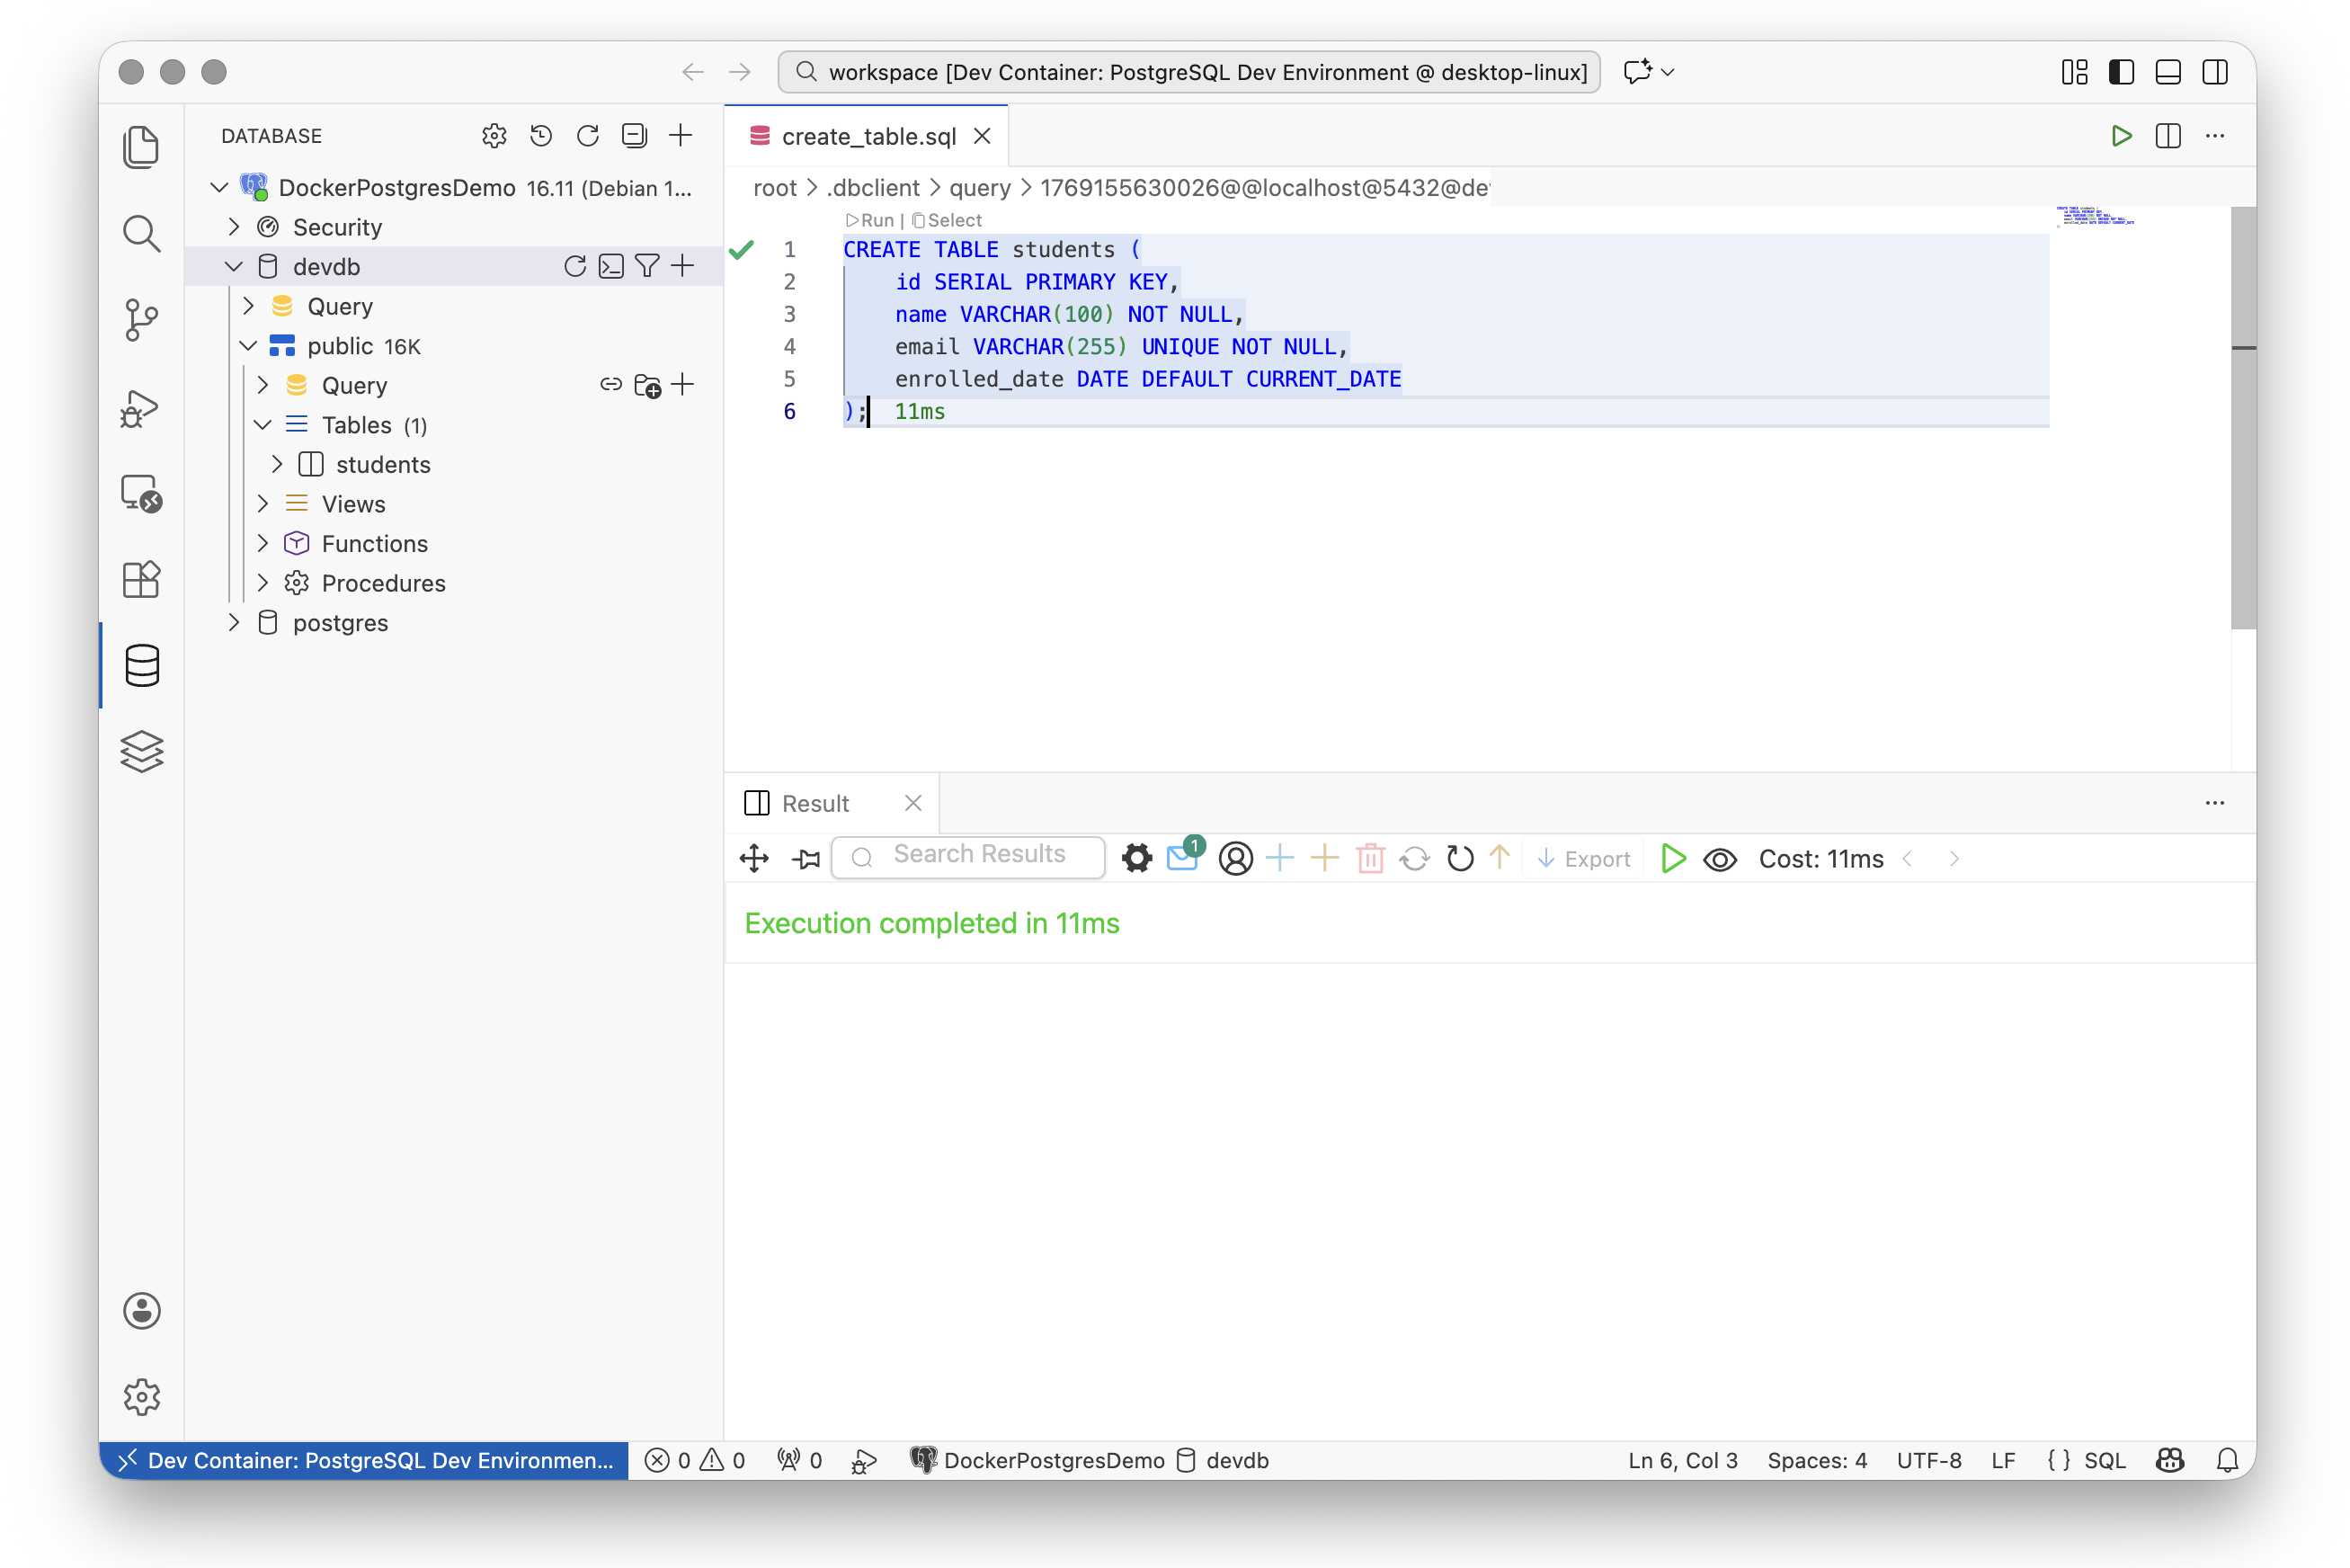
Create a test table
Expand the devdb database in the sidebar until you can see the public > Query element. Click on
the+ icon to create a new query called create_table. Enter the following SQL and execute it by
clicking the Run button:
Run a SELECT query to verify the data was inserted:
1
SELECT*FROMstudents;
Fig. 12. Query results showing test data
You should see three rows returned with the student data you inserted.
Clean up (optional)
If you want to remove the test table:
1
DROPTABLEstudents;
11. Android Emulator Setup (Host Machine)
The Android emulator runs on your host machine rather than inside the container. This provides
better performance and access to hardware acceleration.
Windows: Enable Hardware Acceleration
The Android emulator requires hardware virtualisation to run at acceptable speed. On Windows,
this must be enabled in your BIOS/UEFI settings before the emulator will work.
Restart your computer and enter the BIOS/UEFI setup (typically by pressing F2, F10,
Del, or Esc during startup — the key is usually shown briefly on screen)
Look for a setting named Intel VT-x, Intel Virtualization Technology, AMD-V,
or SVM Mode (the exact name depends on your motherboard manufacturer)
Enable it, save, and restart
If you are unsure whether it is already enabled, you can check in Windows:
open Task Manager, go to the Performance tab, select CPU, and look for
Virtualization: Enabled.
Alternative: Android Studio
If you prefer a graphical interface for managing virtual devices, you can install
Android Studio instead of following the command-line approach below.
Android Studio includes the SDK Manager and AVD Manager with a GUI.
The -d 47 flag specifies the Pixel 9 Pro device profile. To see all available
device profiles, run: avdmanager list device
Verify the AVD was created:
1
avdmanager list avd
Start the Emulator
Launch the emulator with your AVD:
1
emulator -avd Pixel_9_Pro
Warning
The first boot may take several minutes as Android performs initial setup. Subsequent
starts will be faster.
Leave the emulator running while you work with the development container.
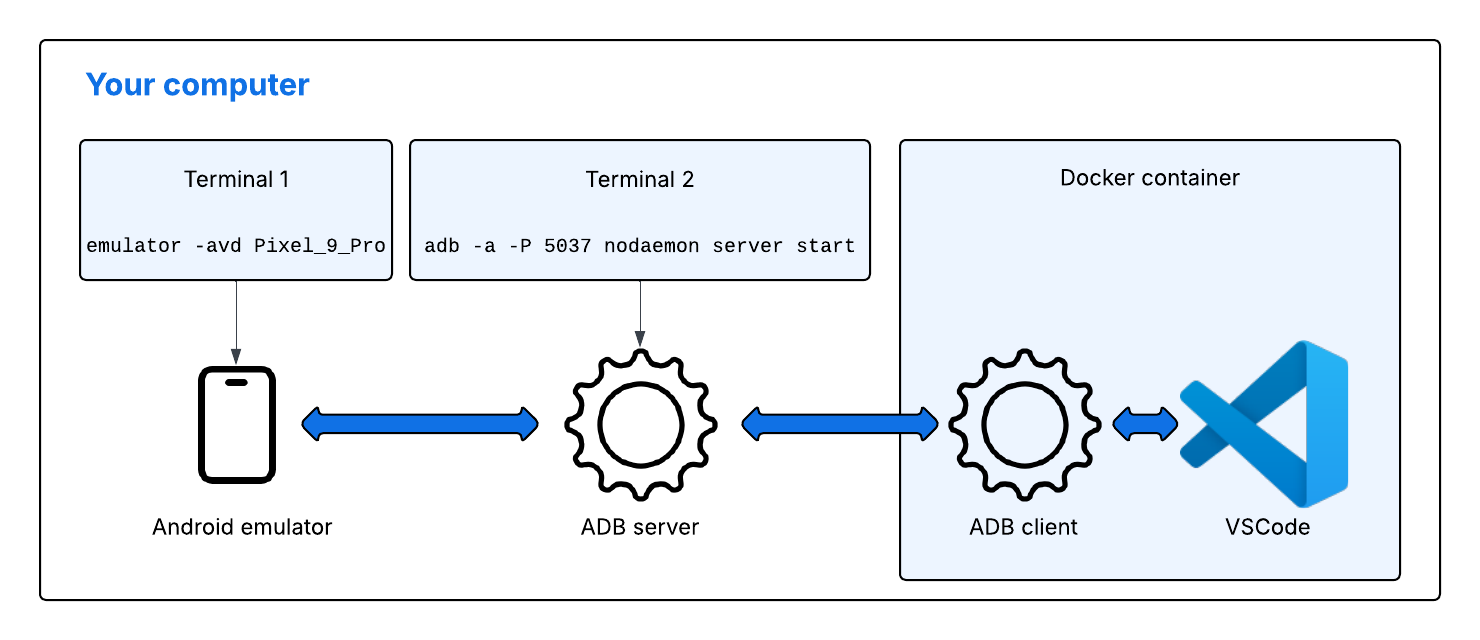
Connect the Container to the Emulator
To deploy apps from the container to the emulator, you need to configure ADB networking.
On your host machine (in a separate terminal), start the ADB server in network mode:
1
2
adb kill-server
adb -a-P 5037 nodaemon server start
Leave this terminal open while developing.
There are several elements to the setup. Fig. 13 provides a visualisation.
Fig. 13. Android Emulator Setup Visualisation
Verify the connection by executing the following command in a new terminal window in VS Code:
1
adb devices
You should see output similar to:
1
2
List of devices attached
emulator-5554	device
If the emulator appears in the list, you’re ready to deploy apps from the container.
12. Create and Run a MAUI Application
With the development container running and the emulator connected, you can create and deploy
a .NET MAUI application.
Create a new MAUI project
Inside the container terminal, create a new MAUI project:
1
2
cd /workspace
dotnet new maui -n HelloMaui
This creates a new directory called HelloMaui containing a default MAUI application with
a simple counter interface.
dotnet restore
If you see an error message that suggests some libraries may be missing and that
dotnet restore can fix it, ignore it for the time being. We will change the
target platform in the next step.
Update the default HelloMaui.csproj file
When we are working inside a Docker container, VSCode needs to communicate with the
ADB server process on the host rather than starting a new one inside the container.
This is partially handled by the devcontainer.json file, but we need to make two
changes to the default HelloMaui.csproj file. First, add the following PropertyGroup
element after the first one:
Remember to save the file after making the change.
Build and deploy
Execute the following command in the project root directory to build the application:
1
2
cd HelloMaui
dotnet build -c Debug
The first build downloads additional dependencies and may take a few minutes. Subsequent
builds will be faster.
Locate the hellomaui-Signed.apk file in the bin/Debug/net9.0-android directory.
Ensure your emulator is running and the ADB connection is established (check with adb devices),
then deploy and run the application:
1
adb install-r PATH-TO-APK-FILE
Warning
If the deployment fails with “no devices/emulators found”, verify that:
The emulator is running on your host machine
The ADB server is started with adb -a -P 5037 nodaemon server start on the host
The container has ADB_SERVER_SOCKET set correctly
adb devices shows the emulator in the container
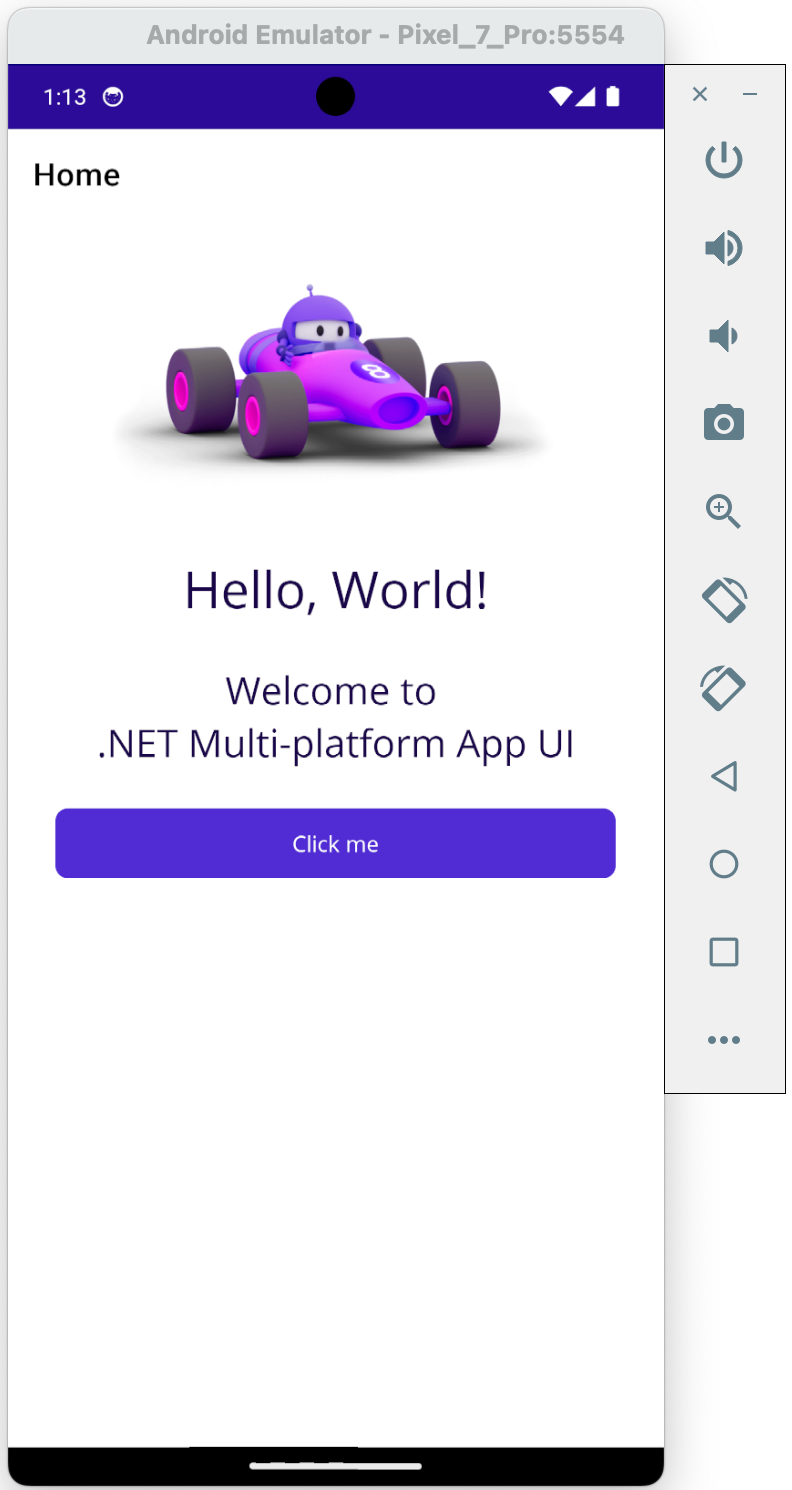
Verify the Application
You should now see a .NET app icon on the home screen of the emulator. You can
tap it to launch the app.
The default MAUI app displays a “Hello, World!” message and a button that counts clicks.
Tap the button to verify the app is running correctly.
Fig. 14. Default MAUI application running on the Android emulator
13. Managing Your Development Environment
Starting and stopping
To stop the containers: Close VSCode or use the command palette (Ctrl+Shift+P / Cmd+Shift+P)
and select Dev Containers: Reopen Folder Locally.
You can also stop containers from the terminal:
1
docker compose down
To start the containers again: Open the project in VSCode and select
Dev Containers: Reopen in Container from the command palette.
Returning to local development
To switch back to developing outside the container, use the command palette and select
Dev Containers: Reopen Folder Locally. Your files remain on your local machine and are
always accessible.
Persistent data
The PostgreSQL data is stored in a Docker volume called postgres_data. This means your
database contents persist across container restarts. To completely reset the database, you
would need to remove this volume:
1
docker volume rm mauidevproject_postgres_data
Warning
Removing the volume deletes all data in the database. Only do this if you want to start fresh.
Rebuilding the container
If you need to update the development tools or modify the Dockerfile, rebuild the container:
Open the command palette (Ctrl+Shift+P / Cmd+Shift+P)
Select Dev Containers: Rebuild Container
This will rebuild the Docker image with any changes you’ve made to the Dockerfile.
Troubleshooting
Problem
Solution
Docker not running
Start Docker Desktop and wait for it to fully initialise
Port 5432 already in use
Stop any local PostgreSQL instance or change the port in docker-compose.yml
Container fails to start
Check Docker Desktop logs or run docker compose logs from the project directory
Cannot connect to database
Verify the containers are running with docker compose ps
Extensions not loading
Rebuild the container: Command Palette > Dev Containers: Rebuild Container
.NET SDK not found
Rebuild the container to ensure the Dockerfile completed successfully
ADB cannot connect to emulator
See the ADB troubleshooting section in the MAUI tutorial